This guide will help you get the most out of every Surfer feature, whether you're a new user or want to make the most of your Surfer subscription.
I’ll cover everything in plain language, with real-world use cases that show you how our content team uses our product.
Let’s start with our most popular tool.
Optimize content with Content Editor
You don’t need to be an SEO wizard to get results with Surfer. That’s the whole point.
We built Content Editor—our most-loved content optimization tool—for people who want to create content that actually performs.
No spreadsheets. No guesswork. Just clear, guided optimization rooted in what’s ranking today.
Whether you’re writing something new, reviving old articles, or letting AI do the heavy lifting, here’s how to use Surfer’s Content Editor.
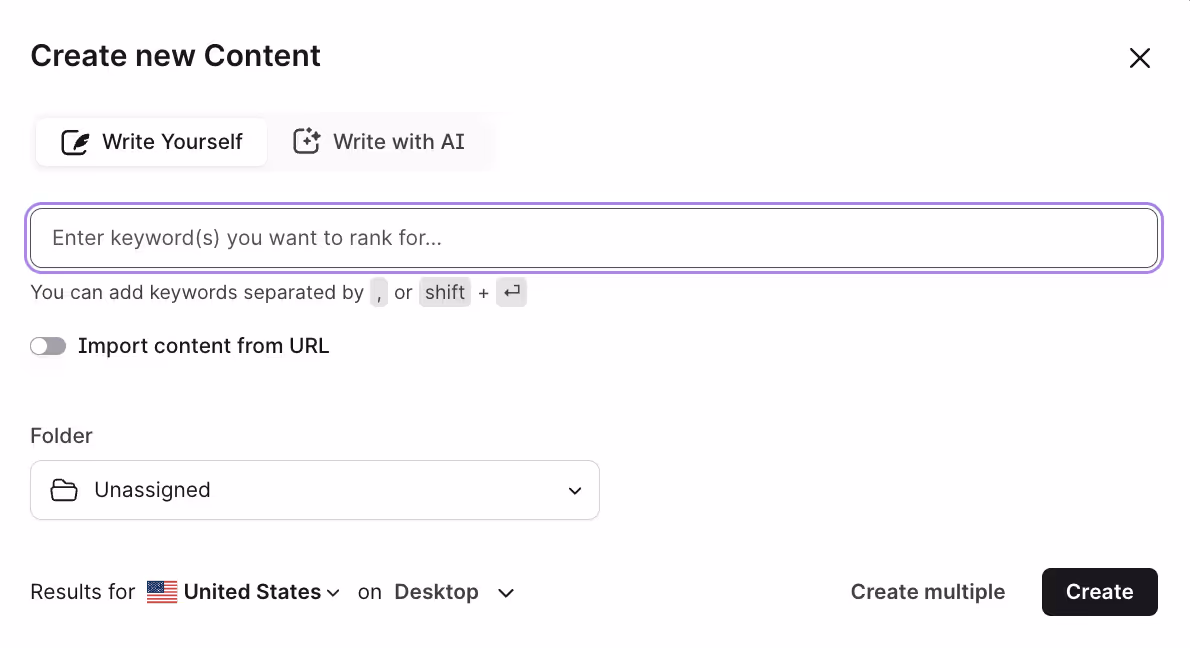
Choose the Write tab in your left panel and click on the top-right button labelled New Content.
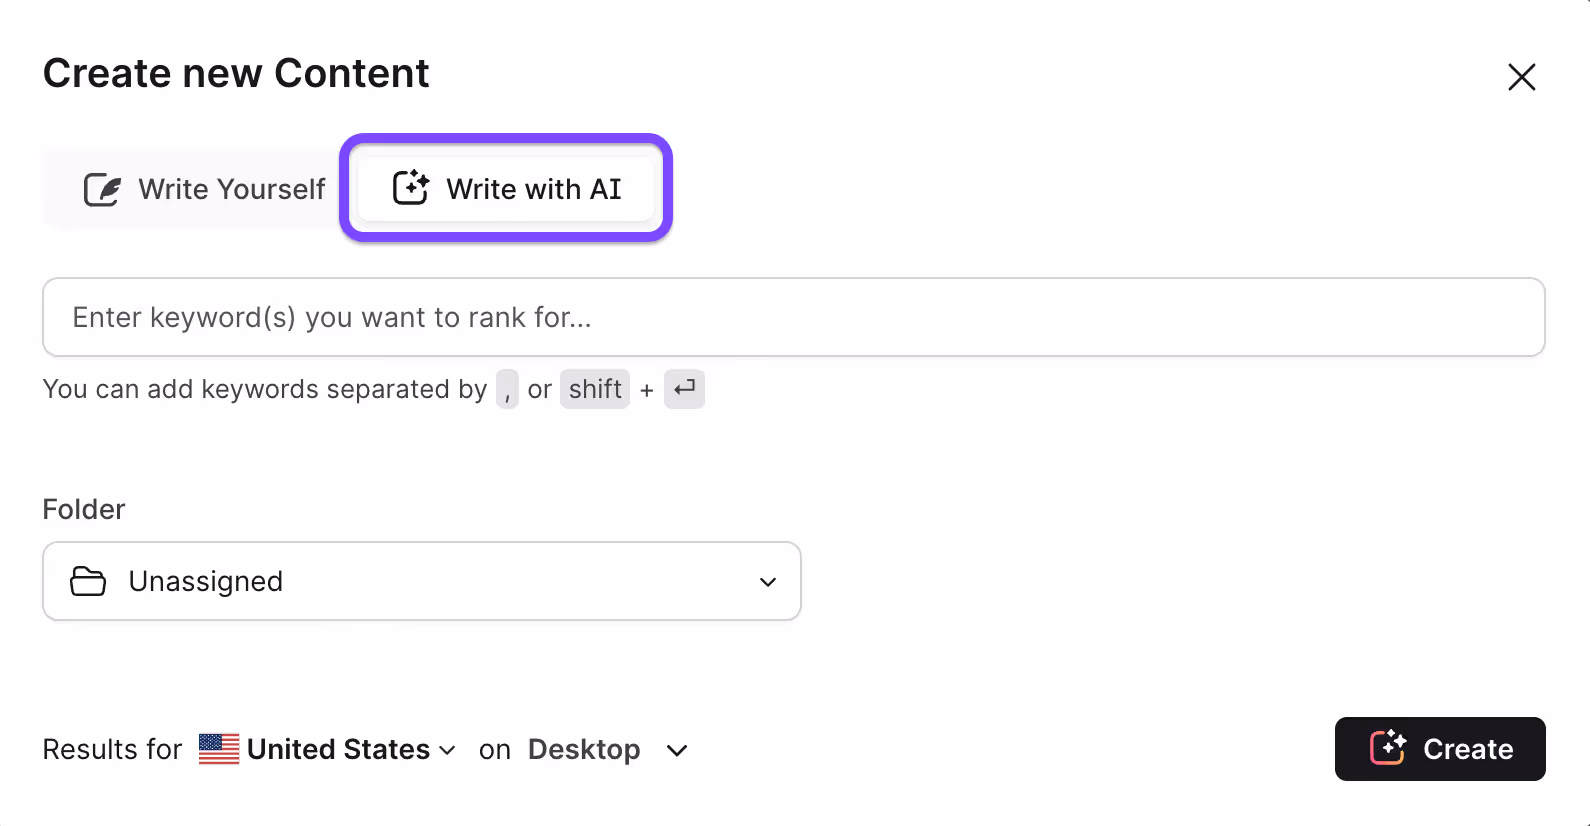
- Choose between writing yourself or writing with AI
- Enter 1-3 primary keywords you are targeting
- Select the country your target audience resides in and their preferred device
Note: You may use the Import content from URL toggle to pull in content from existing blog articles.
You'll see a screen like this on the next page, where you can write and optimize your content.
The editing window includes everything that you will need to create search engine optimized content – on-page SEO suggestions, AI writing tools and keyword inclusion recommendations.
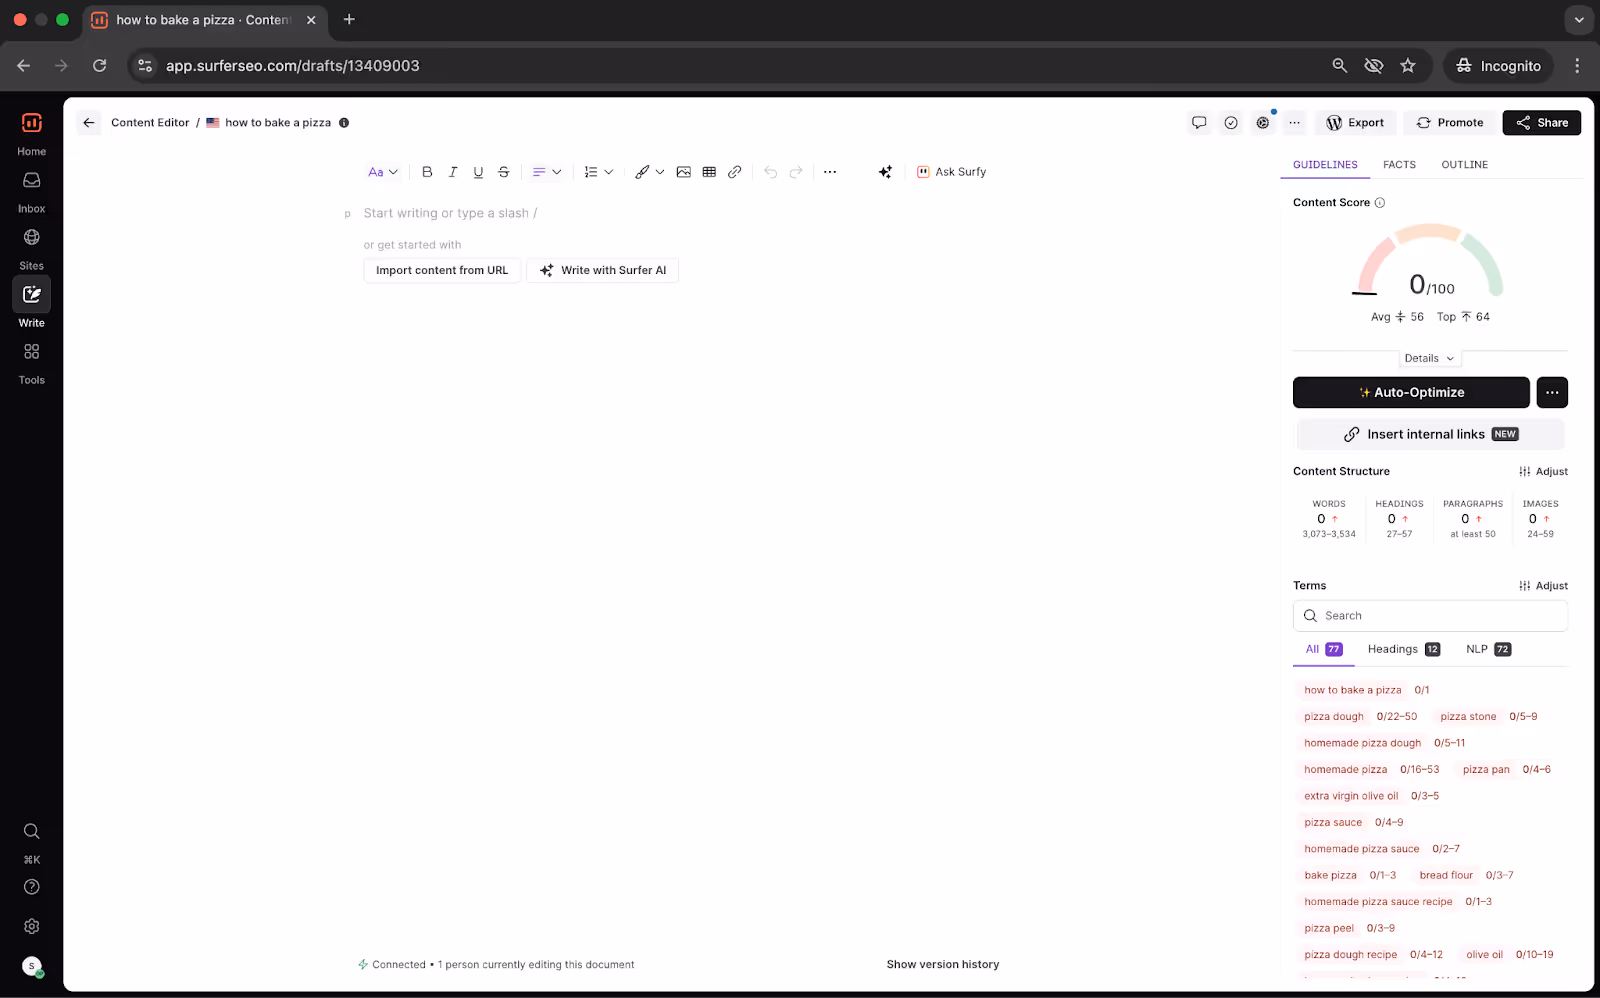
1. Guidelines tab
Let me walk you through these features, starting with the first tab, labelled Guidelines.
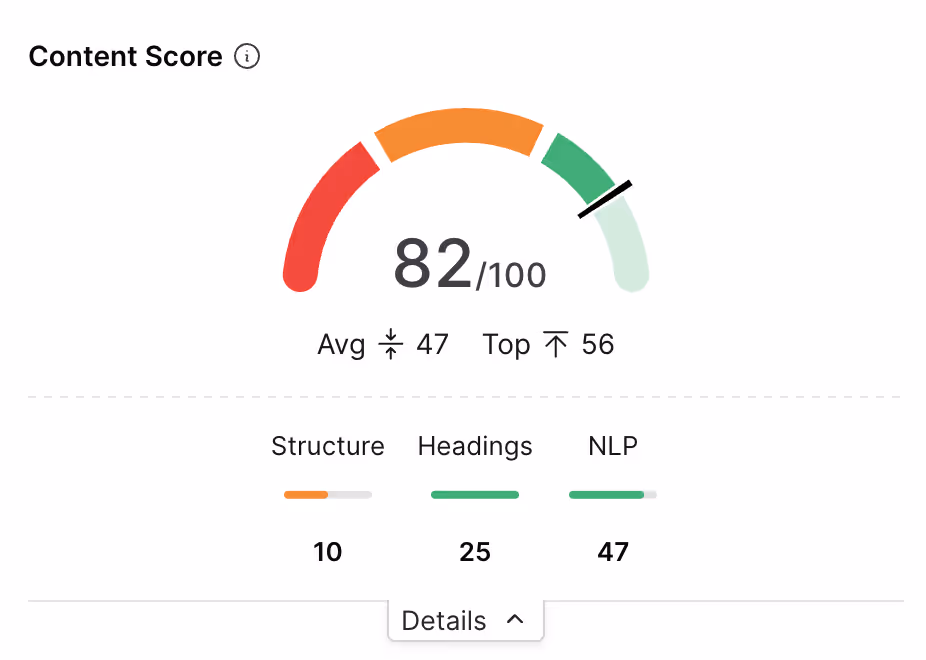
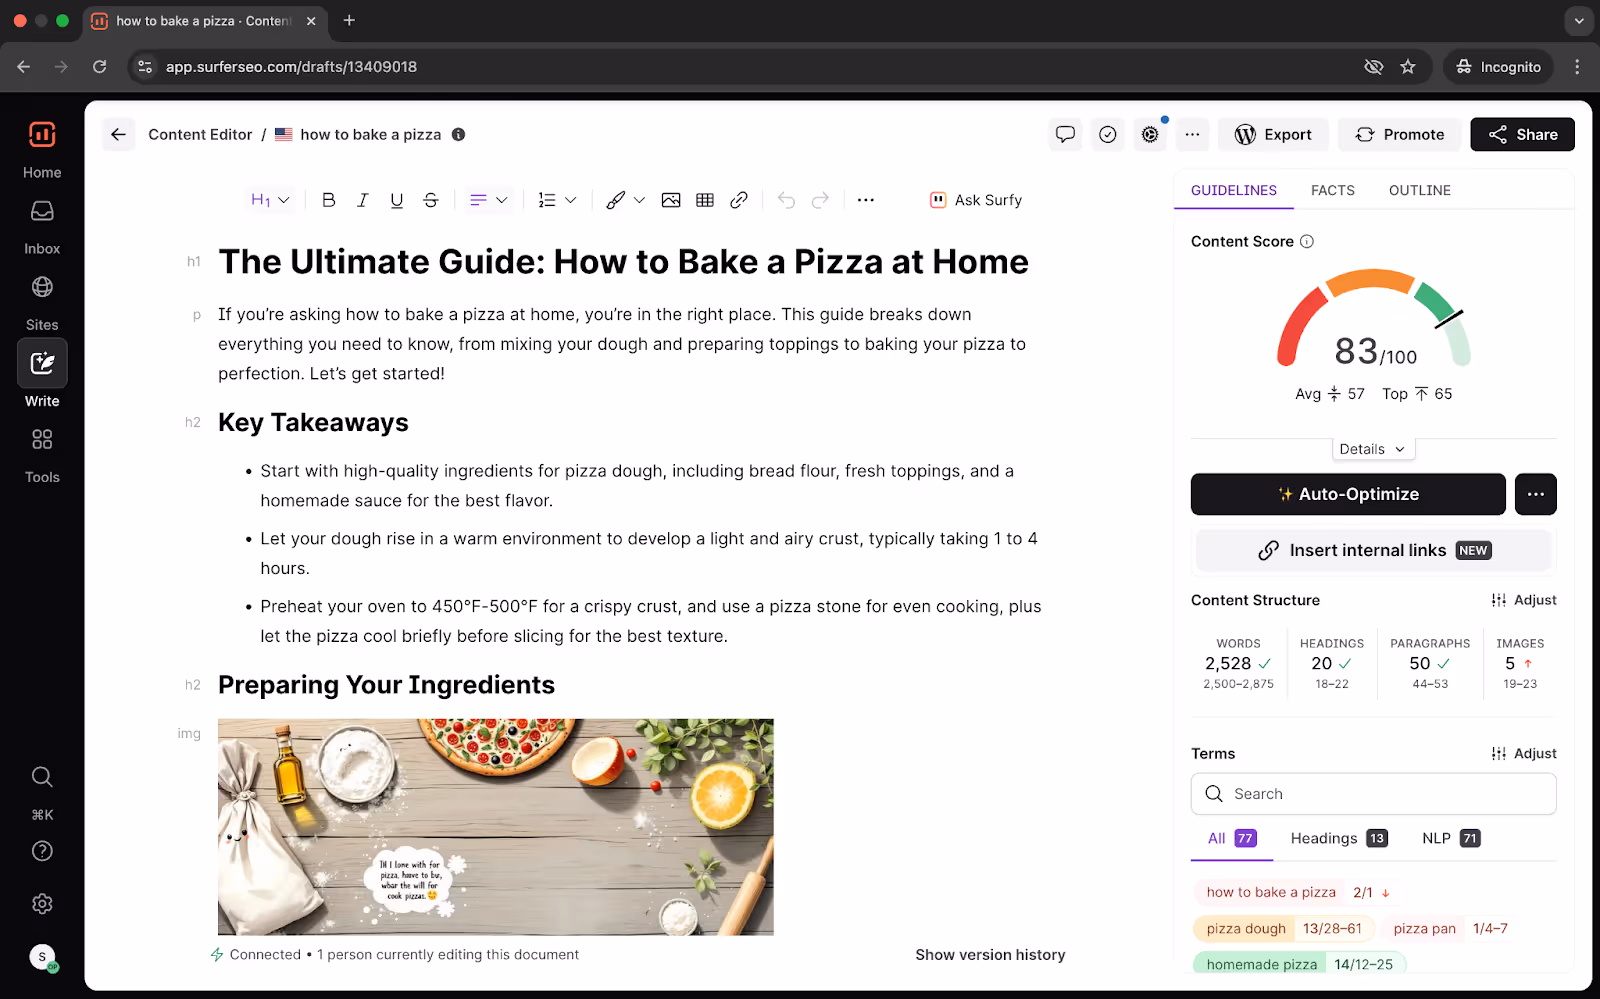
Content Score
The meter on the right with a number between 0 and 100 is your content score.
It’s a live, dynamic indicator of how well your content is optimized to rank.
It evaluates structure, keyword usage, headings, and semantic relevance based on what’s working for top-ranking pages in Google right now.
In other words? It tells you how close you are to winning in the SERPs.
What’s a good Content Score?
Let’s break it down:
- 0–32 → You’ve got work to do. Content is underbaked. Add depth, optimize your structure, and use the right terms.
- 33–66 → You’re in the zone. Your content is shaping up. Time to fine-tune and polish.
- 67+ → You’re ready to hit publish. You’ve covered the essentials and then some. Chasing a perfect 100? Great—but not required.
Here’s the truth: a score over 66 is solid. It means your content is likely better optimized than most competitors.
Instead of chasing perfection, aim to beat your competition by 10–20 points. That’s the sweet spot.
Three major buckets comprise your Content Score:
- Structure
- Headings
- NLP Terms
You can see your progress in each of these areas by clicking Details in the Editor.
No more guessing. You’ll know exactly what’s missing and how to fix it.
Here are a few tips to boost your score.
- Don’t keyword stuff. Use terms naturally, like you’re writing for a human (because you are).
- Make sure your headings do some lifting—they should include meaningful terms, not just fluff.
And remember: your Content Score is a guide, not a goalpost. Trying to squeeze every last point out of it might actually make your writing worse. Use common sense, not just metrics.
Auto-Optimize
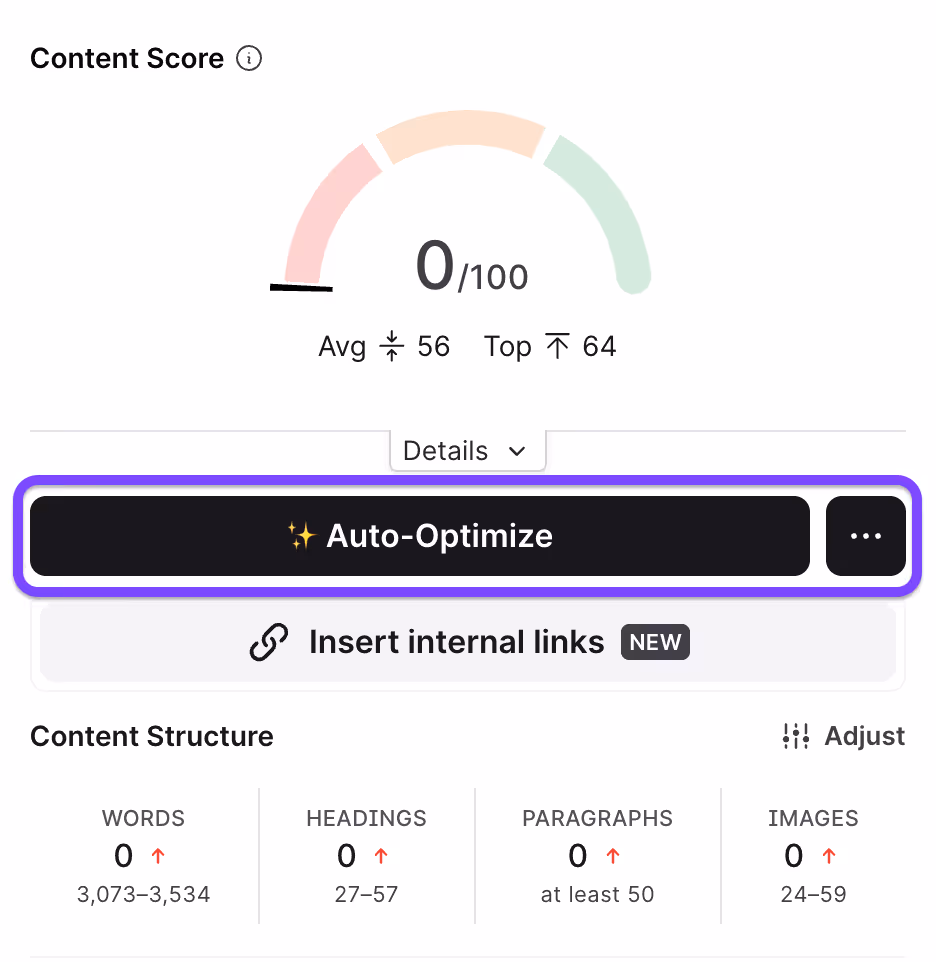
Updating existing content is hard. Even with a solid outline, hitting all the SEO signals and sounding human can be challenging.
Clicking on Auto-Optimize will instruct Surfer to scan your content, compare it with top-ranking pages, and start including NLP-rich terms and missing context, while keeping your tone and structure intact.
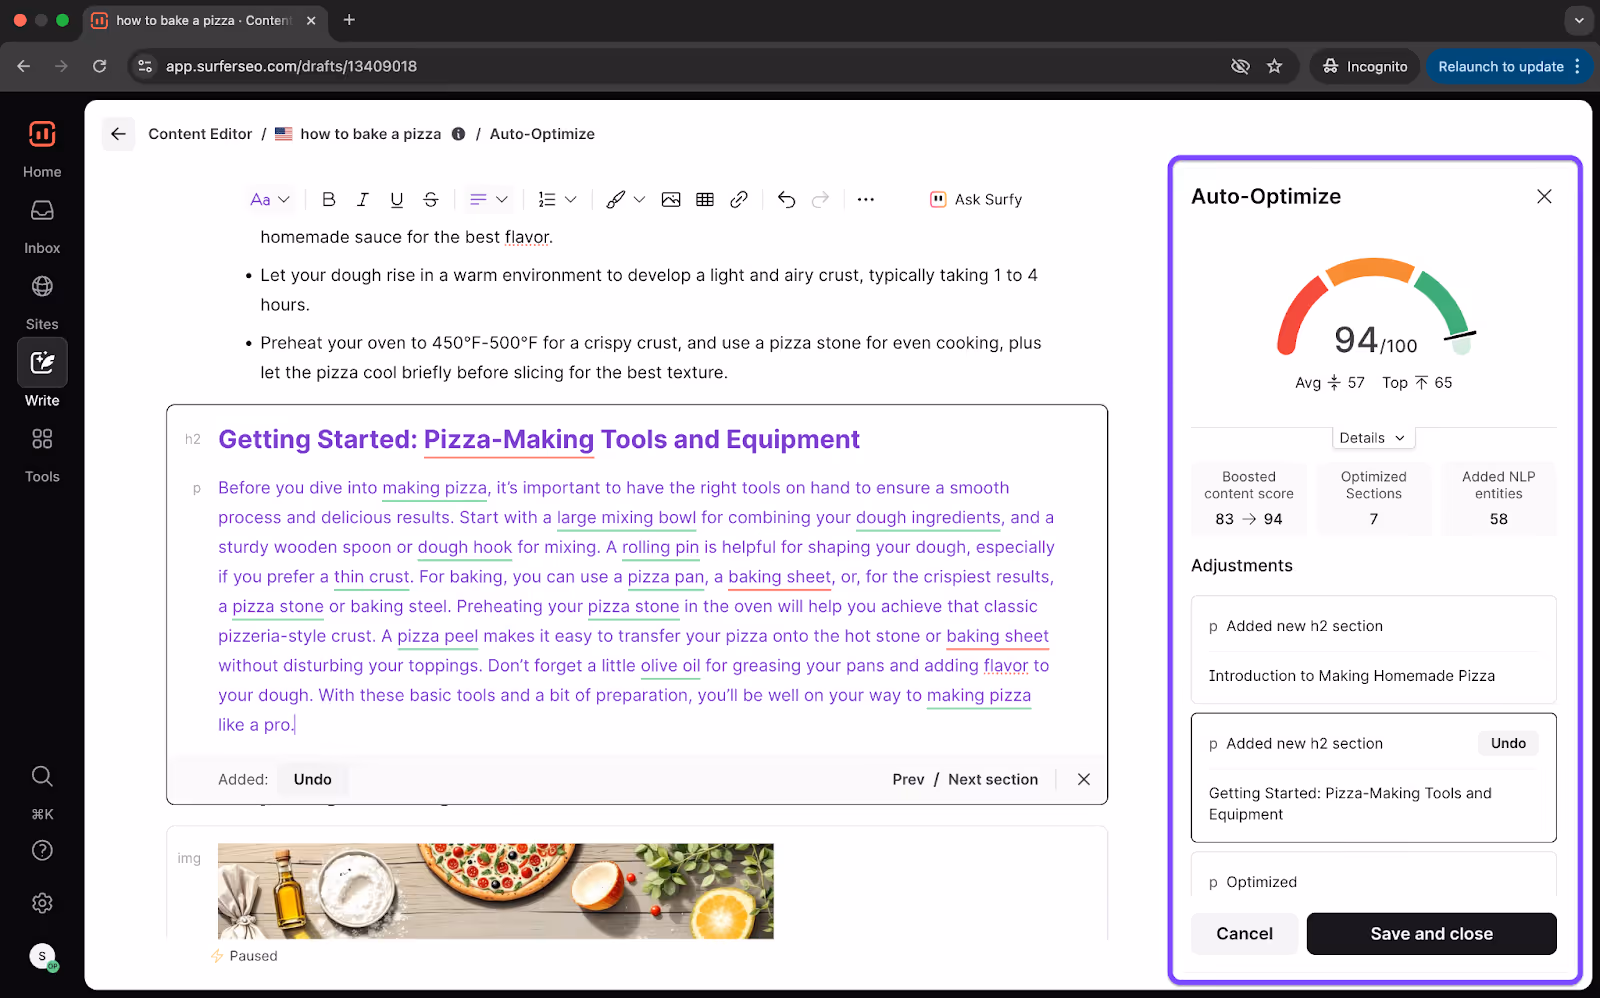
In a nutshell, using Auto-Optimize does the following,
- Enhances your message
- Improves your Content Score
- Surfaces exactly what’s missing
You can compare the updates with your original article and make changes where you want to.
Internal Links
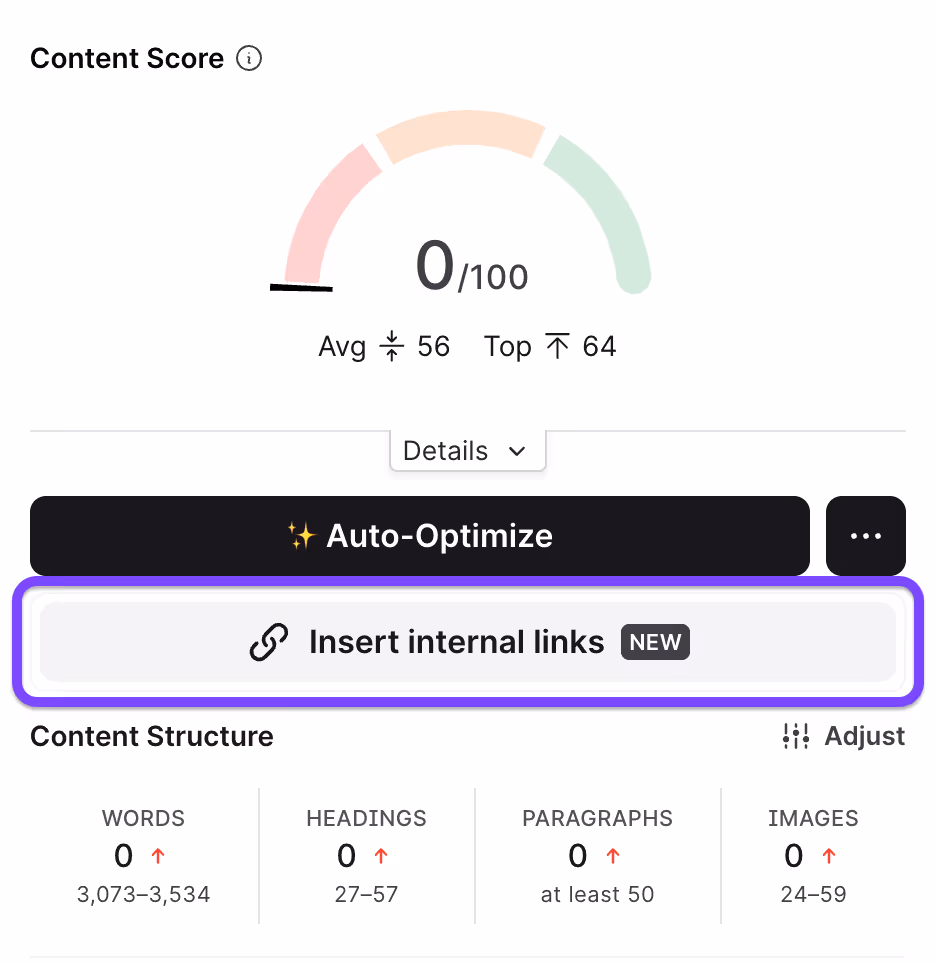
The automated internal linking feature helps you connect your pages meaningfully at scale.
Surfer’s semantic internal link suggestions are driven by LLMs, Google Search Console data, and Surfer’s insights. Instead of just matching keywords, it understands context and relationships between your pages.
You’ll get natural, relevant internal links that:
- Improve user flow
- Strengthen topic authority
- Actually matter to search engines
You’ll see this option by default if your domain is connected to Google Search Console and you’ve set up a Content Audit project for that domain.
Terms panel
Think of the Terms panel as your list of entities and NLP keywords. It shows all the important phrases you should naturally include in your content to help Google understand what your page is about.
- Use the default view to see all significant terms that top-ranking pages are using
- Switch to the Headings view to see which terms should appear in your titles and subheadings
- Toggle to NLP mode to filter the list and show only Natural Language Processing phrases—the ones Google pays special attention to
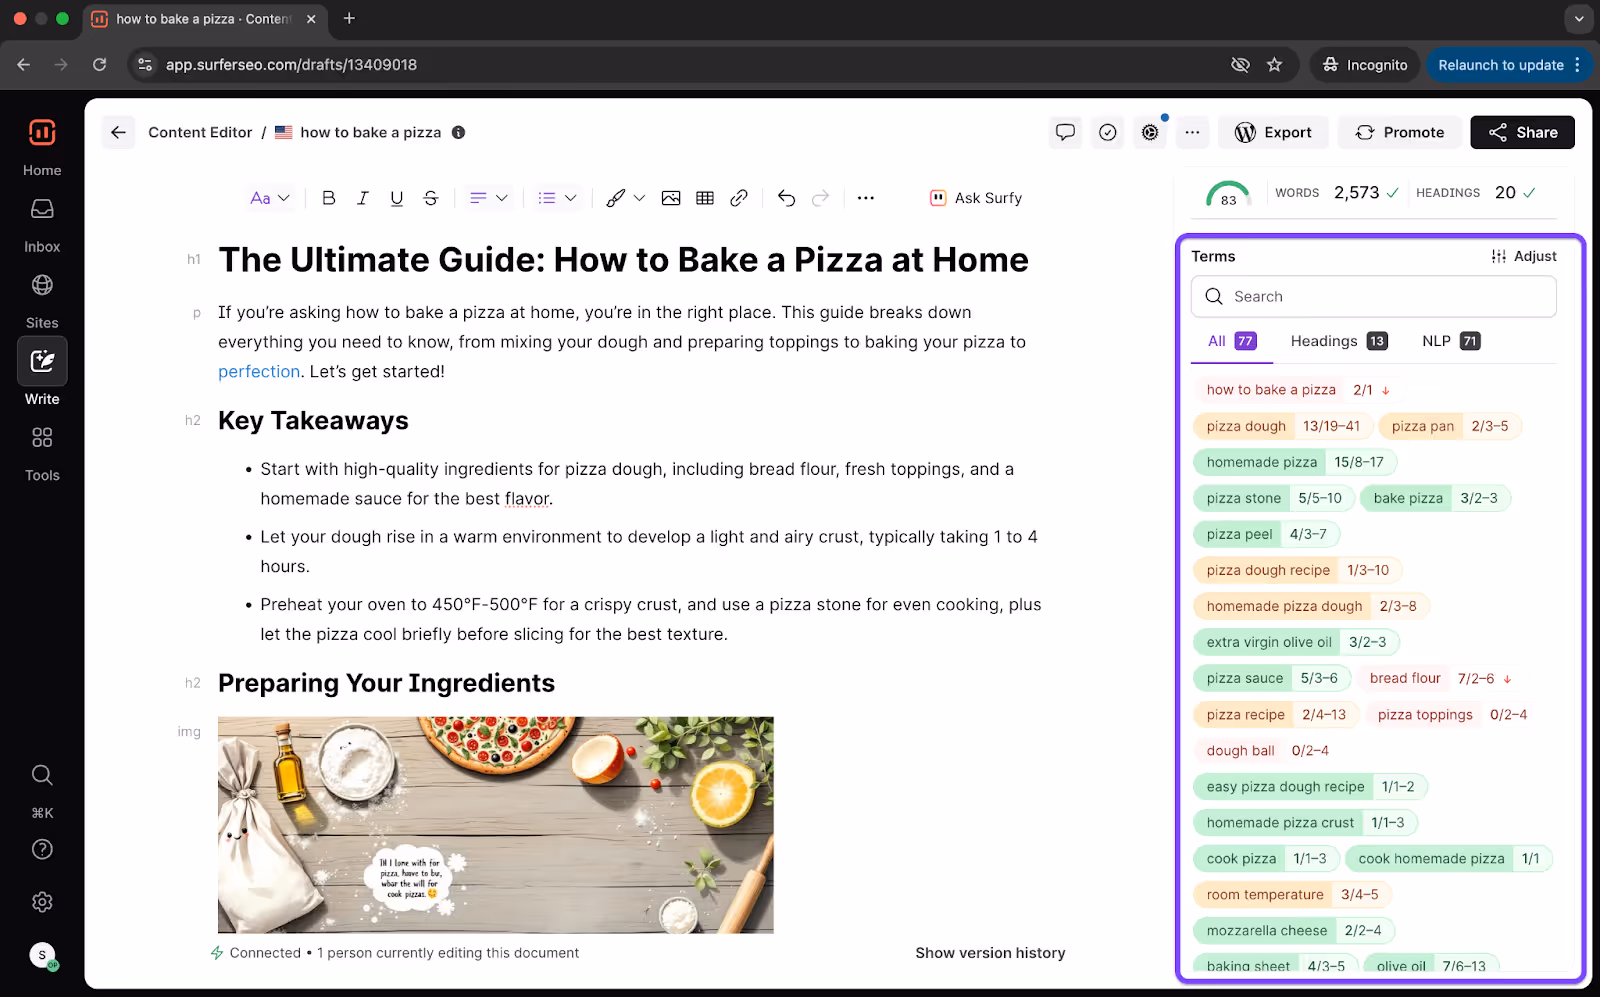
Keywords used in the optimal range are highlighted in green; orange indicates those that require improvement, and red signals missing keywords..
2. Facts tab
The facts tab houses the Boost Coverage feature.
Boost Coverage
The boost coverage feature inside the Facts tab helps you create an article that covers everything your readers and search engines care about.
It ensures that your articles are complete, relevant, and optimized for search results.
Surfer will identify keyword and content gaps in your article and fill them in with newly generated content that improves your chances of ranking well.
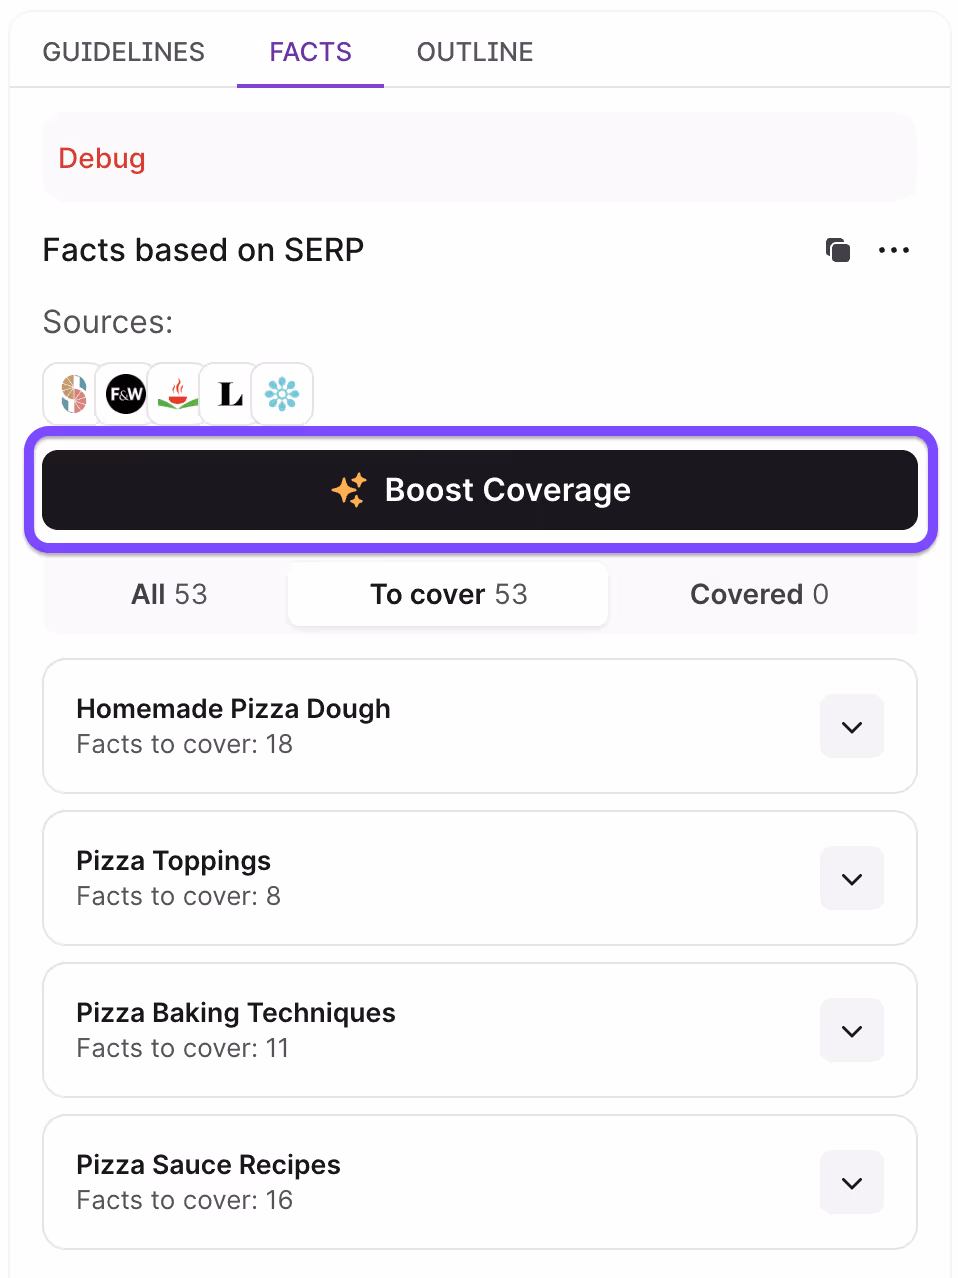
You can see which pieces of information Surfer will add by clicking on the drop-downs. If you’re pleased with the suggestions, click on the Boost Coverage button.
New content is added directly into your article only where it fits naturally. No awkward paragraphs or keyword stuffing.
You can compare the new article to the old version and undo or edit any changes.
3. Outline tab
The Outline tab inside Surfer’s Content Editor is designed to help you build a well-structured article fast.
AI-generated Outline
The AI-generated outline button works by analyzing competitor pages, then filtering and reorganizing the most important headings based on search intent and relevance for your target query.
You can insert the outline with a single click or tweak it to follow a template that matches your desired output.
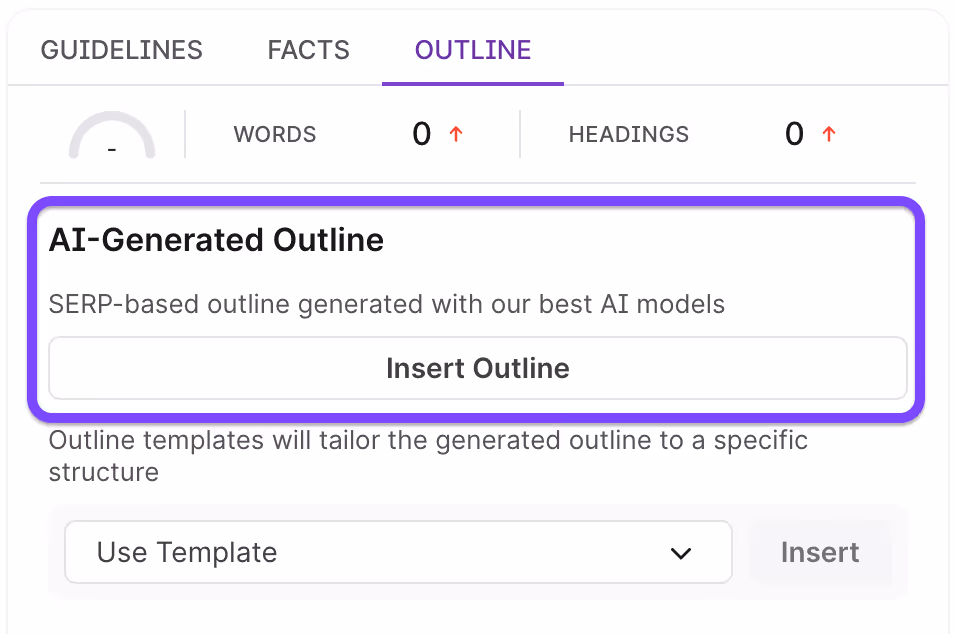
For example, you can choose from local SEO pages, landing pages, comparison pages and product descriptions.
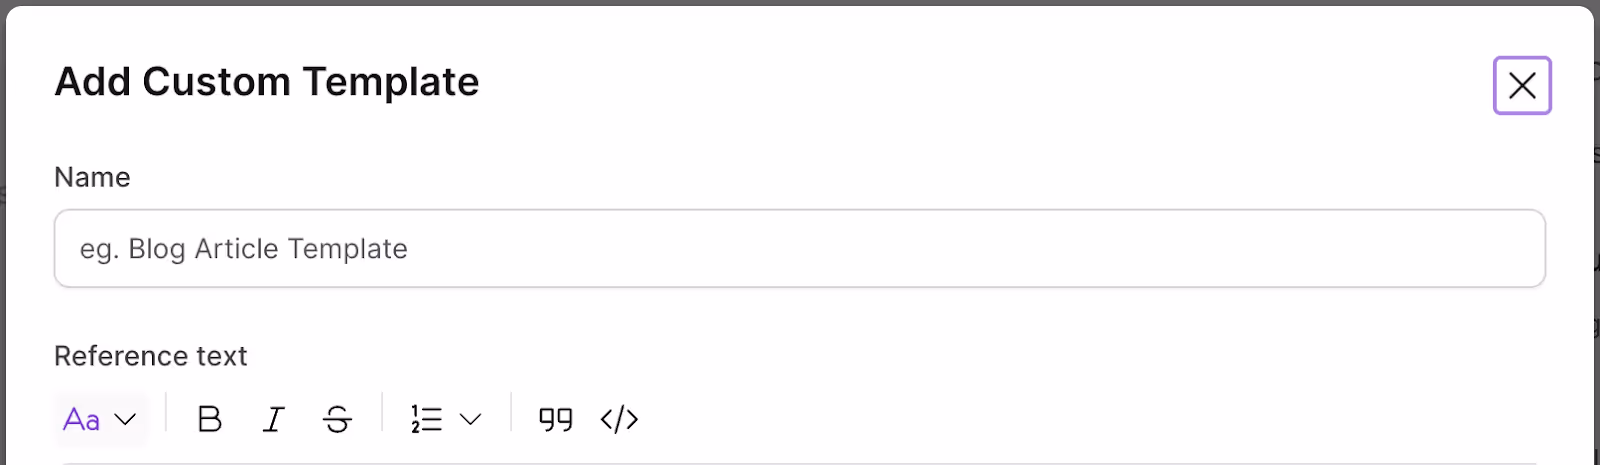
Or go ahead and create your own template that’s unique to your content.
Competitor’s Outline
Alongside the AI outline, you’ll find your selected competitors' outlines. This gives you an instant view of how others are structuring their content without having to open a dozen tabs or run side-by-side comparisons.
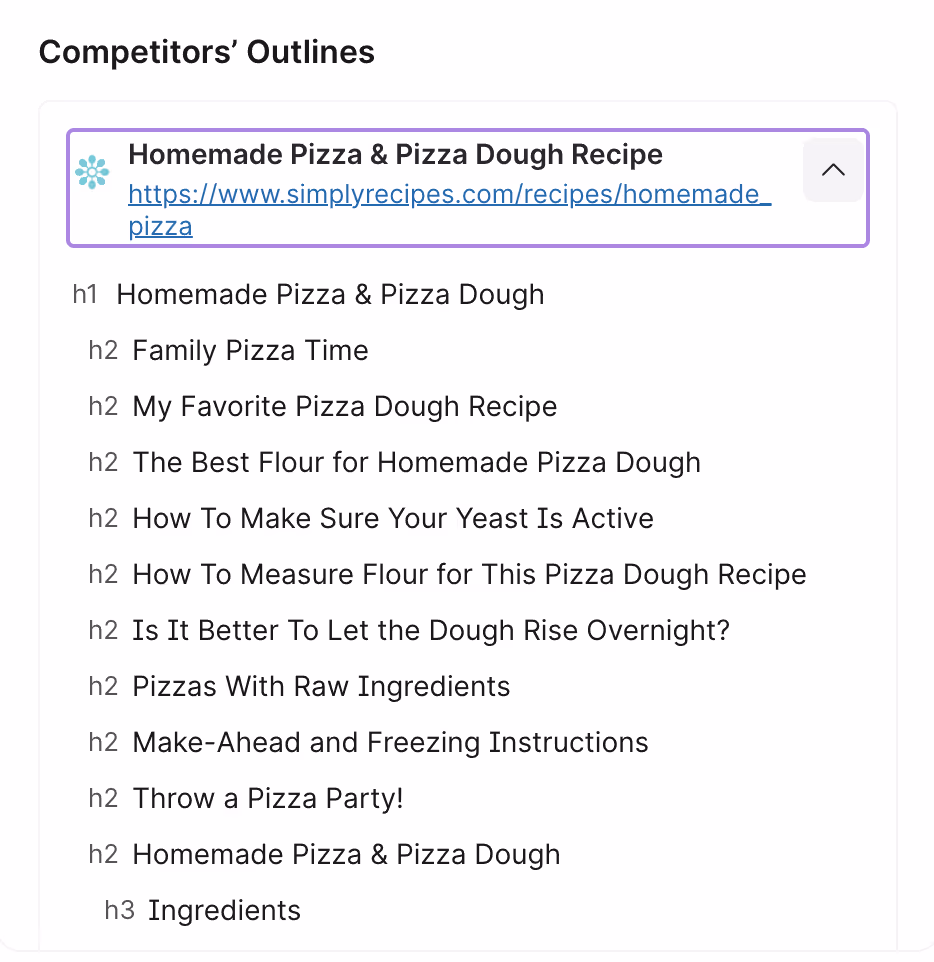
It’s a helpful snapshot of what’s common in the space, what’s being overlooked, and where you can differentiate. These outlines are live reflections of published competitor pages, which means they’re great for inspiration but should always be adapted.
Use them to spot missed angles, discover recurring patterns, or validate your structure. Just remember – always customize to protect your originality and SEO edge.
Topics and Questions
The “Topics and Questions” section lists the most important questions to cover in your article.

Notes
At the bottom of the Outline Tab, you’ll find a Notes section.
Pro tip: If you prefer easier access, you can even pin your notes to the top of the tab so they’re always visible as you build your content.
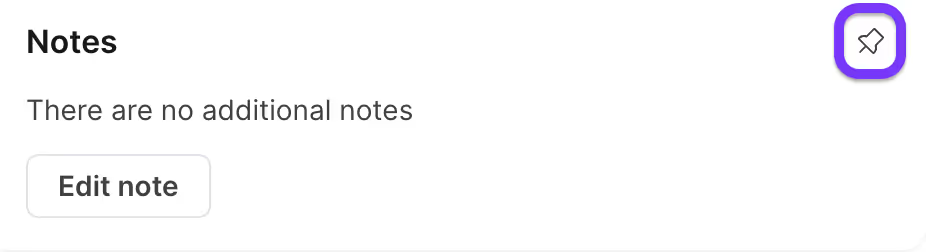
This is a flexible workspace where you can jot down anything from deadlines and task assignments to content briefs and reminders. It’s meant to streamline team collaboration and planning.
I include our content briefs in this area for easier access for writers. You can use Notes to assign tasks, set deadlines, or add any editorial guidance for the team.
If you have internal insights, target phrases, or content angles you want included, simply type them in and press Enter.
4. Customization
You’ll find customization options in the gear icon inside Content Editor, where you’ll have full control over how your content guidelines are built.
Here, you will choose which competitors matter, how long your article should be, and which terms and topics to include.
Just keep in mind that once you adjust these settings, your Content Score will update accordingly.
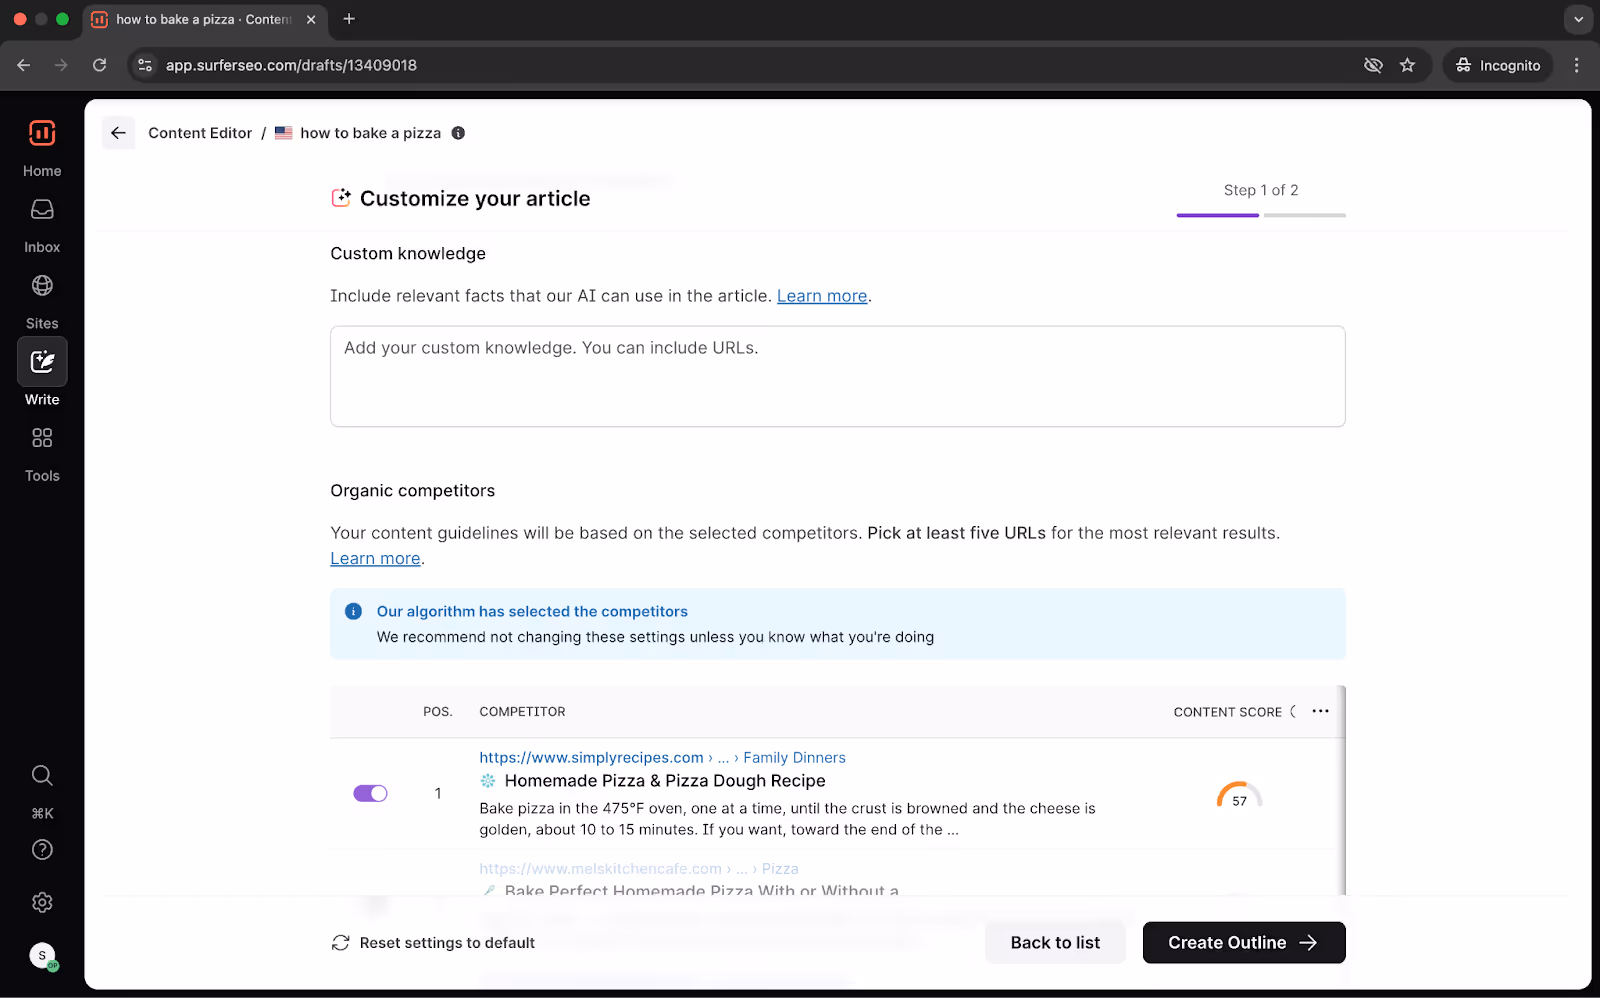
Organic Competitors
In the Competitors section, you’ll see the top ten pages currently ranking for your target keyword.
These results are based on your location and are designed to reflect real-time search intent.
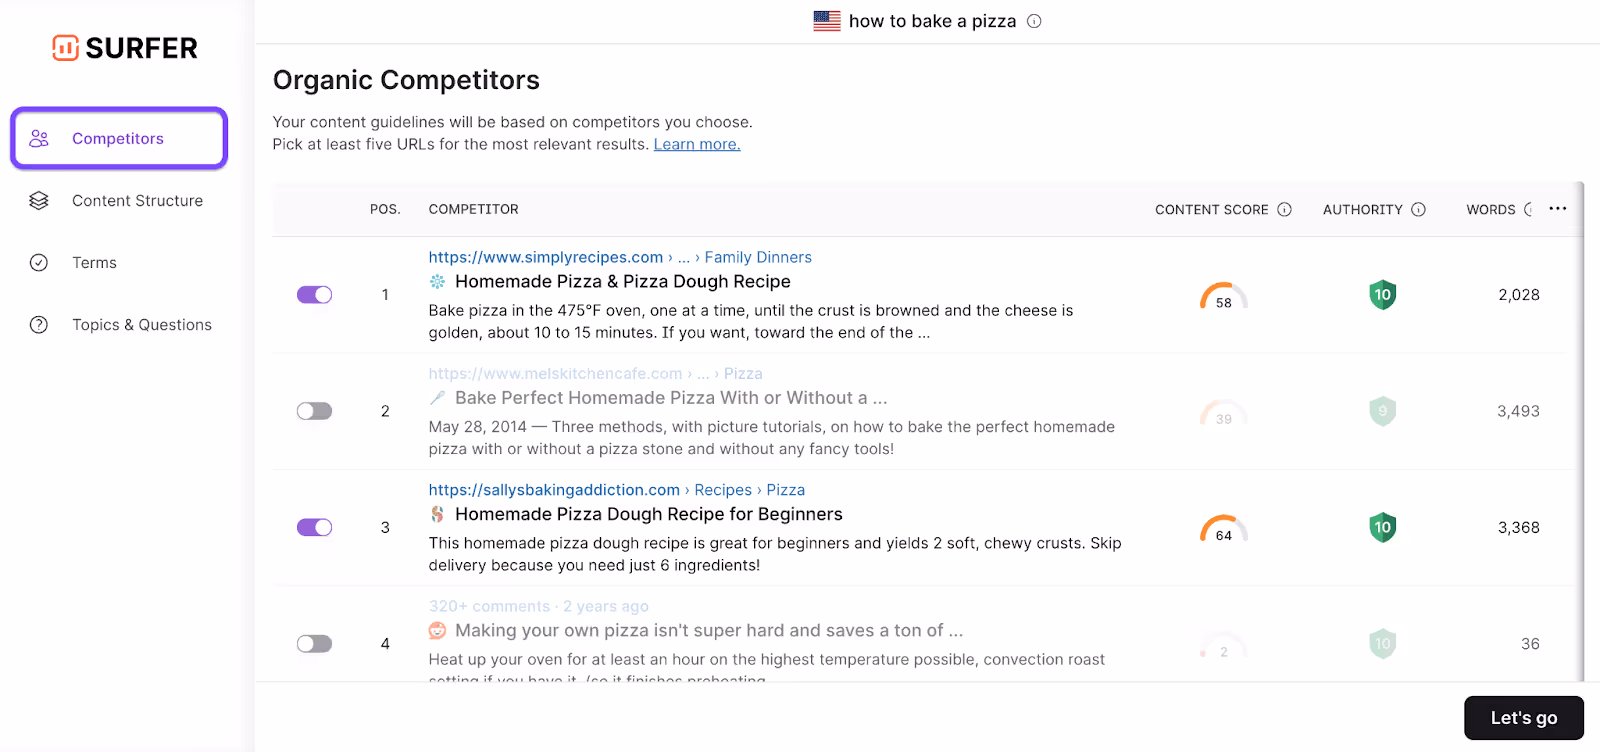
By default, Surfer selects five competitors from this list prioritizing those with the highest Content Scores.
But you can load ten more options or handpick your set of organic competitors.
Pro tip: Choose competitors that align closely with the type of content you’re creating. If you’re writing a blog post, avoid benchmarking against e-commerce product pages or service landing pages.
Stick with content that shares your intent, format, and audience.
Pay attention to Content Scores, and avoid including outliers—pages that are drastically longer or shorter than the rest can skew your structure recommendations.
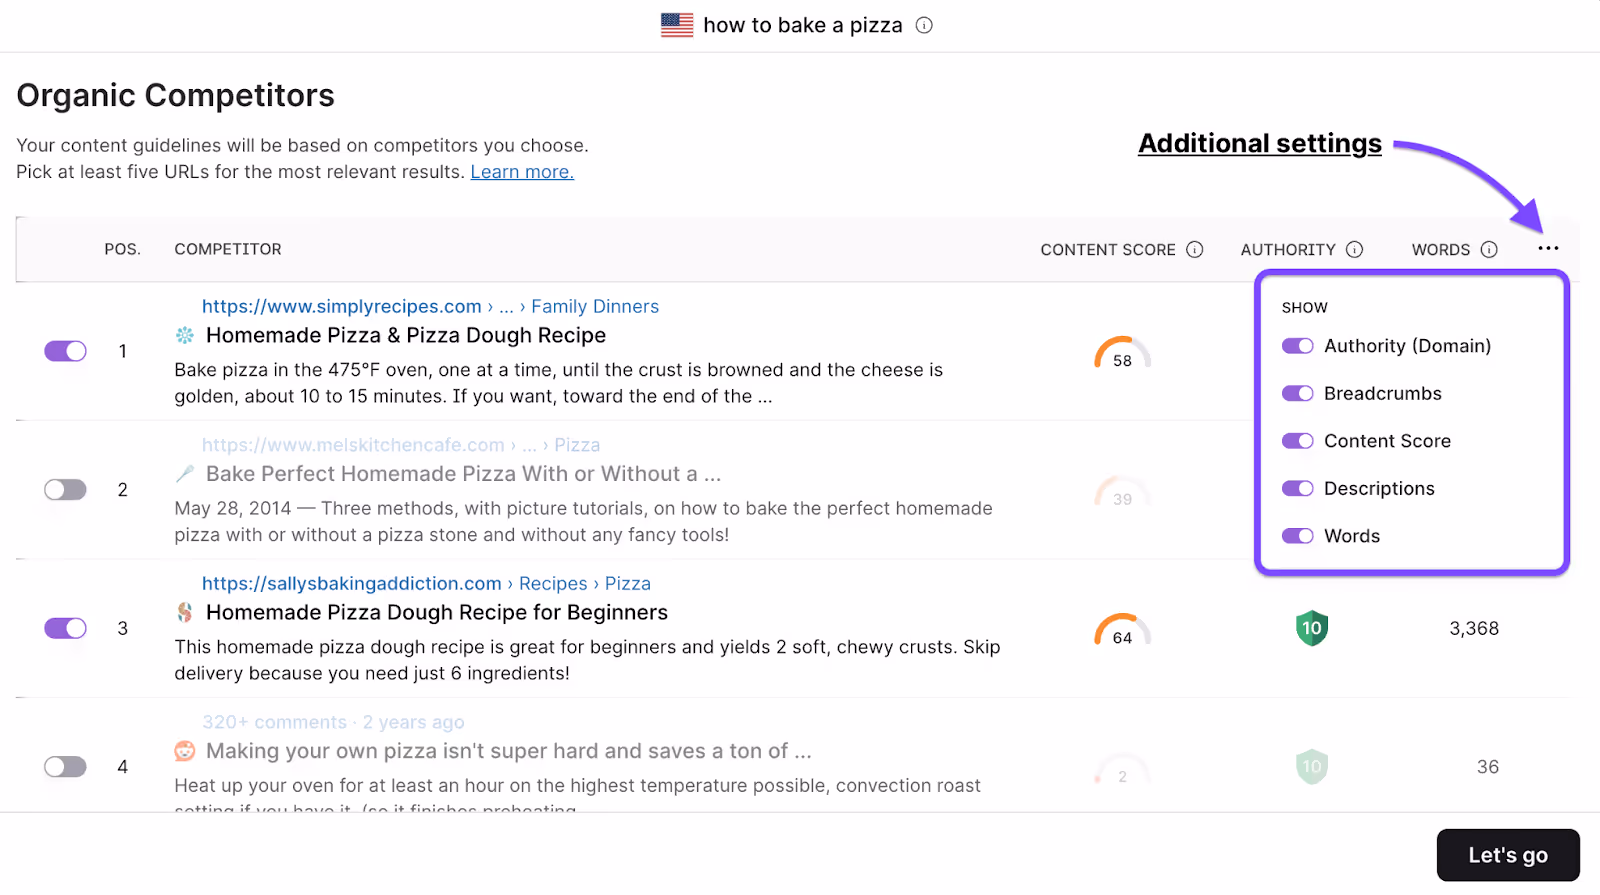
You can also view additional data like Domain Score, meta descriptions, traffic estimates, or breadcrumbs to better assess competitor pages.
Remember: you’ll need at least three unique domains to generate a valid Content Score.
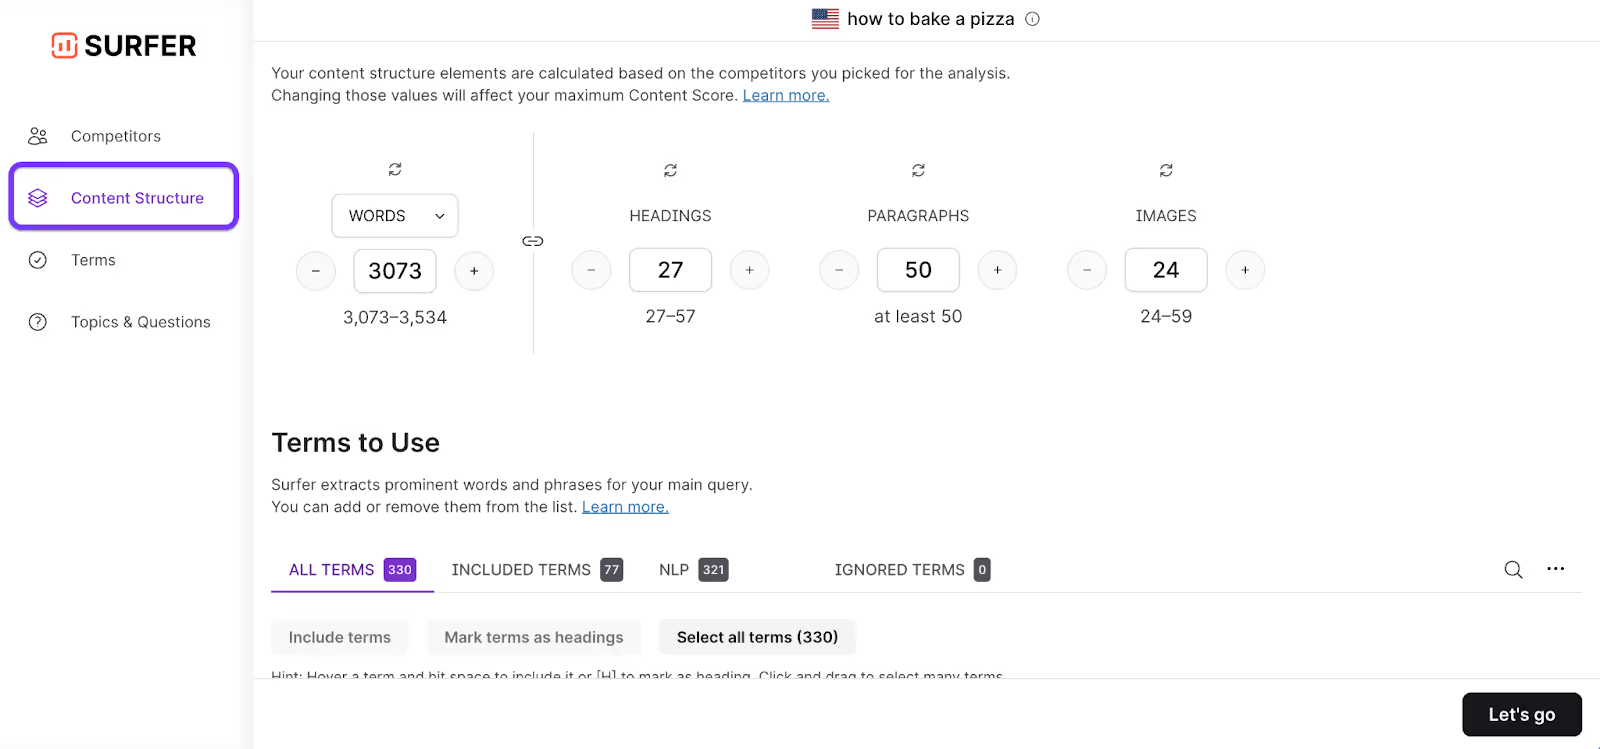
Content Structure
Once you’ve selected your competitors, the Content Structure section allows you to fine-tune the layout of your article.
Here you can adjust your expected word count, number of paragraphs, headings, and images.
When working with freelance writers, you can control the word count. If you think adding more visuals will help clarify things, consider increasing the number of images.
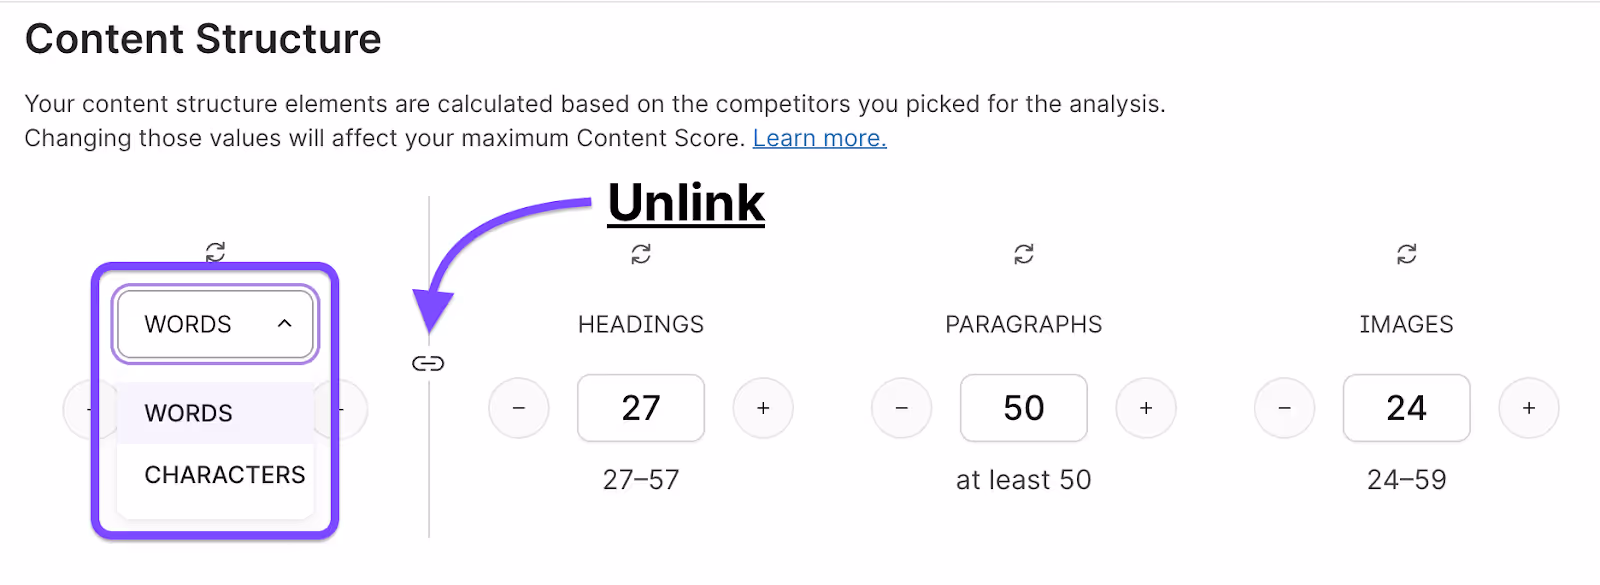
Pro tip: You also have the option to link or unlink elements within the structure or switch from word count to character count if that better suits your workflow.
Use this space to make the guidelines work for your content style.
Terms
The Terms section is where you’ll see all the suggested words and phrases that help shape your on-page SEO.
Surfer sorts them by relevance, so the most important terms appear at the top. You can choose to include or exclude individual terms, assign them to headings, or even blacklist them entirely if they don’t make sense for your audience or tone.
Filter by All Terms, Included Terms, NLP Terms, or Ignored Terms to stay organized.
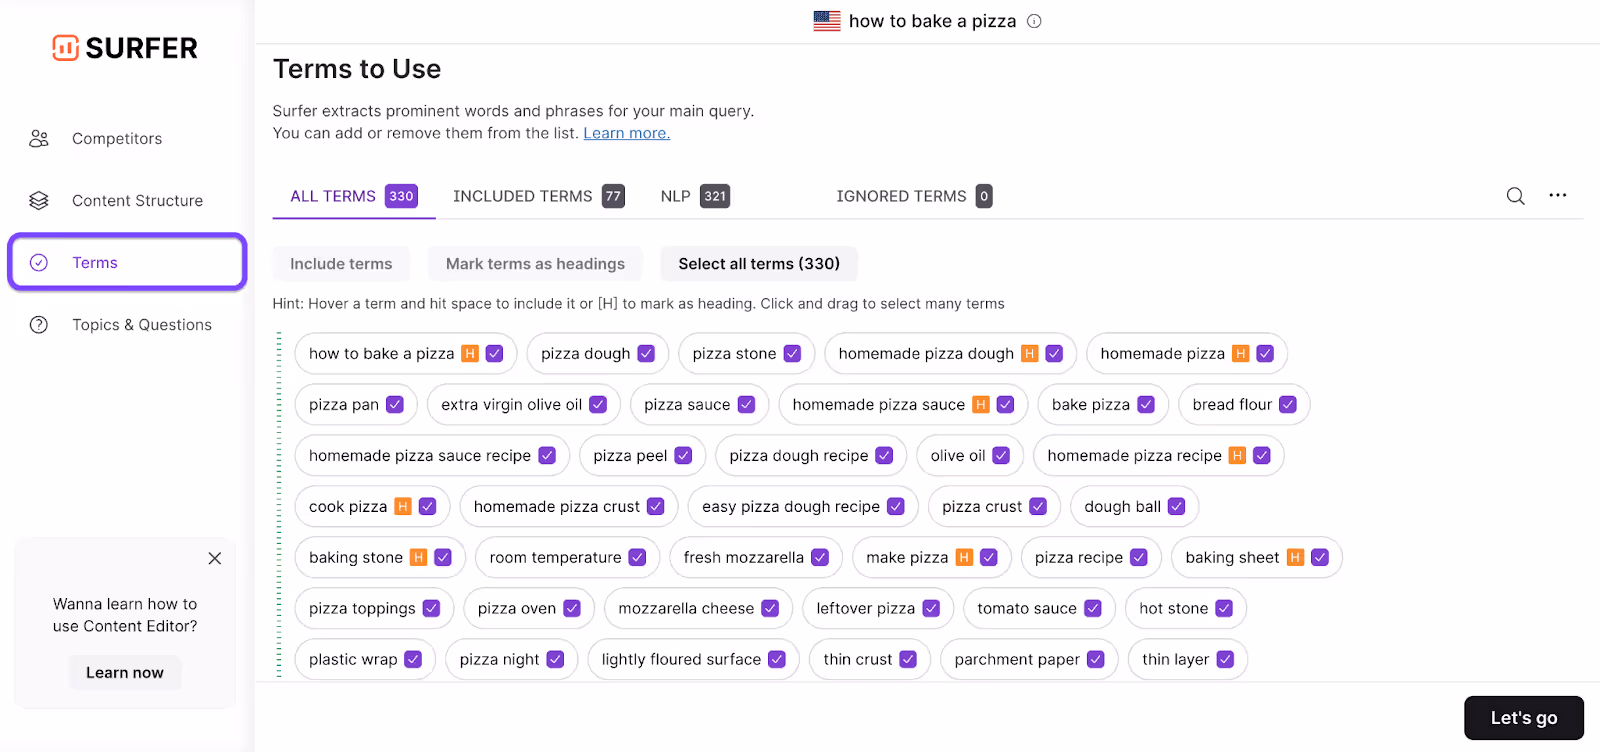
Pro tip: If you already have a list of secondary keywords you want to include, you can upload them in bulk and Surfer will place them at the top of this section, making them easy to spot while you write.
Topics & Questions
This section is especially useful if you’re working with writers or planning content collaboratively. Surfer suggests topics and questions pulled from three key sources:
- high-ranking competitor content
- Google’s “People Also Ask” box
- and Surfer’s internal keyword intelligence.
Each suggestion comes with a checkbox so you can just tick the ones that make sense for your draft.
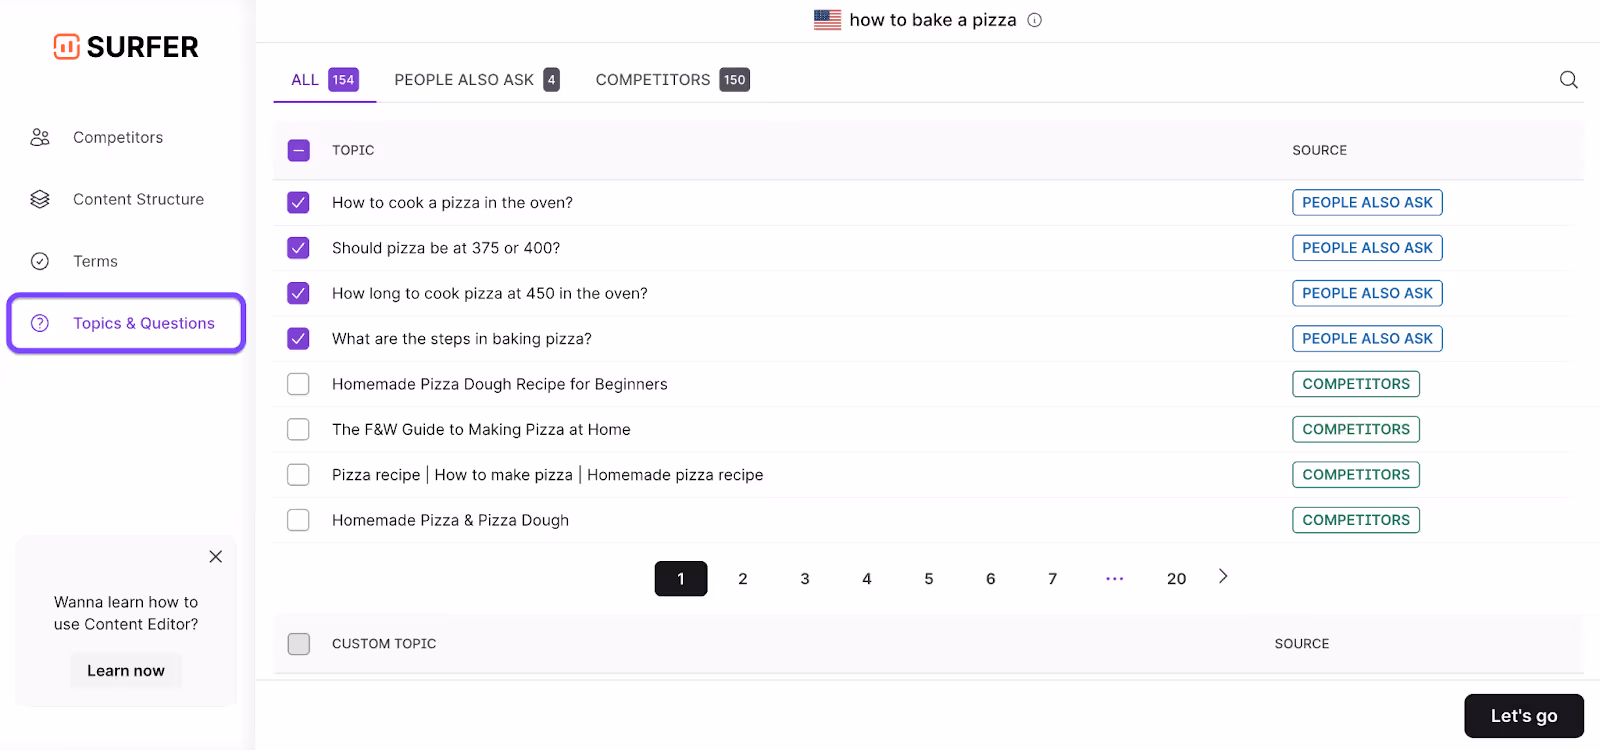
You can also add custom topics or questions of your own.
Write with Surfer AI
Surfer AI simplifies the process of creating high-quality, SEO-friendly content without the stress of a blank page or the hours typically spent researching, outlining, and drafting.
If you selected the Write with AI tab in Content Editor, you’ll be prompted to enter a keyword, target country and device.
Powered by a combination of SERP analysis, NLP insights, our proprietary optimization engine, and OpenAI technology, Surfer AI is designed to generate long-form articles that not only read well but are aligned with what users and search engines are actively looking for.
Customize your article
Once your query is submitted, you’ll be taken to the customization screen.
Here, you can fine-tune your article before AI begins writing. You’ll choose from 11 different article templates, from blog posts to landing page copy, or you can build a custom template.
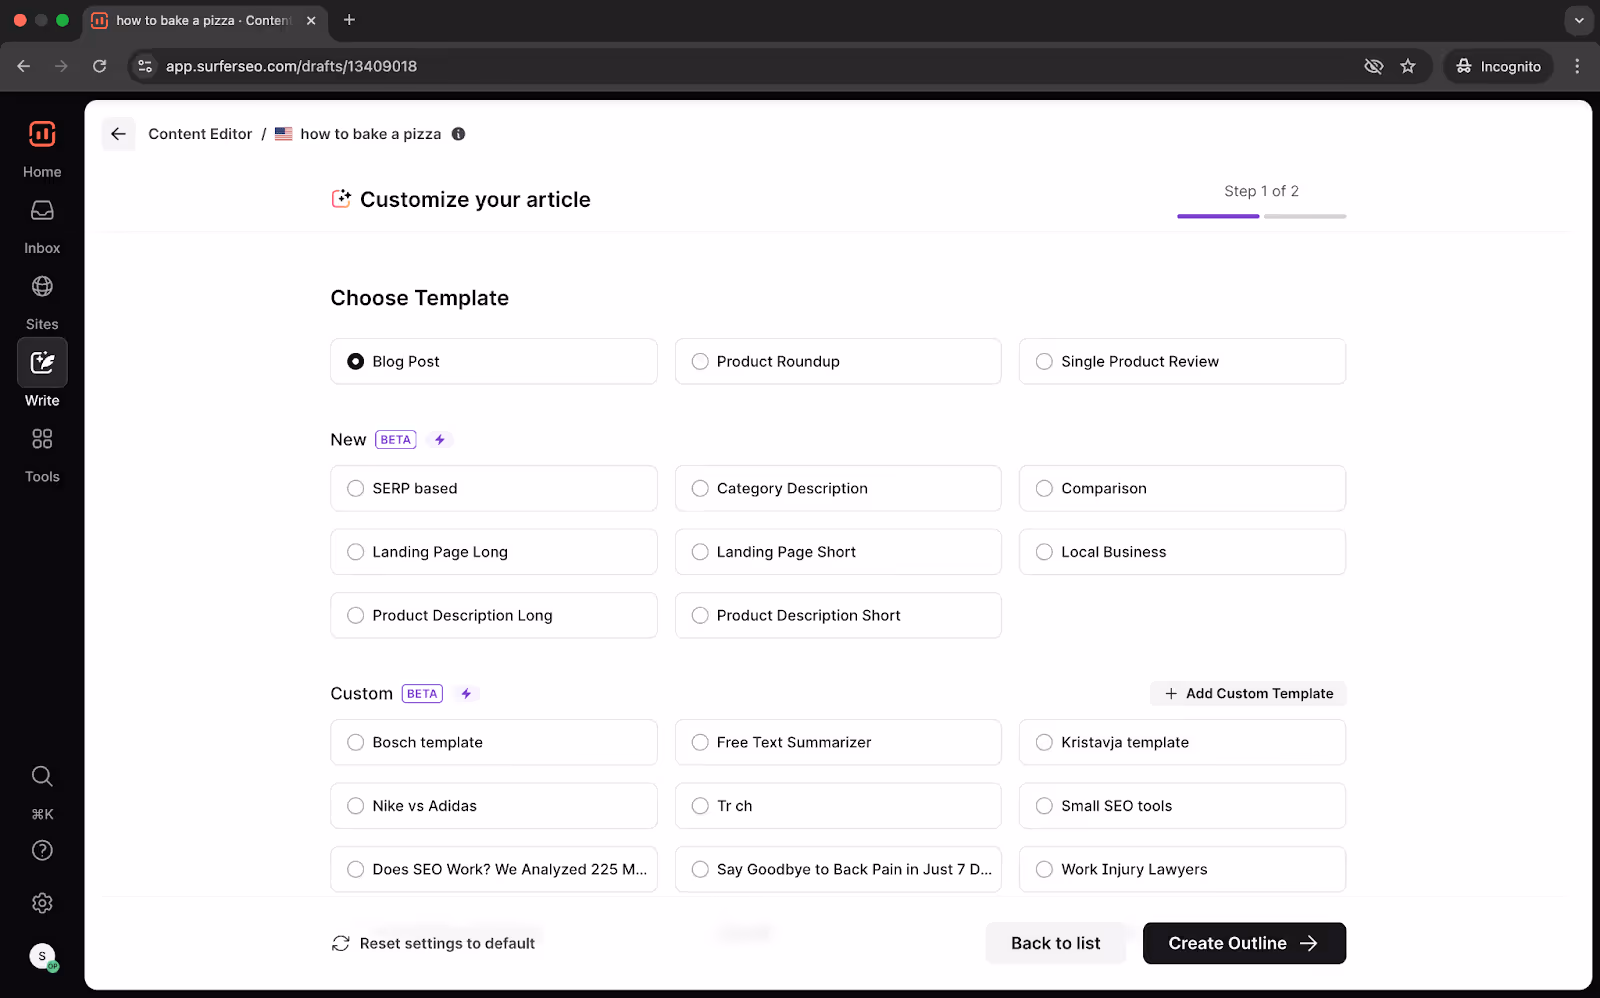
Next, set the tone of voice for your brand.
For even greater control, enable Advanced Settings to review your competitors or add Custom Knowledge, which injects selective insights, product data, or company-specific context into the draft.
Click Create Outline once you’re happy with the options.
AI-generated Outlines
This is where you have the most power to influence how your final AI-generated article will look. You can edit, remove, or reorder the headings and add points tailored to specific sections of the draft.
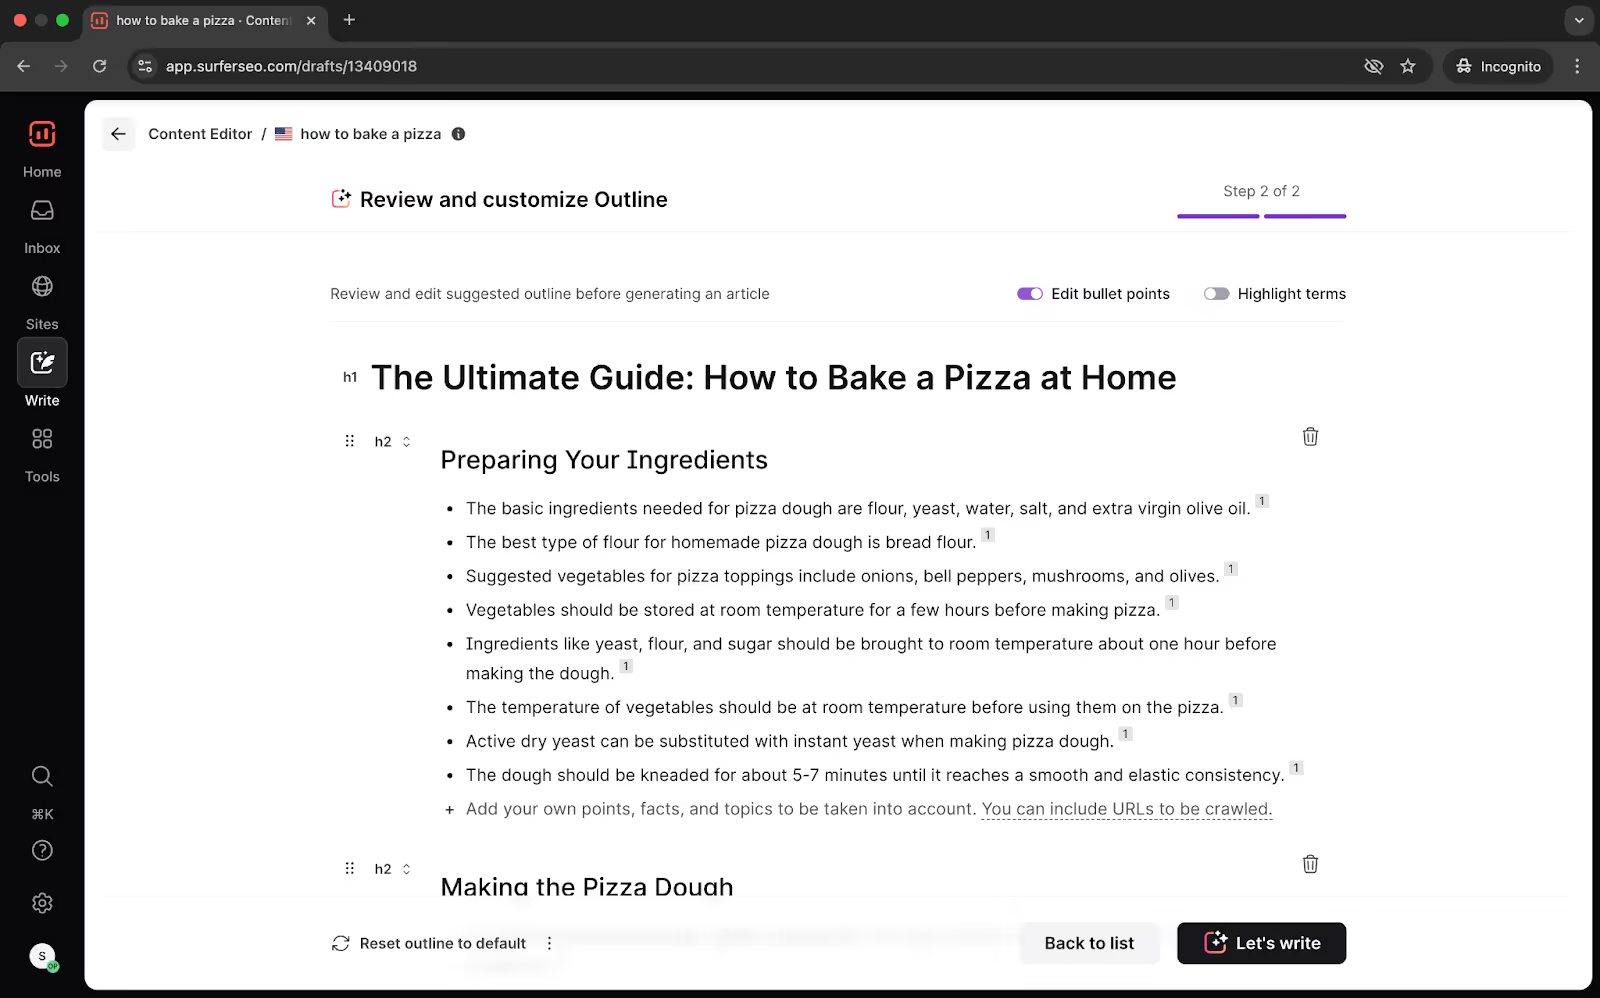
If needed, Outline backups let you roll back to earlier versions of your outline, so nothing gets lost in the process.
When you're happy with the outline, click Let's write.
Surfer AI will then take a few minutes to reference top-ranking competitors, analyze SERP data, and produce a cohesive, well-structured article that fits the topic and tone you've selected.
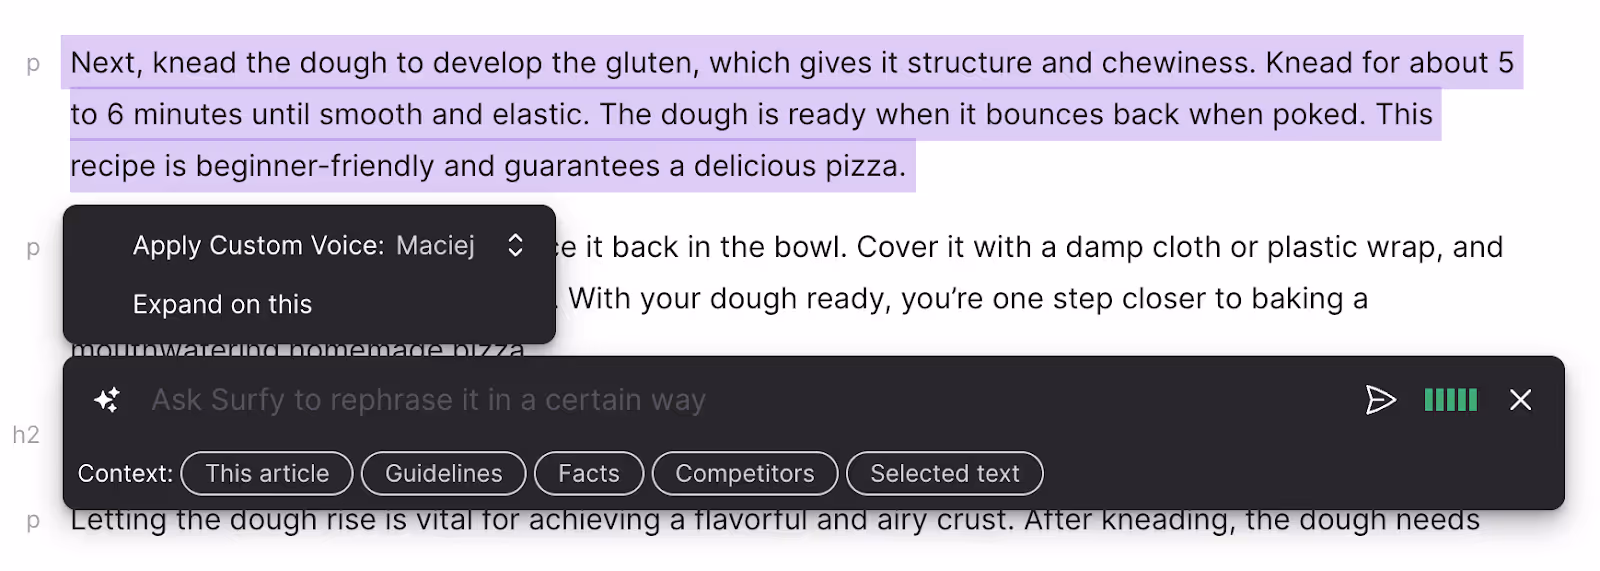
Edit with Surfy
Surfy is your personal writing assistant inside the Content Editor that will help you edit and improve your content, whether you're working on a Surfer AI-generated draft or writing from scratch.
To get started, highlight a sentence or paragraph you’d like to revise and click the Ask Surfy button.
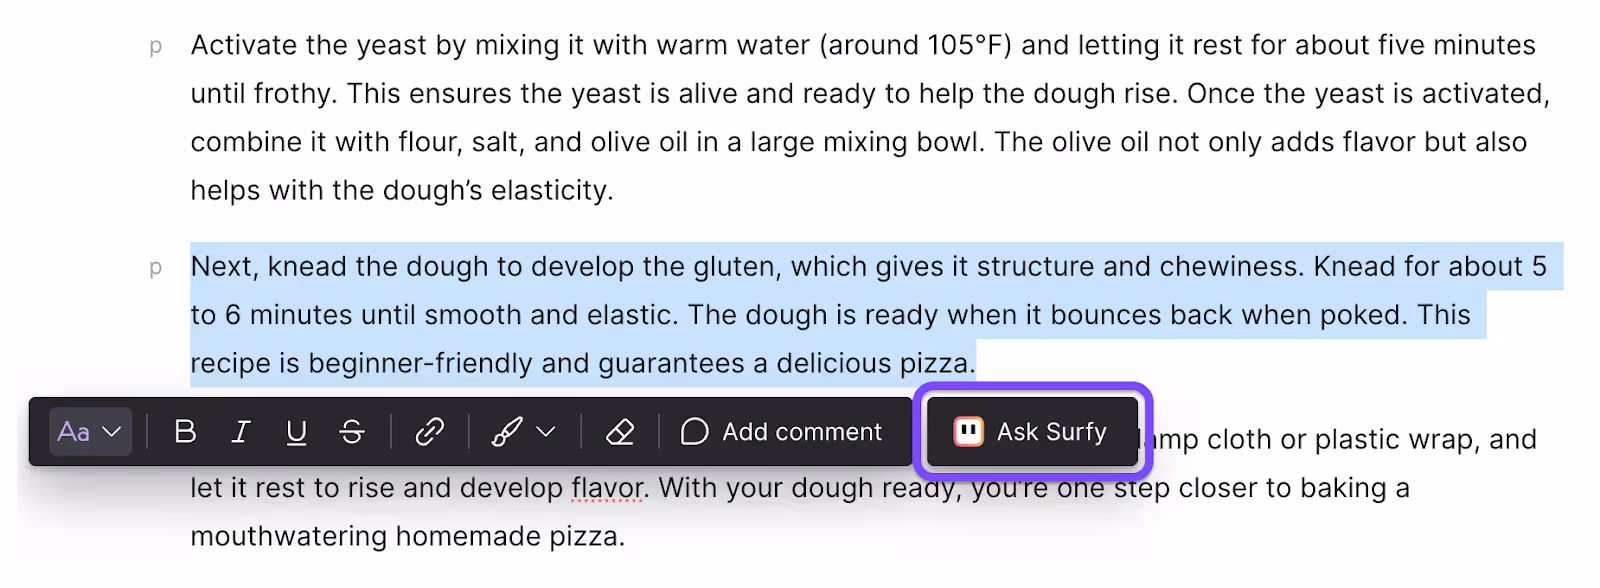
Then type in your instructions:
- ask for a rephrase
- request a more concise summary
- or tell Surfy to expand the idea with an example or additional context.
You can use Surfy to reword clunky text, improve clarity, rewrite in a different tone, or inject missing keywords into a sentence.
It can help you generate a quick list of pros and cons, bold key ideas, break down dense thoughts into bullet points, or enrich a section with a well-placed example or fact.
Every interaction with Surfy builds on the last. The assistant learns your tone, your style, and your intent. The more you use Surfy, the more personalized it becomes.
Add AI images
You can create AI images inside Surfer with the following steps.
- Simply click Insert image in the toolbar above or type the /img or /image command
- Describe the image you want, and Surfer will produce it for you.
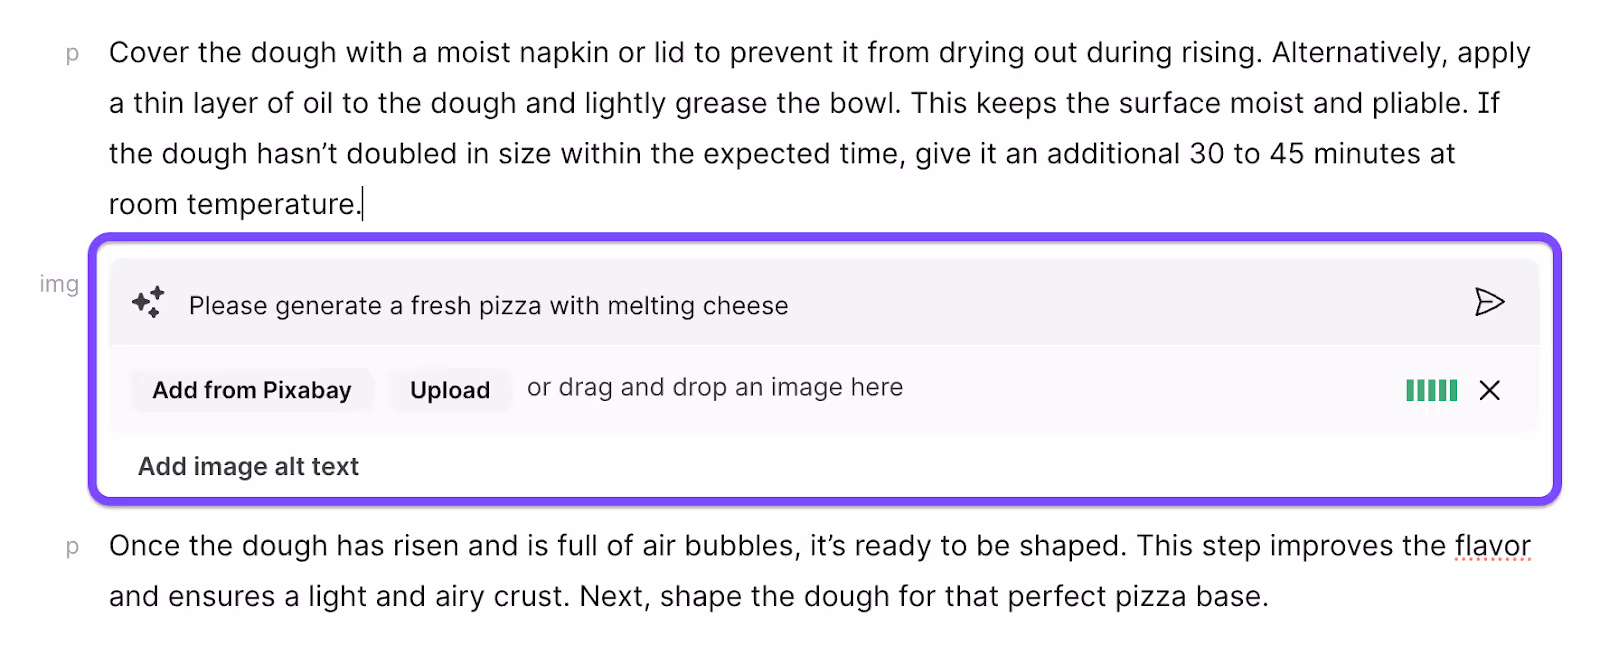
You can also insert visuals from Pixabay, upload from your own files, or drag and drop images directly into your editor.
Once your article is ready, take a moment to review.
Read through the tone, ensure consistency, add internal or external links, include visuals if needed, and personalize sections with your brand voice or first-hand insights.
The base article will be SEO-optimized, but your personal touch is what makes it truly stand out.
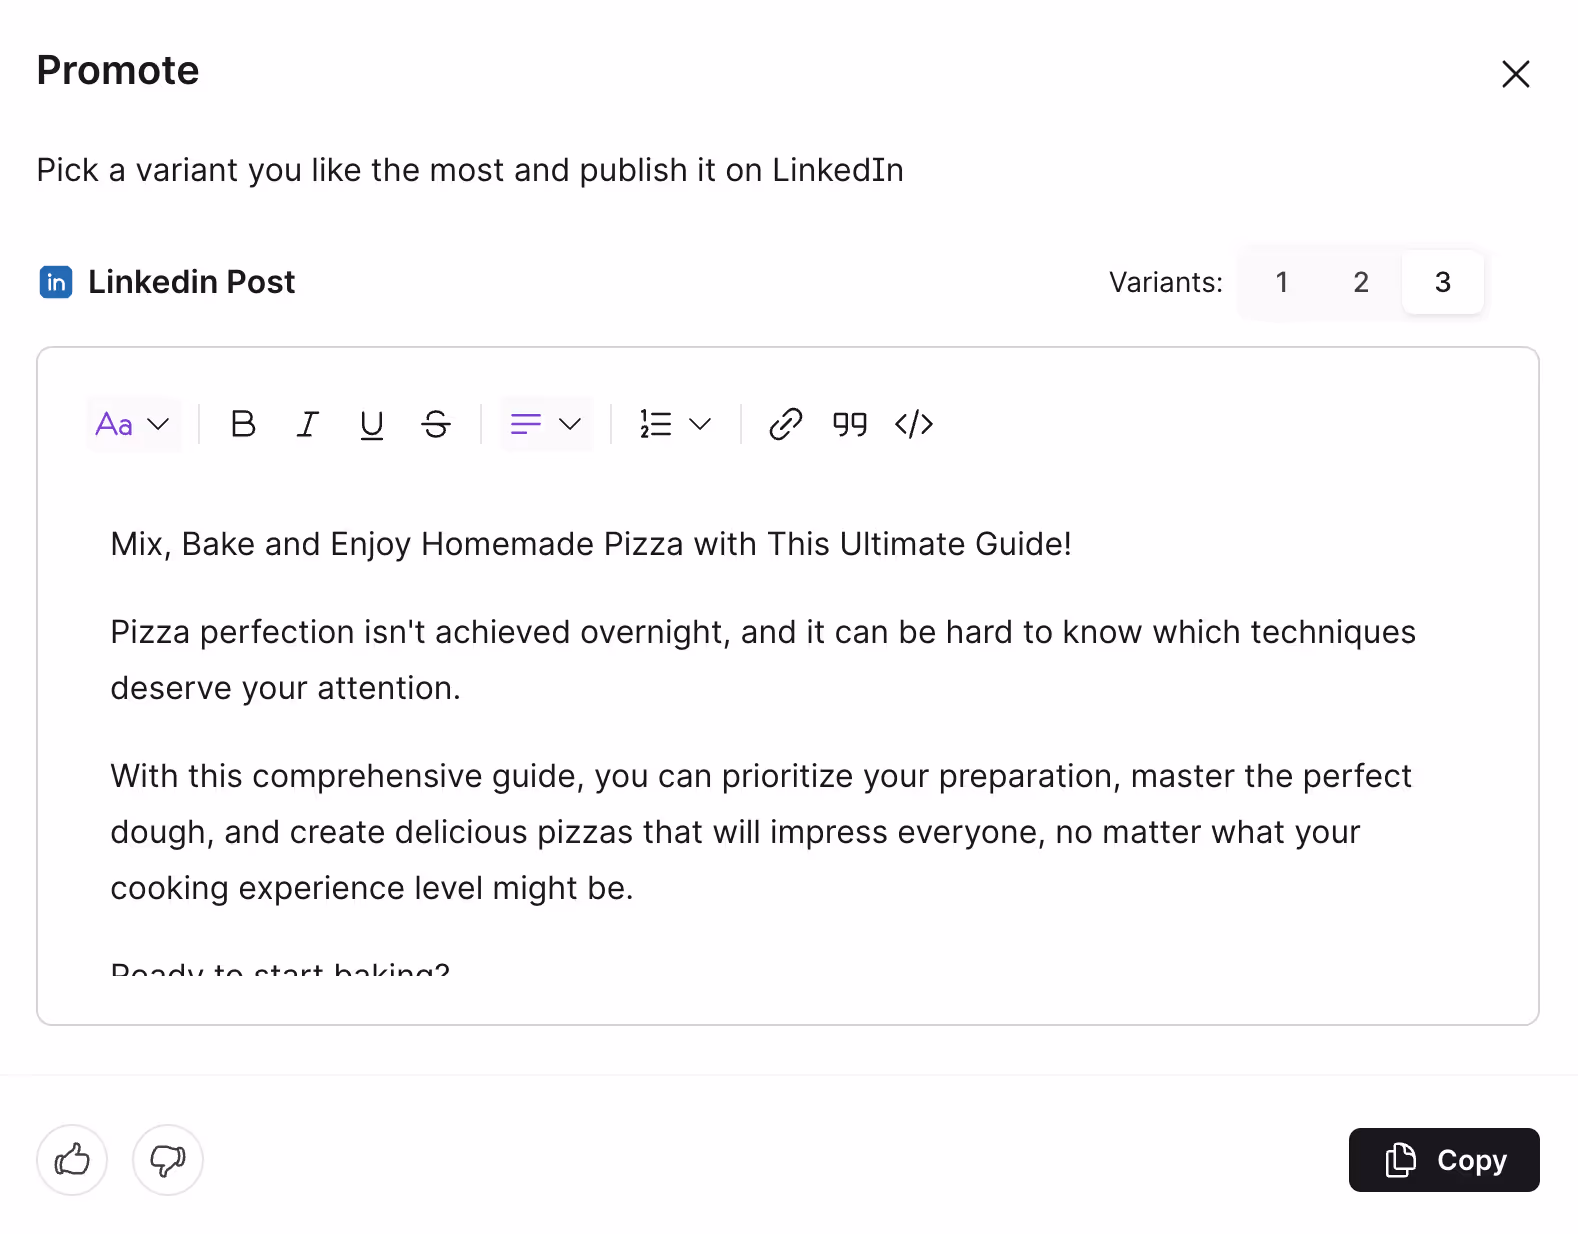
Repurpose to Promote
Surfer will generate three variants of your article for LinkedIn posts so you can widen your reach with repurposed content.
Select the Promote button in the top right corner to get started.
Sharing drafts in Surfer
Collaborating on content is easy with Surfer’s flexible sharing options. Depending on who you’re working with, you can choose the sharing method that fits best.
If you’re collaborating within your Surfer Organization, the simplest option is to copy the Private Link directly from your browser.
This link requires a Surfer login and is only accessible to users within your organization, making it ideal for secure internal collaboration.
When you need to share a draft with someone outside your organization, generate a Shareable Link using the Share button inside the Content Editor.
No login is required—anyone with the link can view the draft. If you need to update access or start fresh, simply click Reset link to generate a new one.
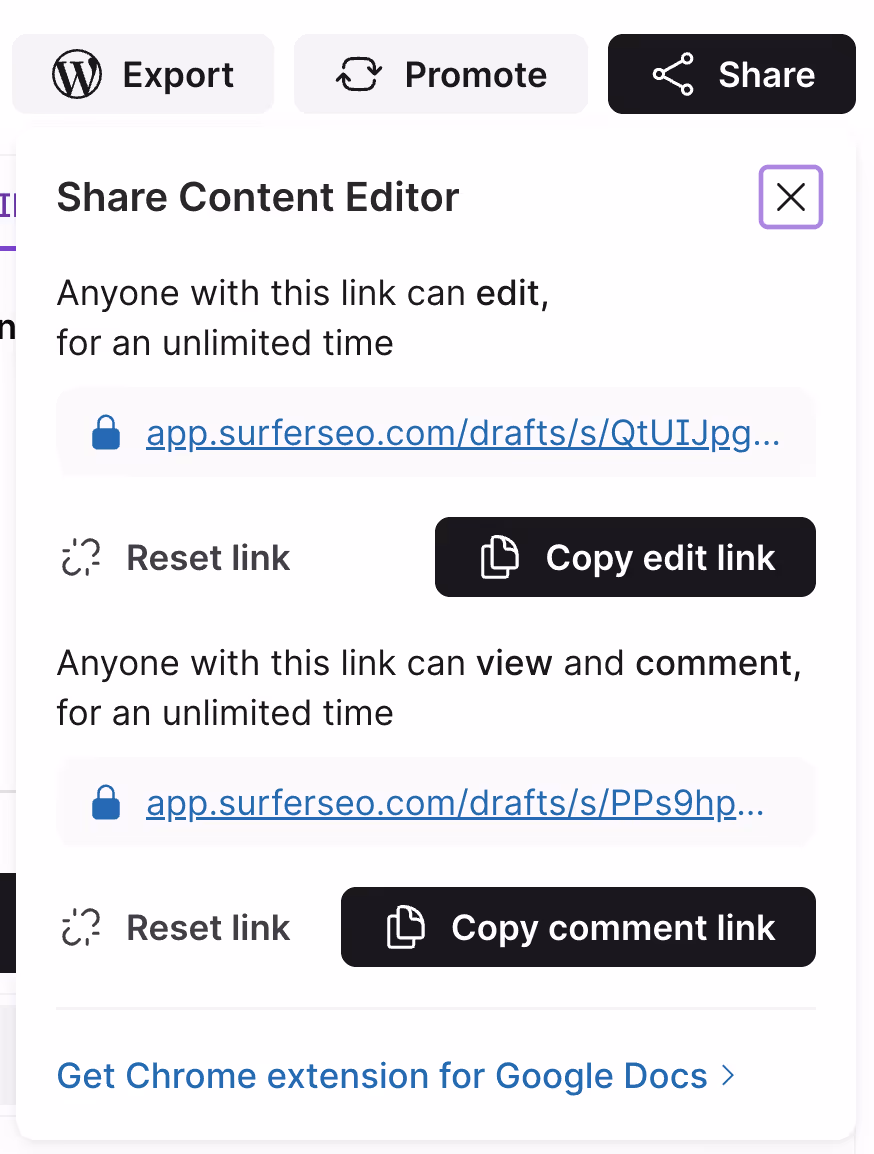
Surfer also supports real-time editing—multiple users can work on the same draft simultaneously, whether through a private link or a shareable link.
You’ll see how many collaborators are active at the bottom of the page and watch updates appear live in your document.
Commenting in Surfer
Highlight the relevant section and select Add comment to open a text box where you can leave ideas, questions, or suggestions.
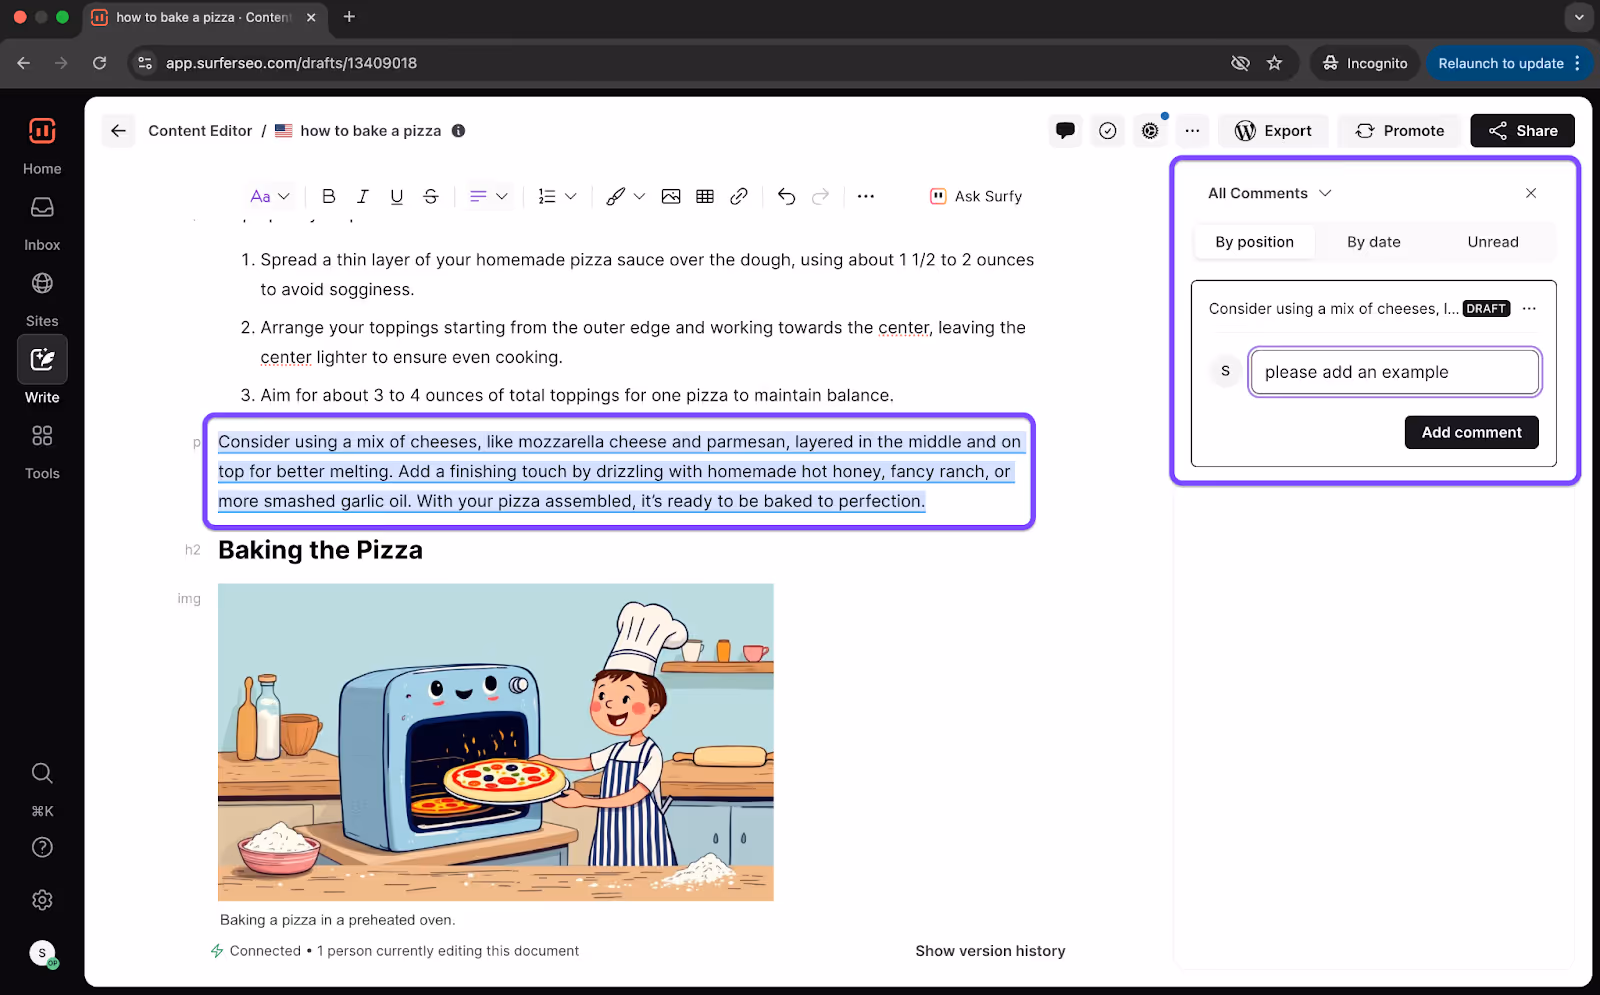
It’s an easy way to foster clear, contextual communication without editing the draft itself. You can also share a link for others to comment in the Share options.
Measure and improve performance with Sites
Sites brings all your content performance data into one intuitive dashboard, so instead of jumping between tools, tabs, and spreadsheets, you get a unified, high-level view of what’s working, what’s not, and where to focus next.
Sites helps you stay organized, track optimizations, and monitor long-term results, whether you’re running one website or managing a portfolio of domains.
You’ll find 3 tools inside Sites.
- Dashboard
- Content Audit
- Topical Map
To begin using them, connect your domain’s Google Search Console account with Surfer. Once connected, you’ll be able to spot trends, analyze performance shifts, and track how your site responds to content changes over time.
1. Dashboard
Your dashboard starts with a performance overview powered by your connected Google Search Console. Surfer automatically pulls in performance metrics and organizes your work around that specific website.
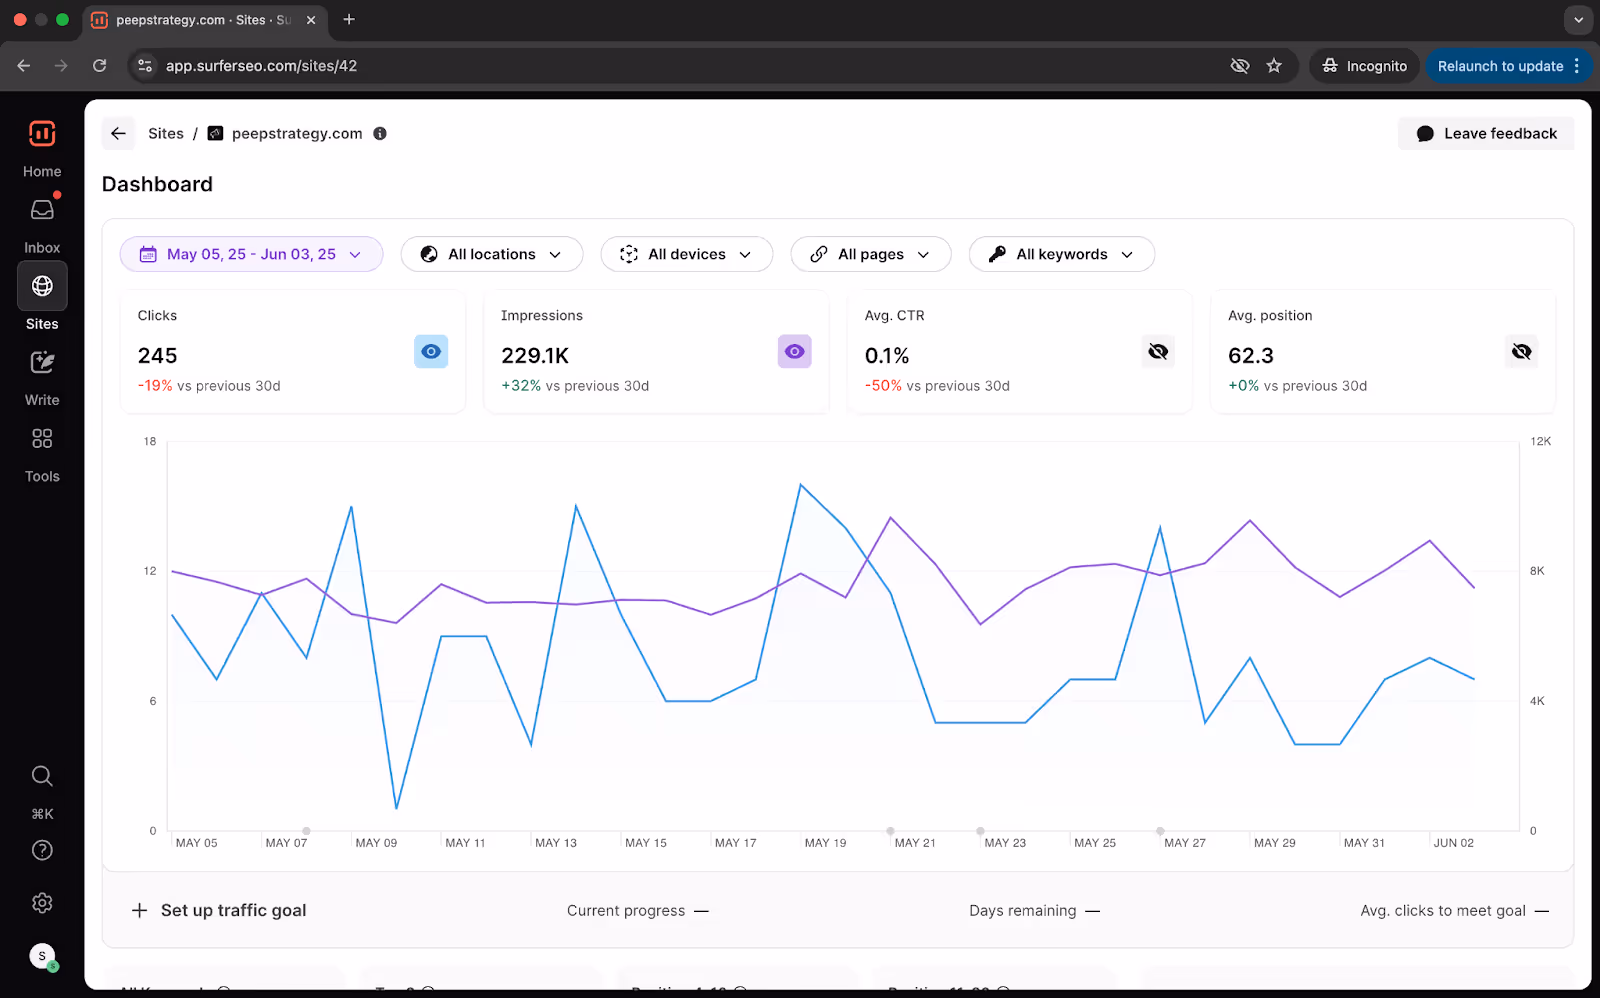
This means your Content Editor queries, audits, and topical clusters are no longer floating independently—they’re part of a unified content system inside Surfer.
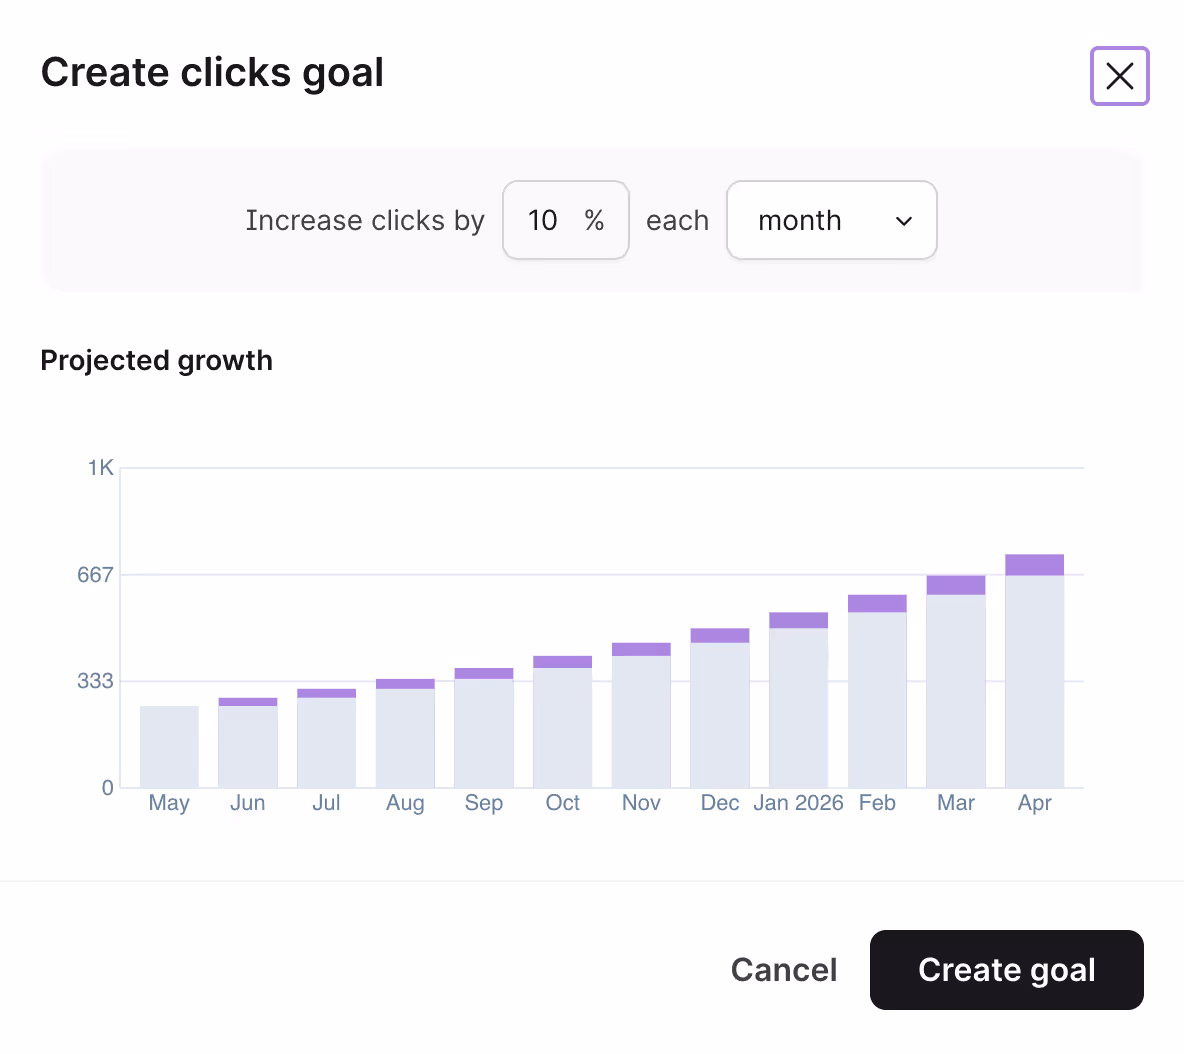
Inside you can also create and set goals for traffic performance metrics that will be tracked for your pages.
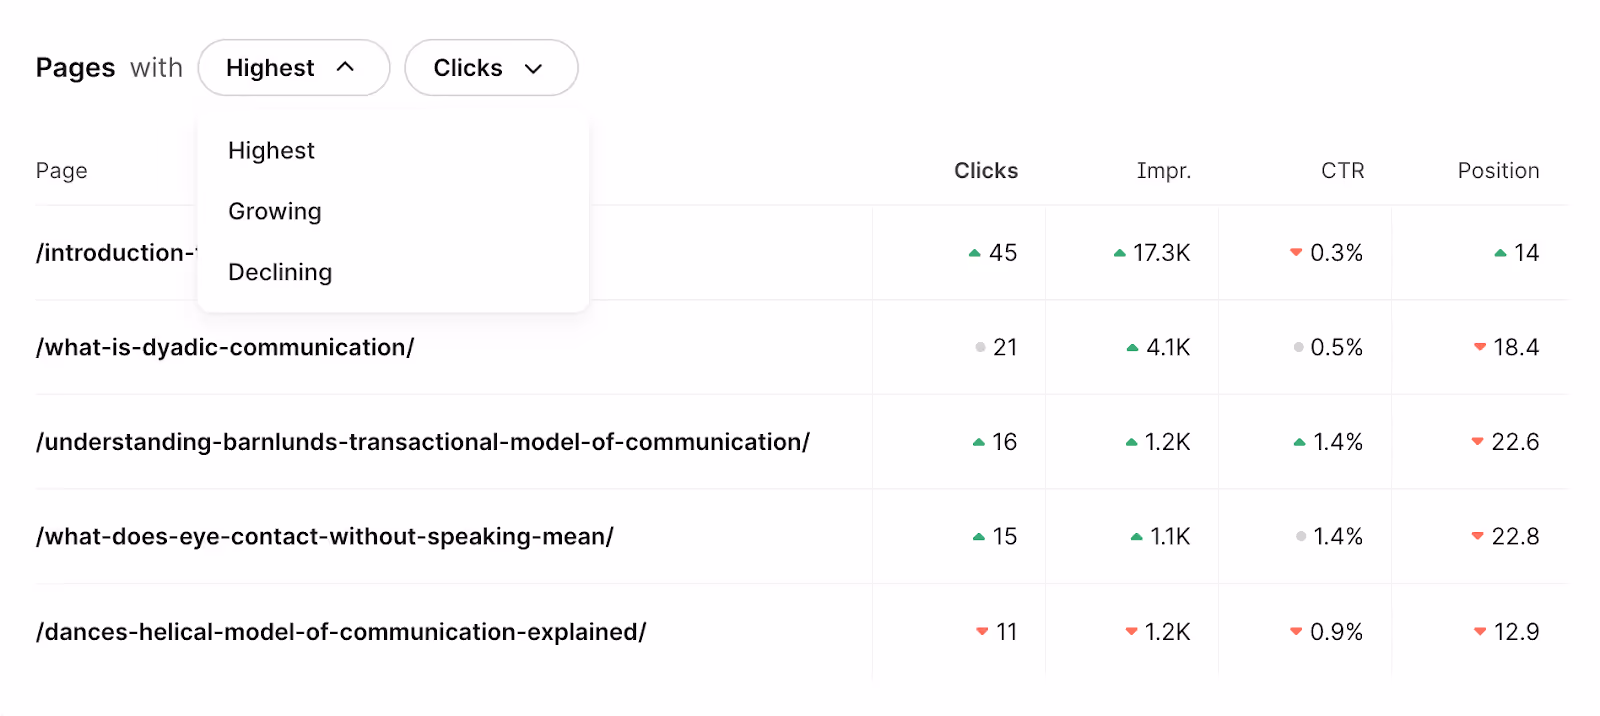
Pro tip: Use the readymade reporting templates inside Dashboard to get a quick overview of how your content is performing.
For instance, you can find pages or keywords with growing or declining clicks.
On the right panel, you’ll find suggestions for improvement. More on these below.
2. Content Audit
Content Audit helps you identify underperforming pages and shows you exactly how to improve them by adding missing terms, fixing formatting issues, or refreshing outdated sections.
It pulls in your top 100 pages based on traffic and impressions from GSC. For each page, you’ll see key metrics including impressions, clicks, and click-through rate (CTR), with data trends shown for the current and previous 30-day periods.
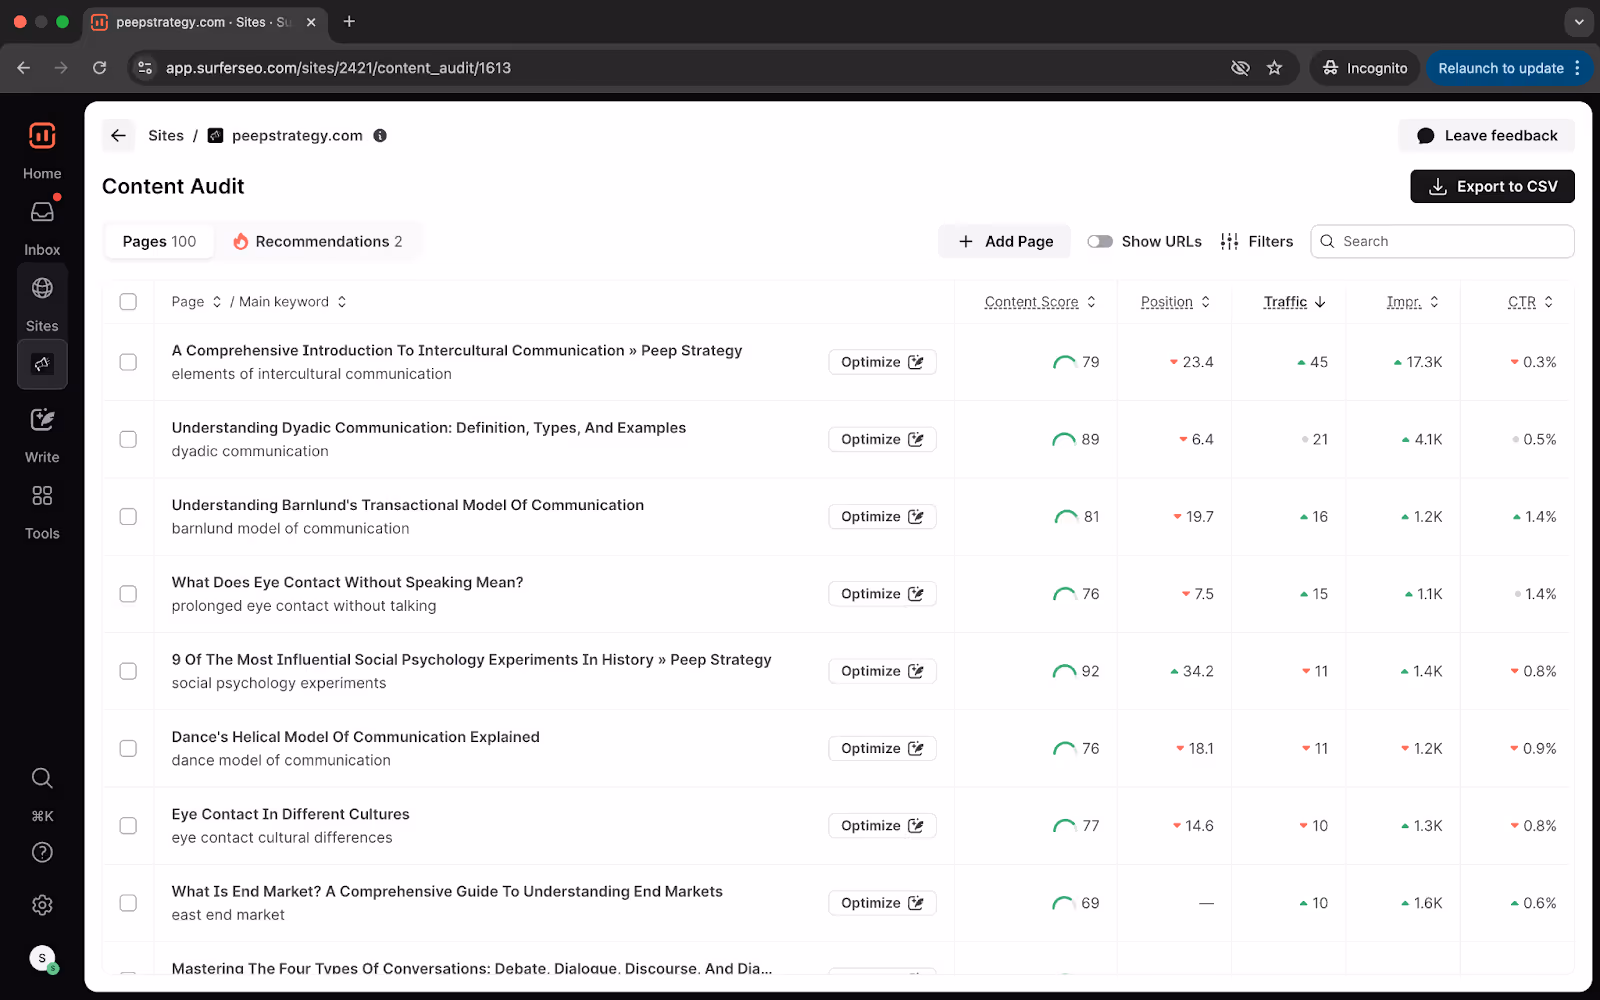
You’ll also see the main keyword driving traffic to each page and its average SERP position. The Content Score is there help you find under optimized pages.
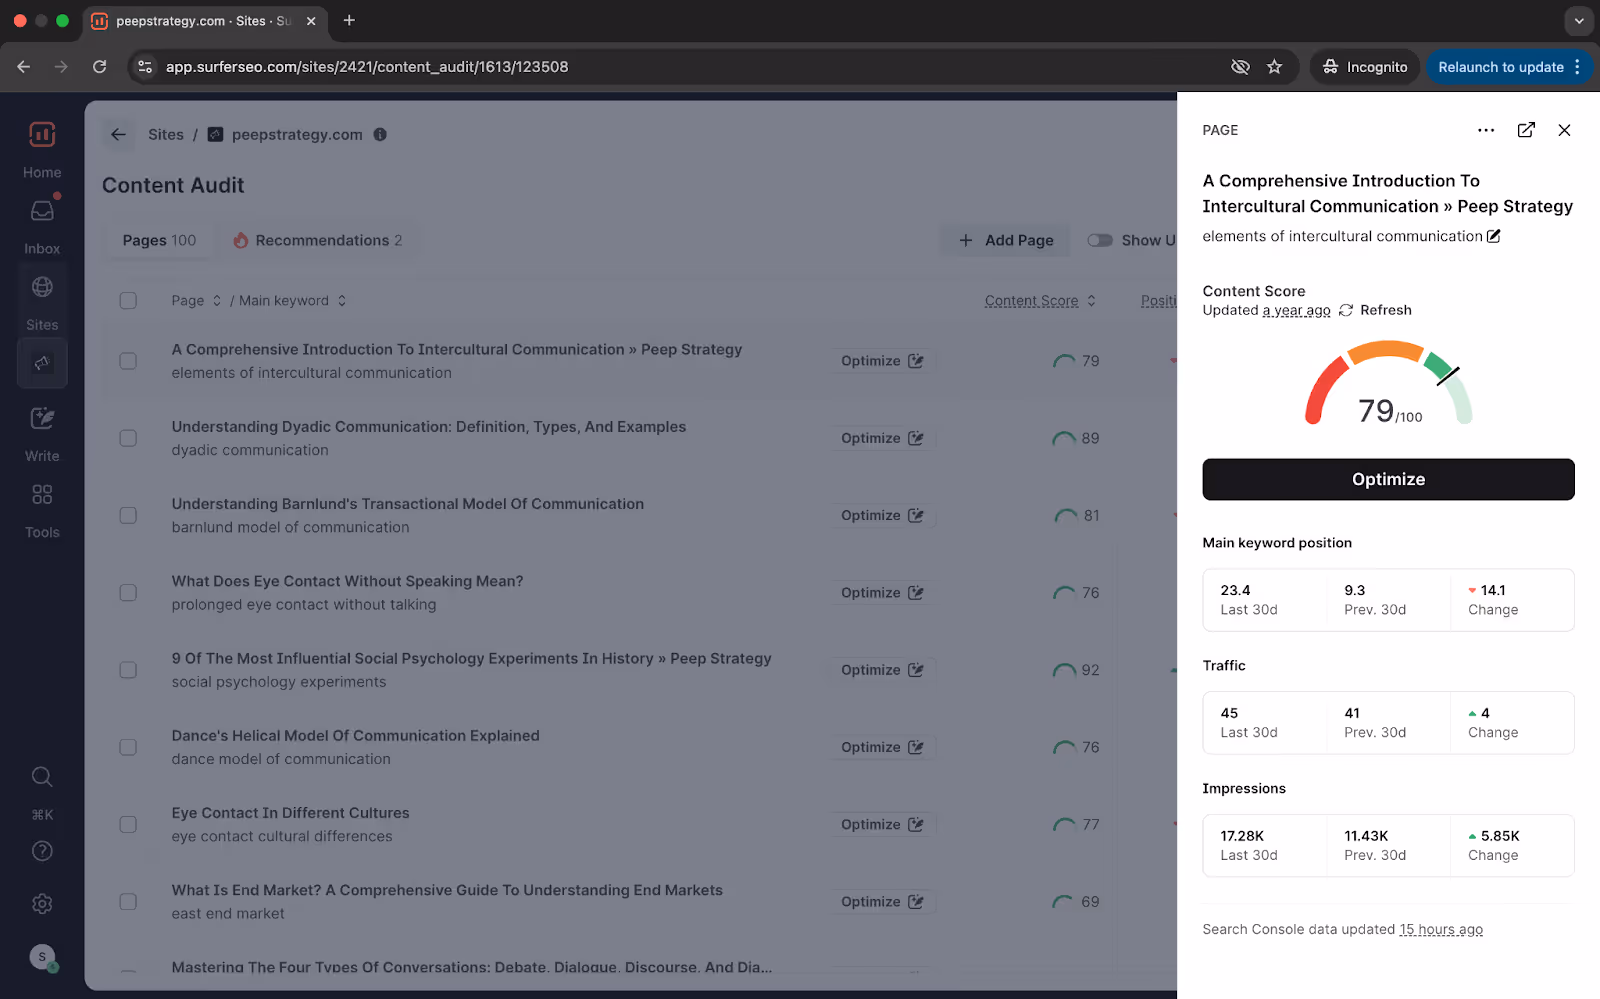
Explore individual pages inside Surfer Content Audit.
Open a URL to track performance changes, view the keywords sending traffic to the page, and even update the primary keyword if you want to track a different keyword.
If you want to track new pages, simply add them at any time. And if you need to declutter your project, removing pages is just as easy.
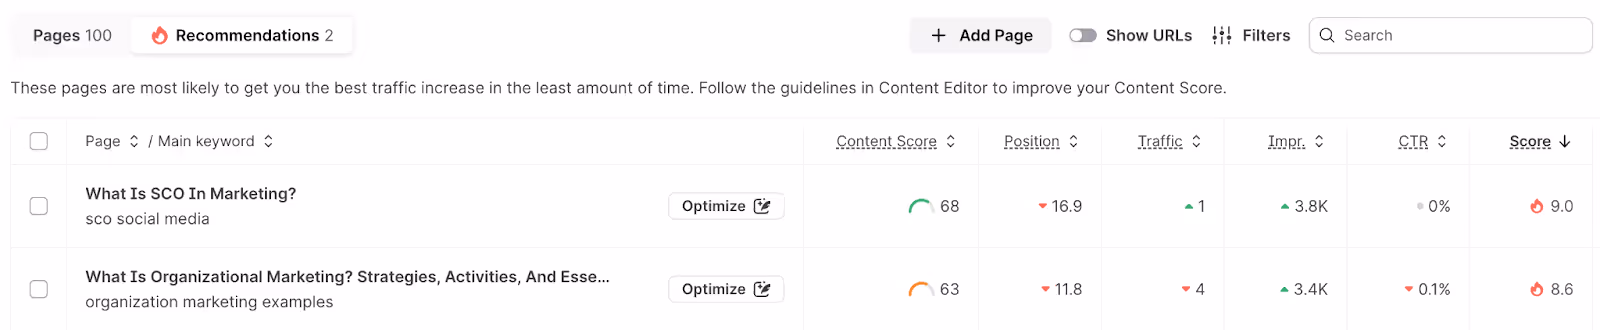
One of Content Audit’s most powerful features is its ability to surface low-hanging fruit. Under the Recommendations tab, you’ll find pages that are close to the first page of Google, and highly likely to improve with targeted optimization.
Apply your own filters and prioritize work based on your unique criteria. Content Audit also makes it simple to export your findings.
Pro tip: Download detailed CSV reports that include titles and URLs to Content Scores, traffic trends, and optimization recommendations. You can combine these with data from other tools for even more insights.
When it’s time to improve a page, click Optimize and the page will open in Content Editor, where you can start refining the content right away using Surfer’s tools.
3. Topical Map
Surfer’s Topical Map helps you explore new content opportunities and strengthen your topical authority by analyzing the clusters of content you already cover and surfacing semantically related topics you haven’t touched yet.
In short, it answers the question every content strategist asks:
What should I write next and why?
The tool integrates with your Google Search Console data to deliver insights based on your actual site performance in 3 helpful tabs.
In the first tab All topics, the left panel has related topic clusters and you’ll find supporting articles in the right panel.

Instead of simply giving you a list of keywords, Topical Map reveals how your current content connects across topic clusters and highlights related clusters that can help you build stronger SEO depth.
It identifies gaps you can fill with new articles and shows how your pages are currently performing.
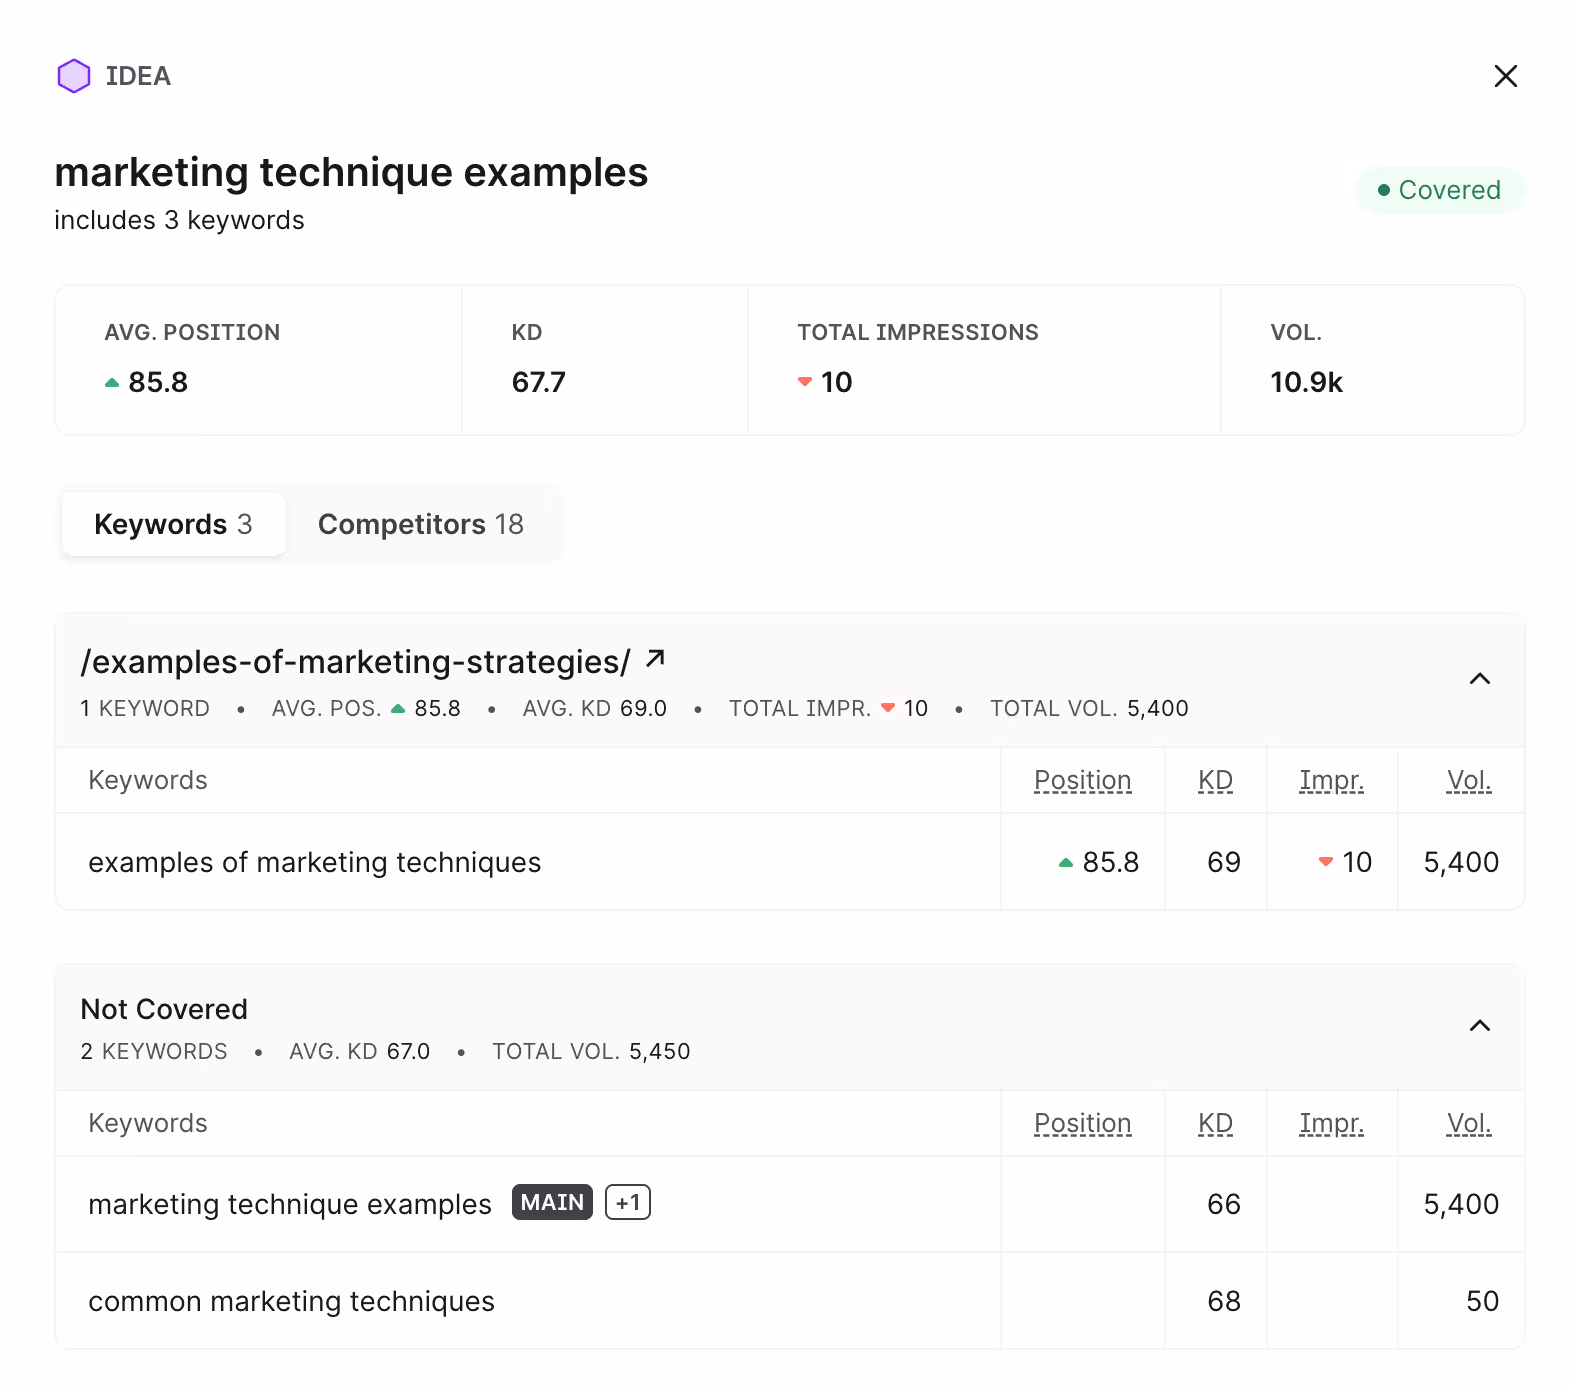
Click on a keyword to view more metrics about it.
The Recommendations tab is where you’ll find new content suggestions to write.
Pro tip: Sort the suggestions by the Score column to prioritize ideas that are best suited to your authority and coverage.
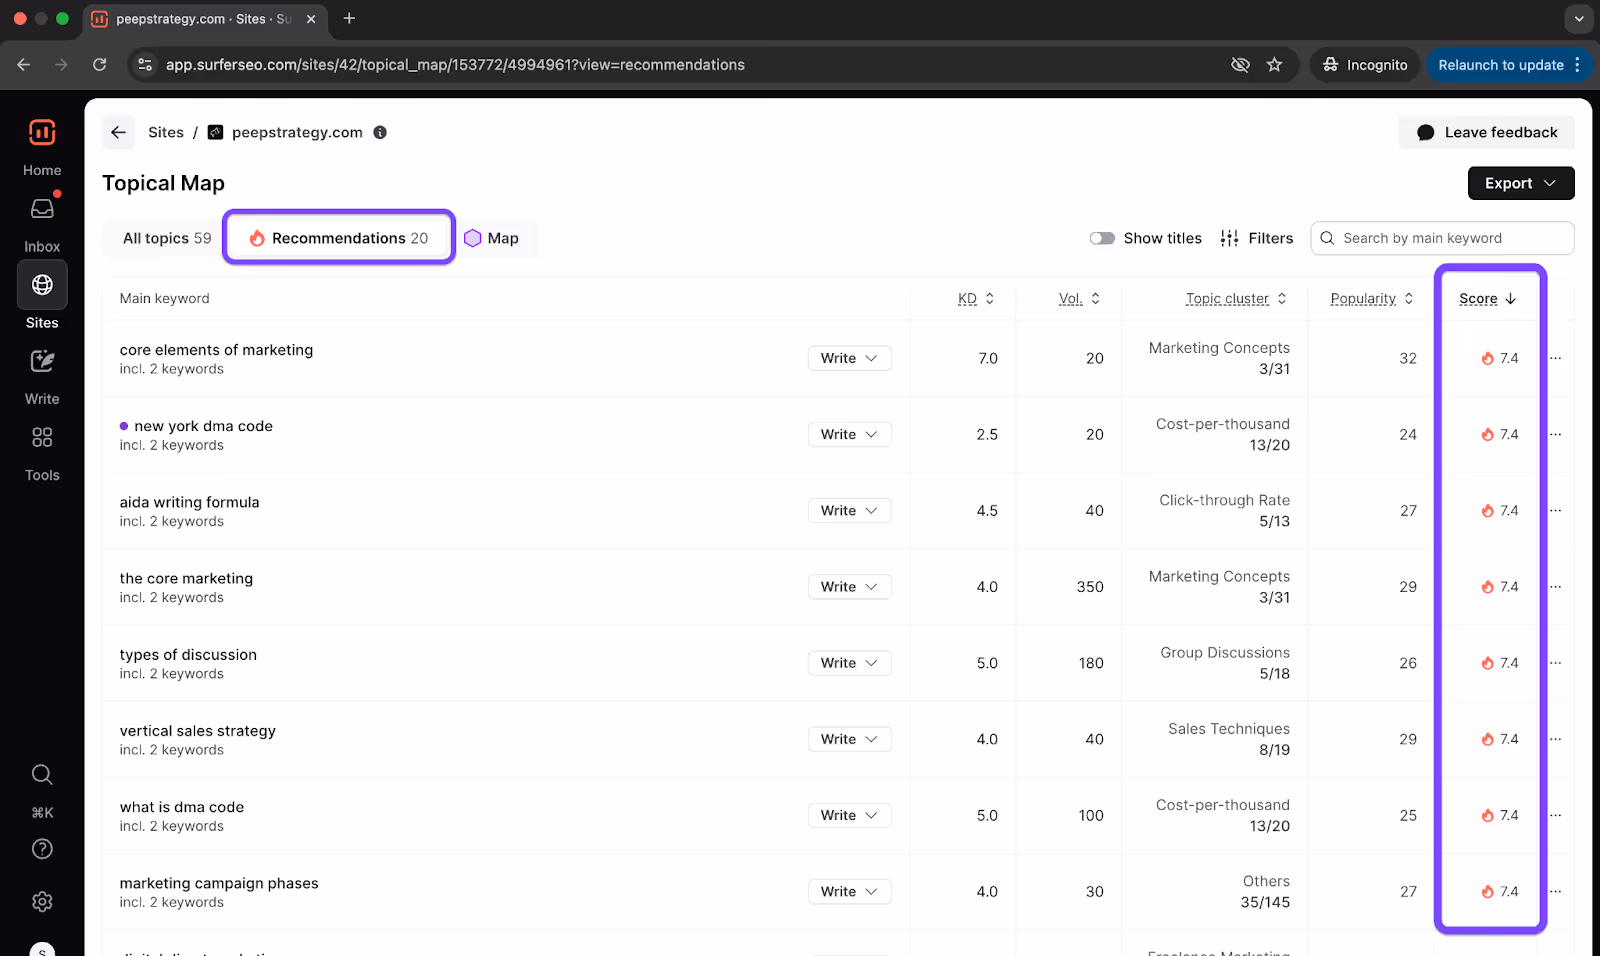
This way you don’t have to mentally calculate which keywords are best for you to target. Surfer scores these ideas based on relevance, keyword difficulty, and your chance to rank.
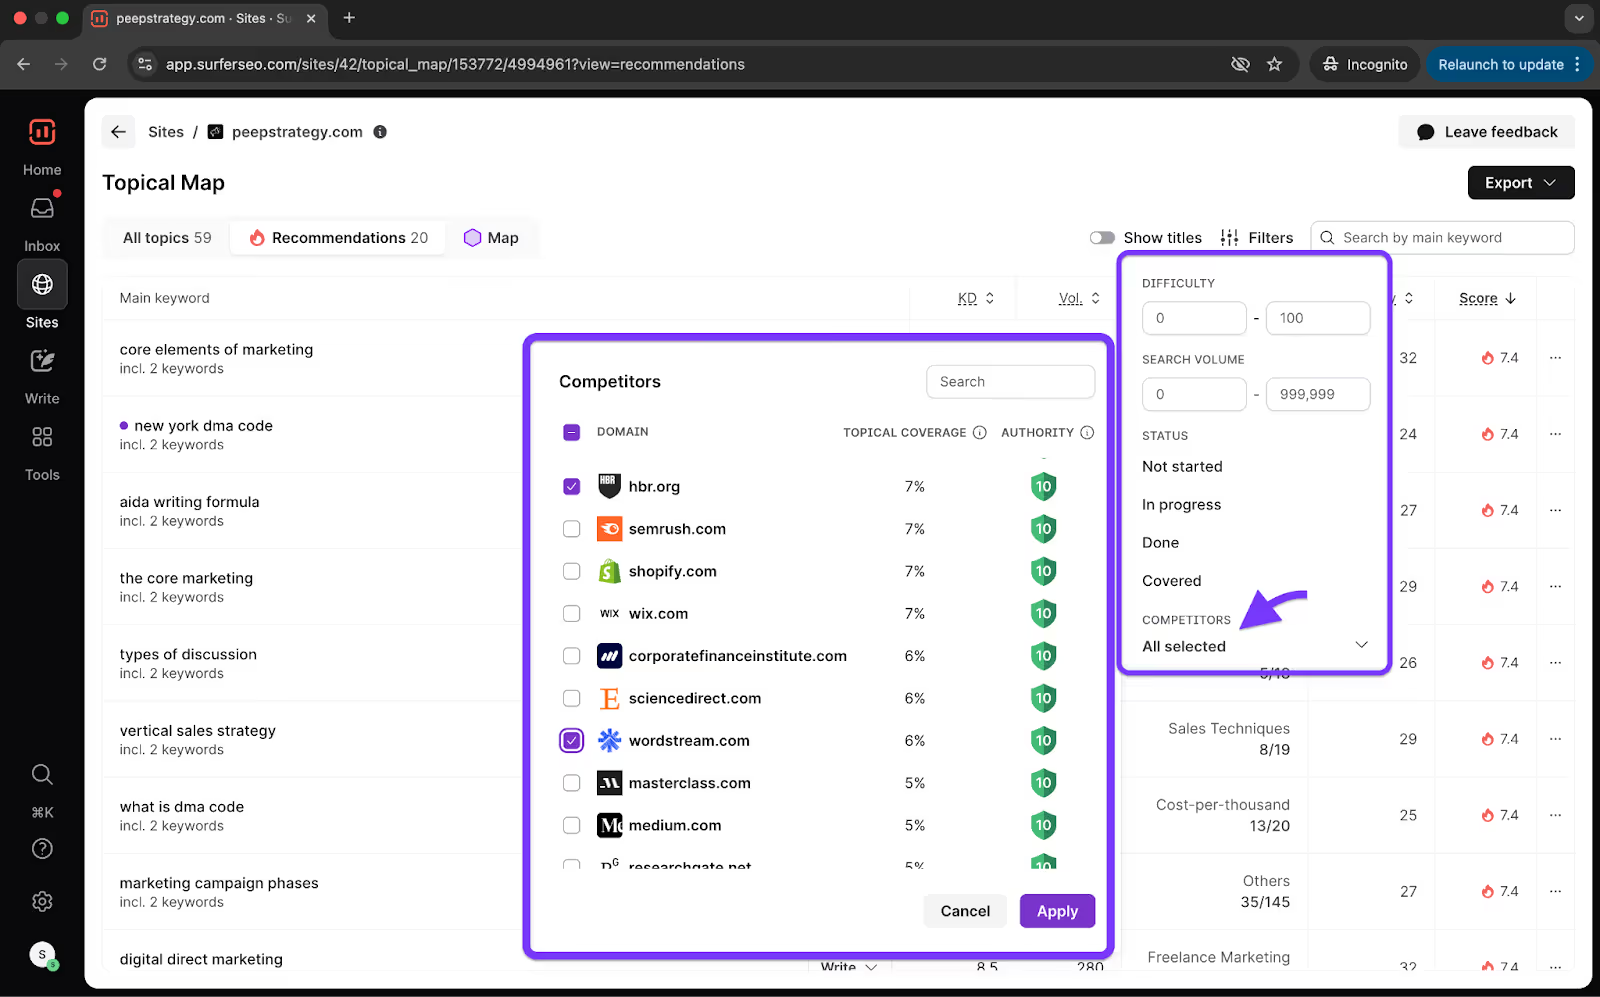
You can also uncover your competitors’ coverage and rankings.
- Open the Filters settings
- Go to Competitors
- Select competitor websites you want to analyze
The last tab has your domain’s Topical Map.
This visualization gives you an idea of your topical depth.
The central cluster reflects your best-performing keyword, and surrounding clusters are organized based on semantic proximity to your main keyword.
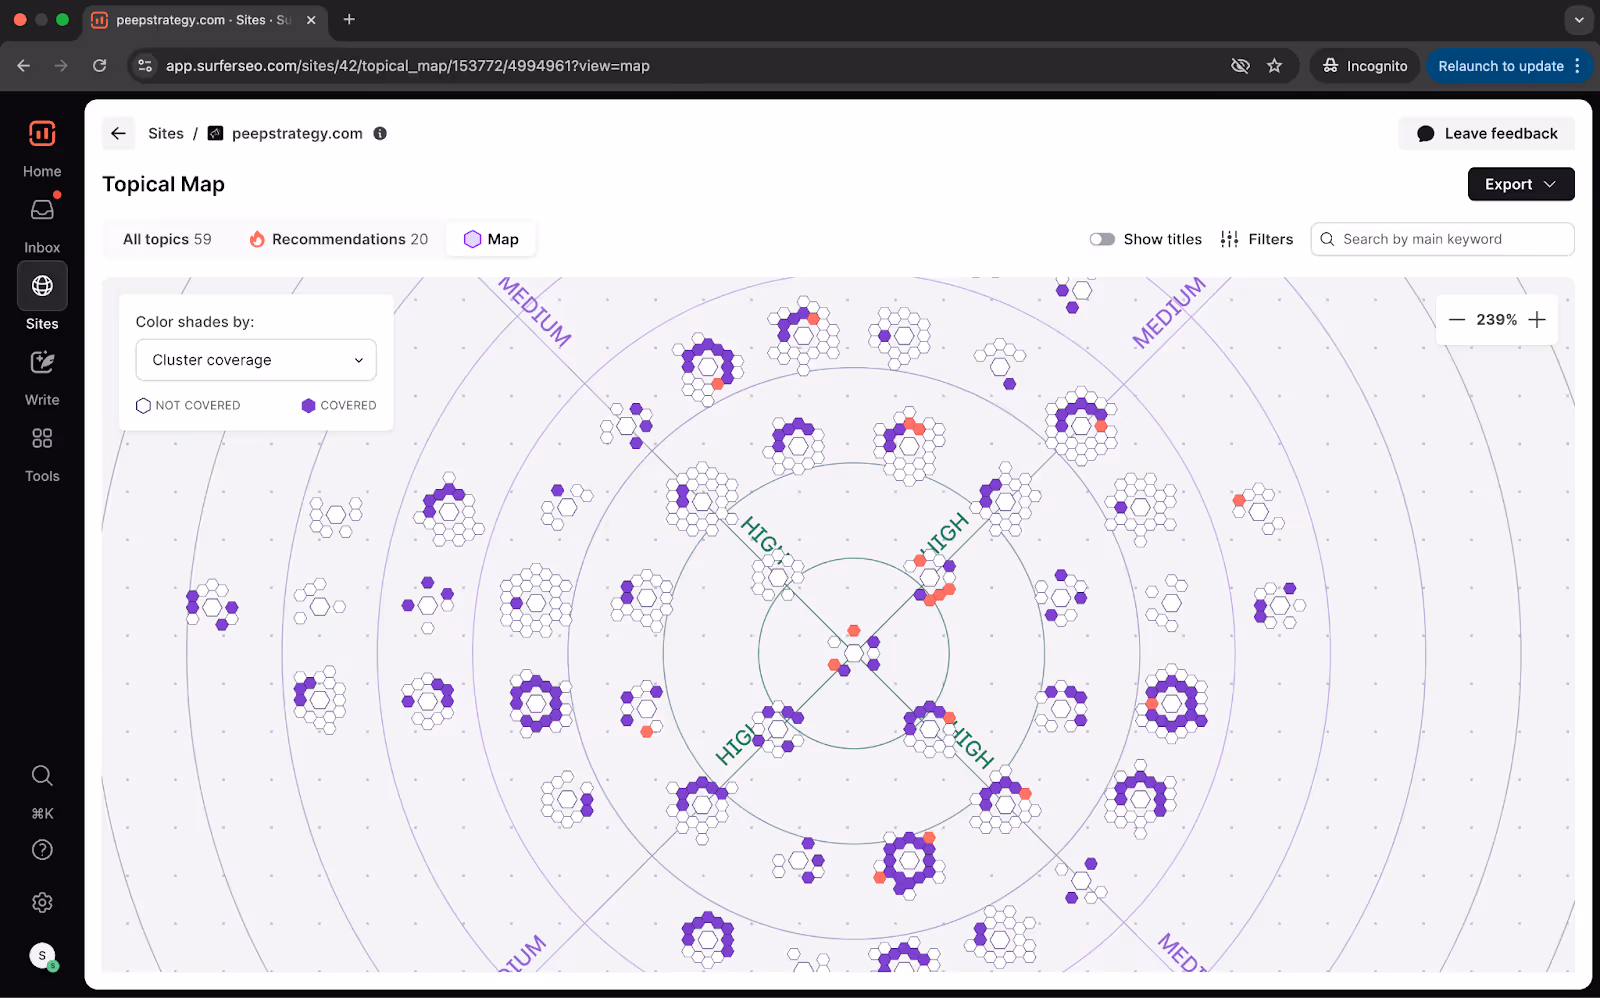
The large hexagon represents a content hub and is made up of smaller hexagons that are topics within the hub.
You’ll quickly see which clusters are covered and which still offer room for growth, with color shading indicating both topical difficulty and coverage status.
- Keyword difficulty is shown by a color gradient from white to purple, with purple being the hardest.
- Keyword clusters are shown with purple indicating coverage and white indicating a lack of coverage.
The red hexagons are recommended opportunities you should target first!
Pro tip: Use the filters to select a single competitor and view their topical coverage to reveal where they have weaknesses that you can exploit in your content strategy.
For users who want to go deeper, the Cannibalization Report highlights instances where multiple pages on your site may be competing for the same keyword. Consolidate or restructure your pages to avoid cannibalizing your rankings.
P.s > You can brainstorm new article ideas without connecting your GSC account to Surfer. While you won’t get live status indicators or performance tracking, Topical Map still offers valuable suggestions for new content and helps you expand into related clusters.
Track keywords with Rank Tracker
Rank Tracker gives you insights into how your target keywords are ranking, helping you track progress, spot trends, and stay ahead of the competition.
It highlights how your rankings are shifting day to day and provides competitive context, showing which players are gaining ground and which are losing visibility.
Getting started inside Rank Tracker is simple.
- Create a new project by clicking New Rank Tracker project
- Enter a project name and your URL
- Choose whether to track rankings for an entire domain or a specific URL.
- Enter the keywords you want to monitor.
- Select your target country and device type
For each keyword, you’ll see the current rank in Google’s search results.
You’ll also see whether your content is appearing in any SERP Features—such as featured snippets, knowledge panels, image packs, local packs, video carousels, or shopping results.
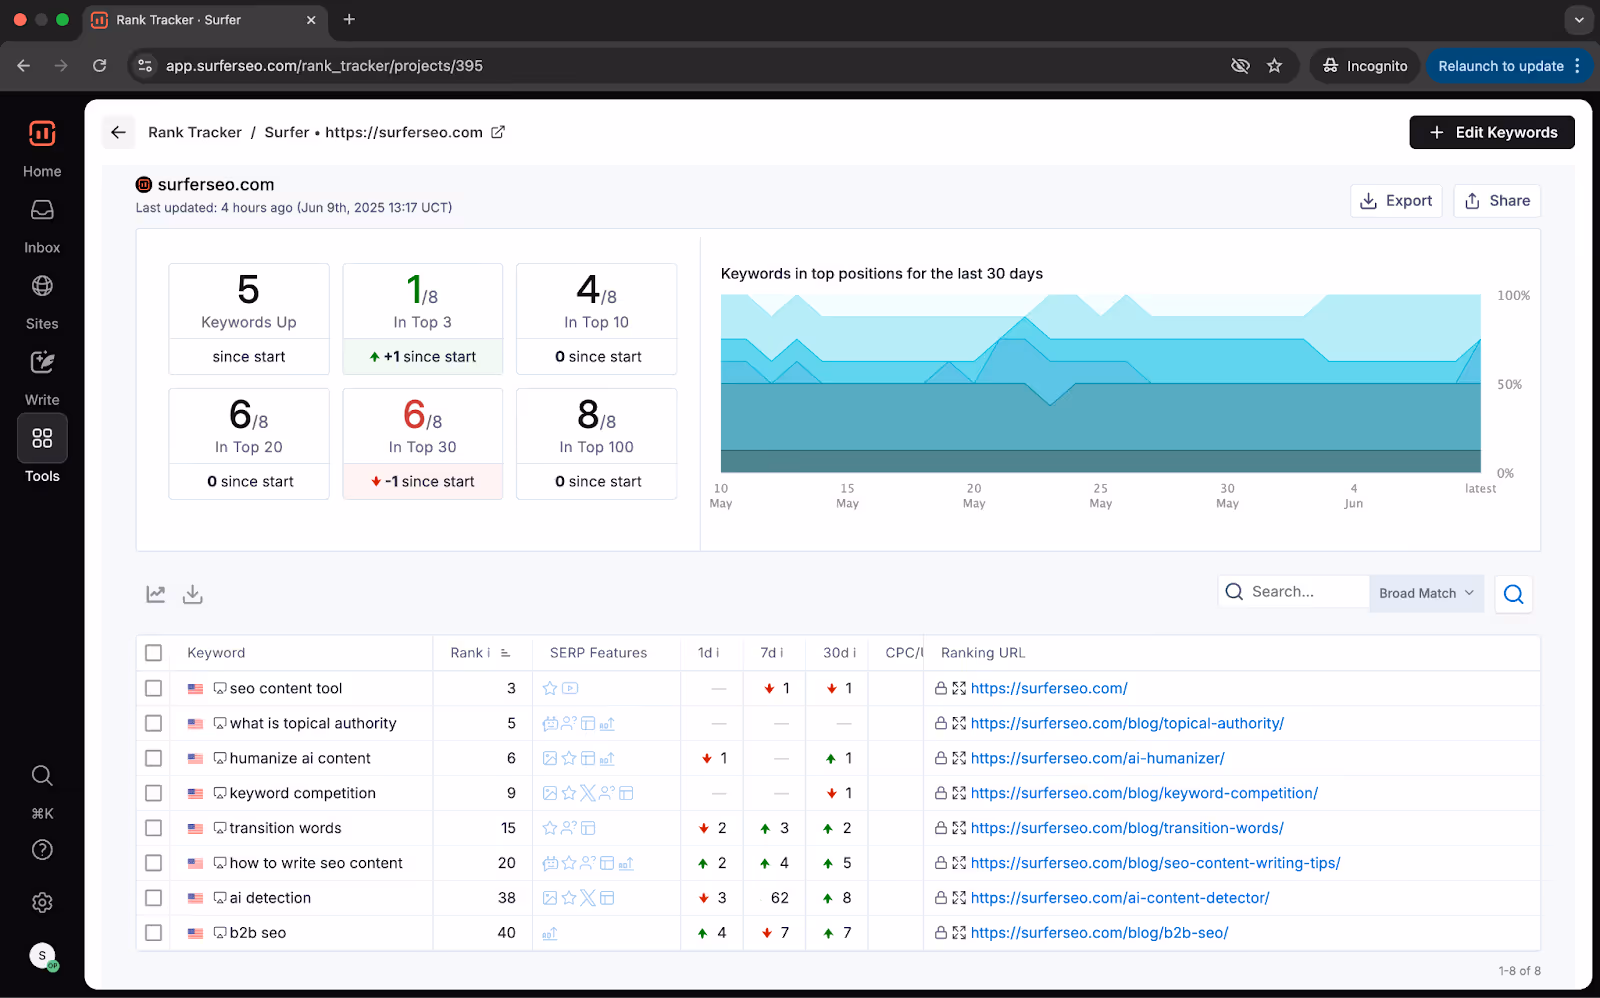
The dashboard also shows how your rankings have changed over time. You can track shifts over one day, seven days, thirty days, or since the keyword was first added.
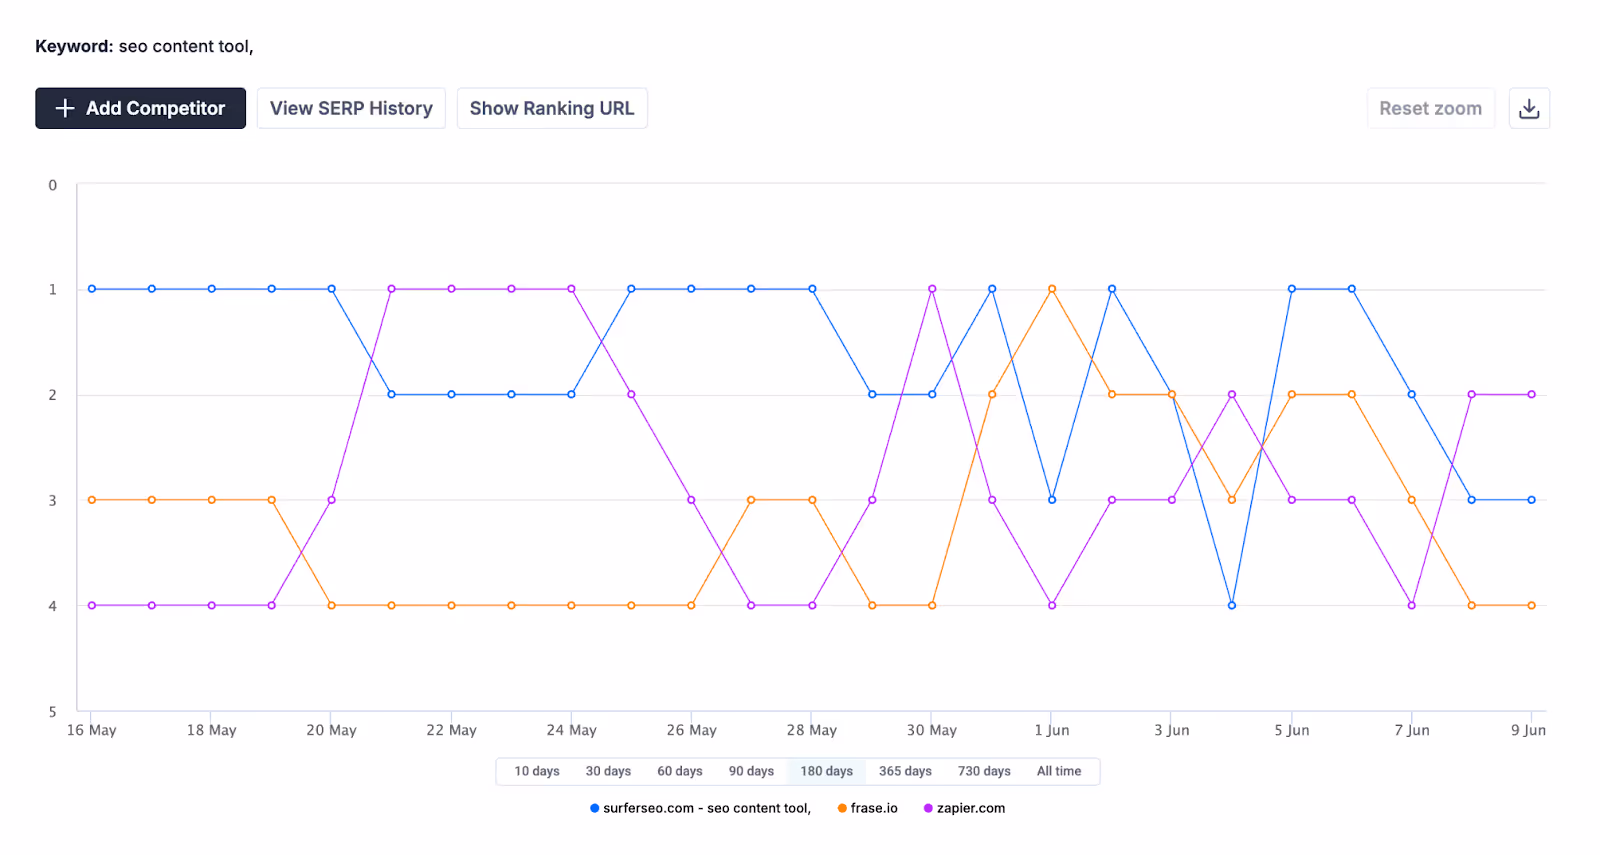
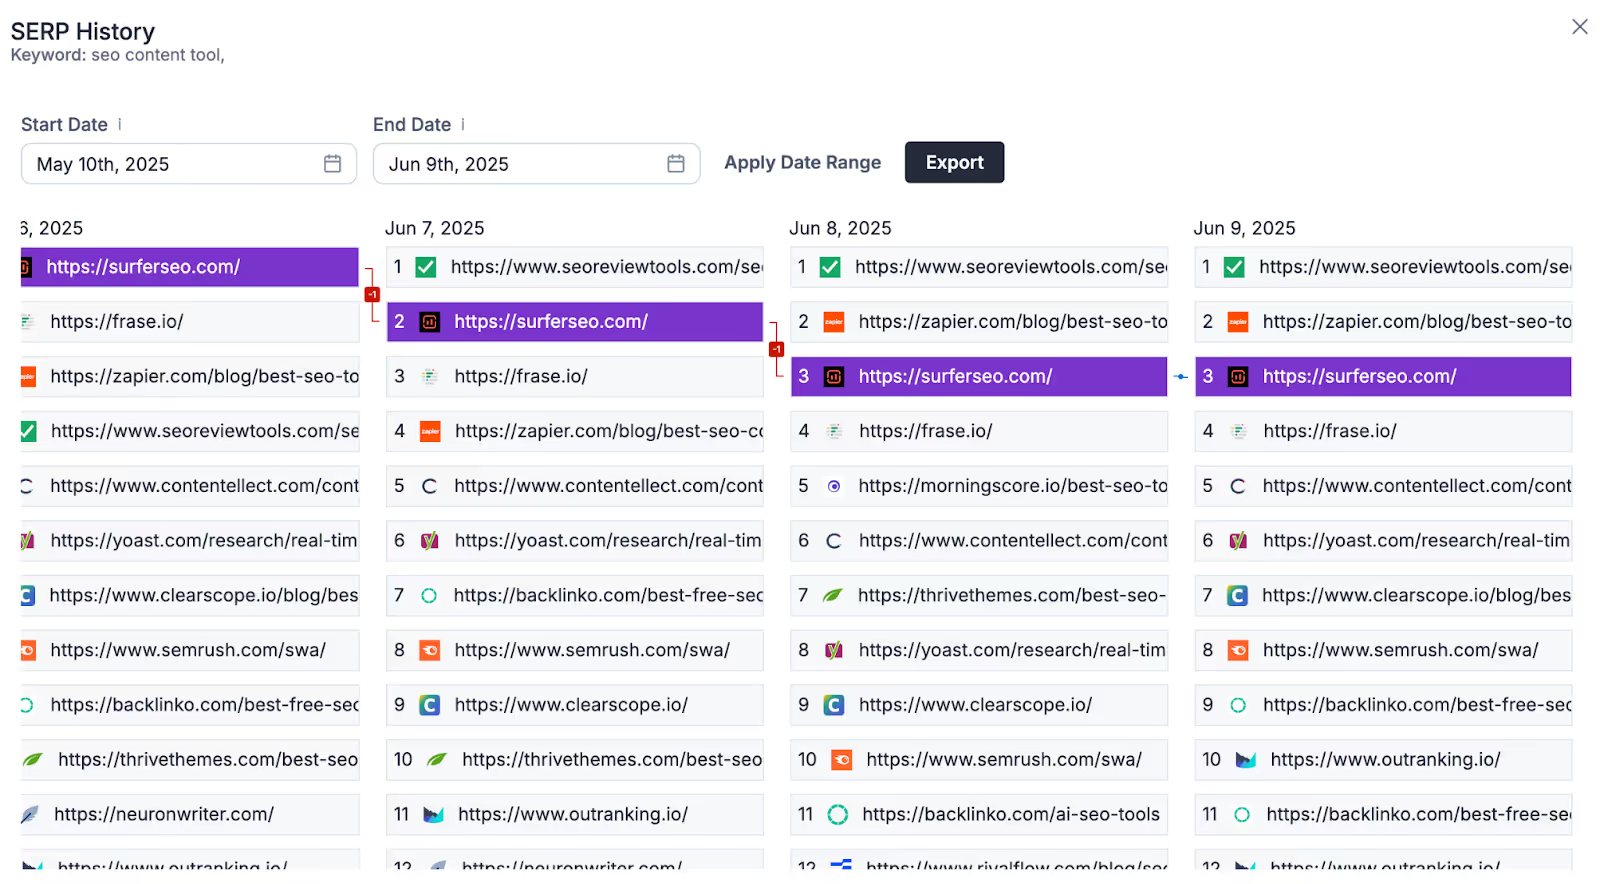
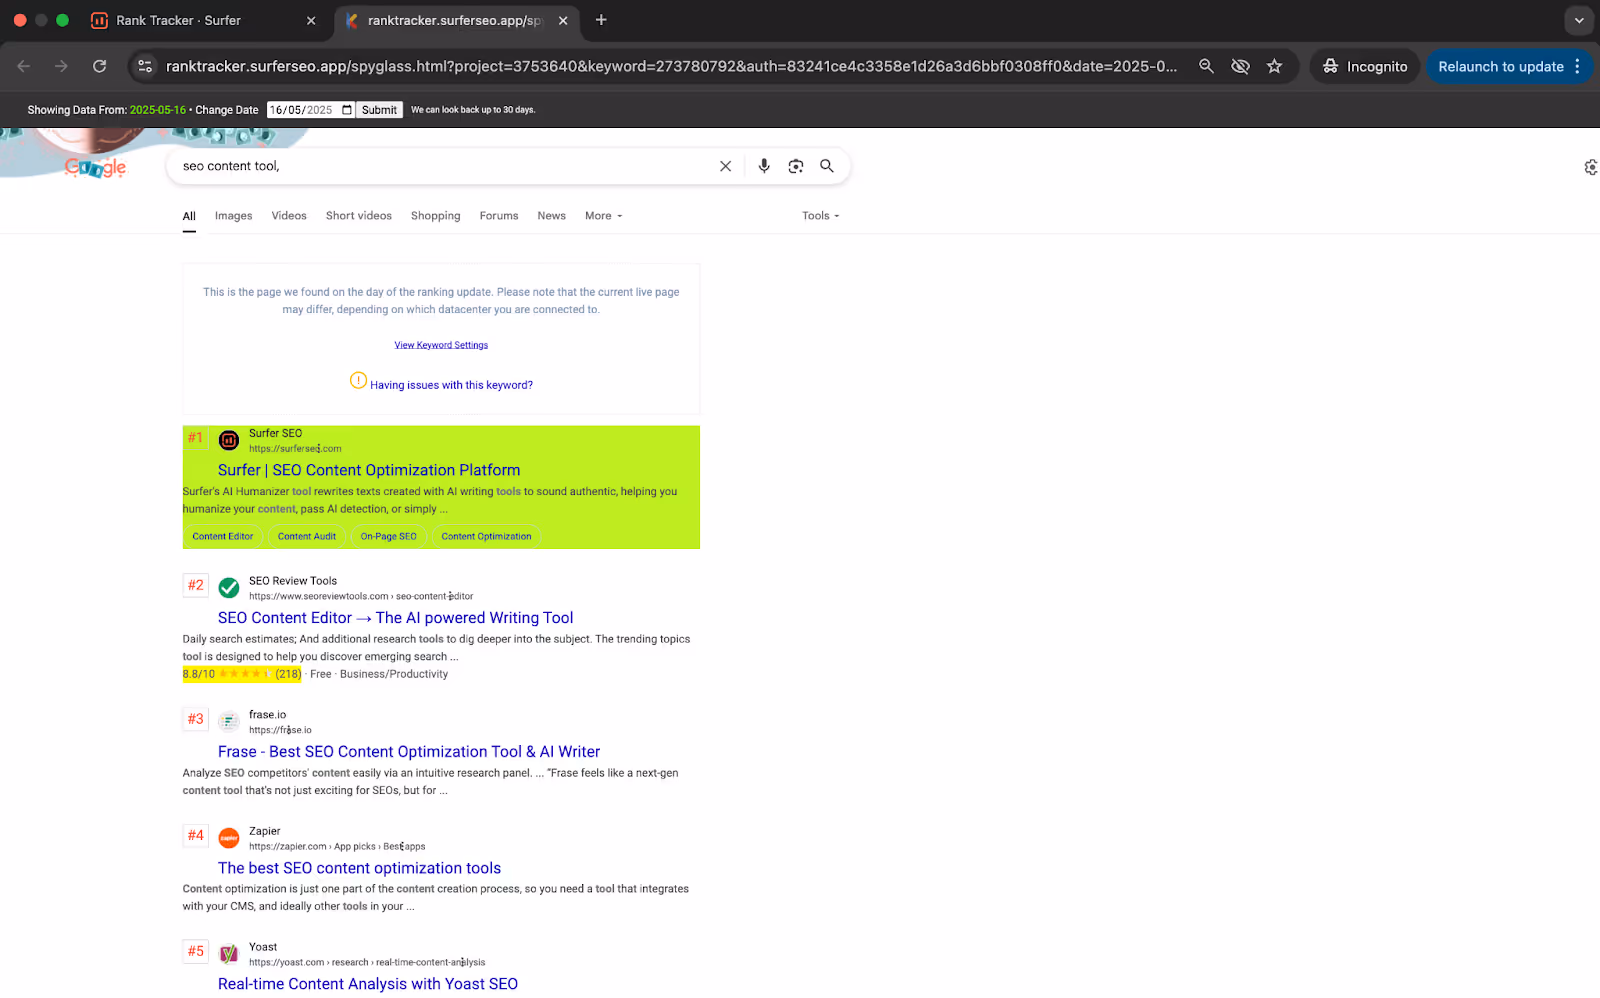
You can view individual keyword ranking history in 3 different charts.
- Historical ranking chart vs competitors
- SERP ranking history
- Historical screenshots of ranking URLs
Pro tip: Use historical ranking reports to examine drops in keyword rankings. Look for new pages that have climbed the rankings and analyze them.
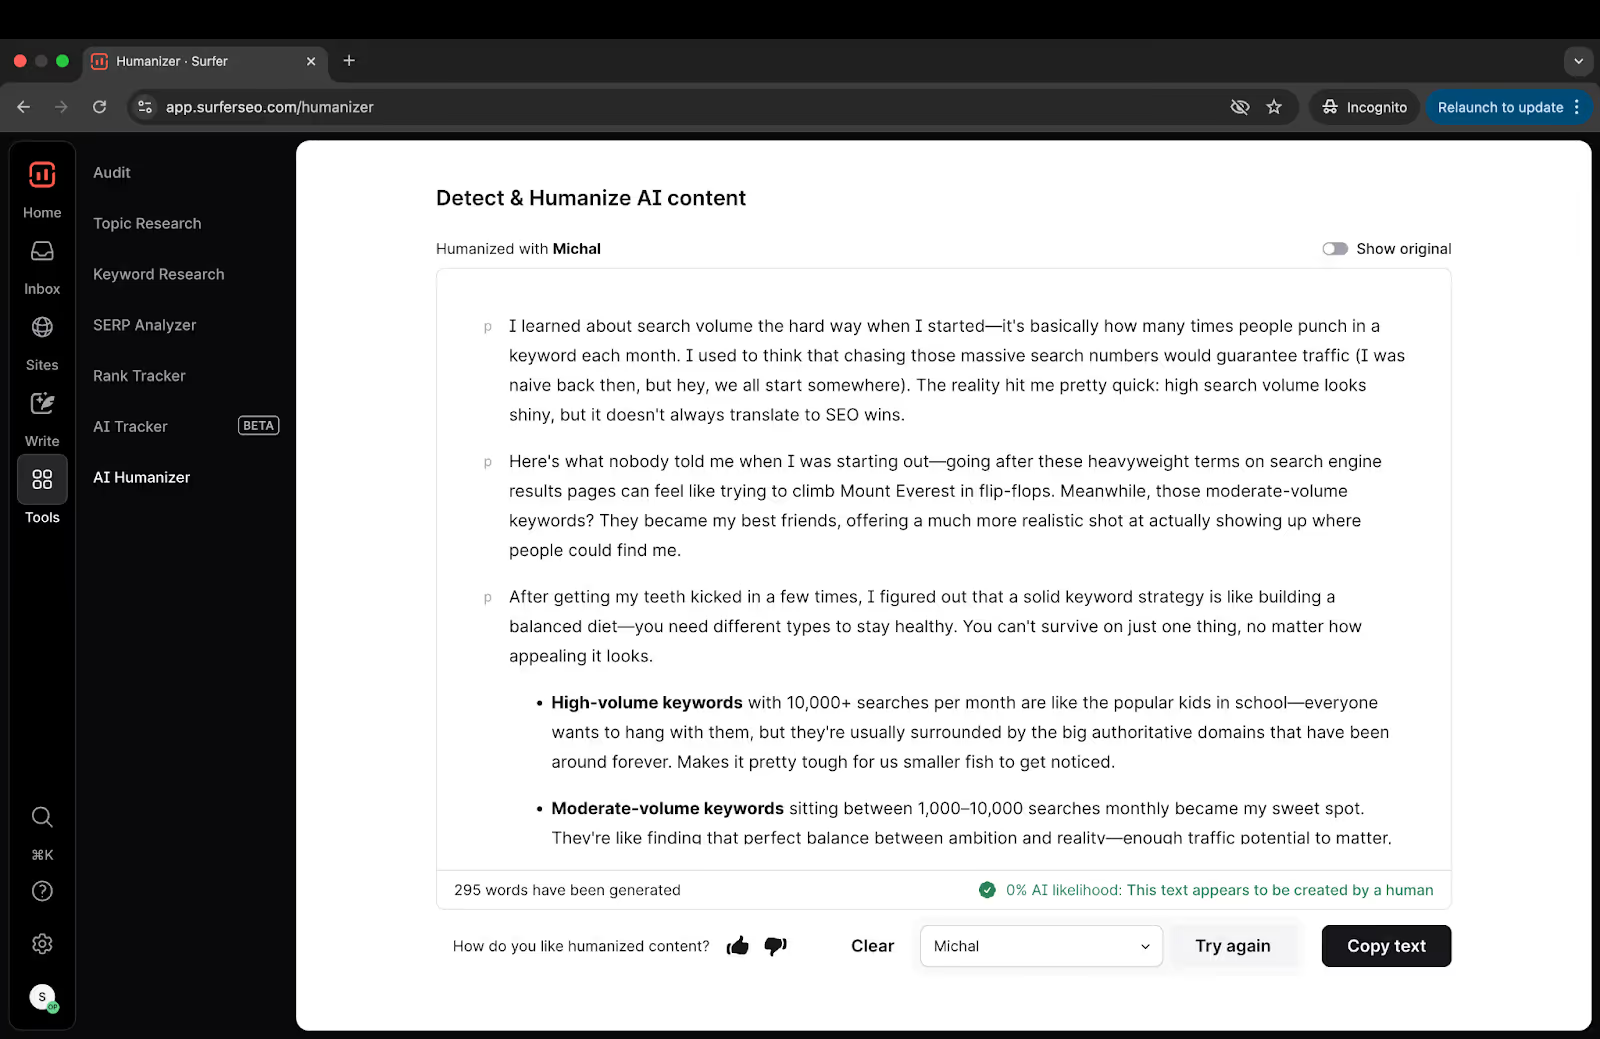
Detect and Humanize AI content
Humanizer transforms AI-written text into natural, human-sounding content without losing the original meaning, tone, or SEO value.
To get started,
- Paste your AI content into the text box
- Enable the details switch to see your AI and human % split
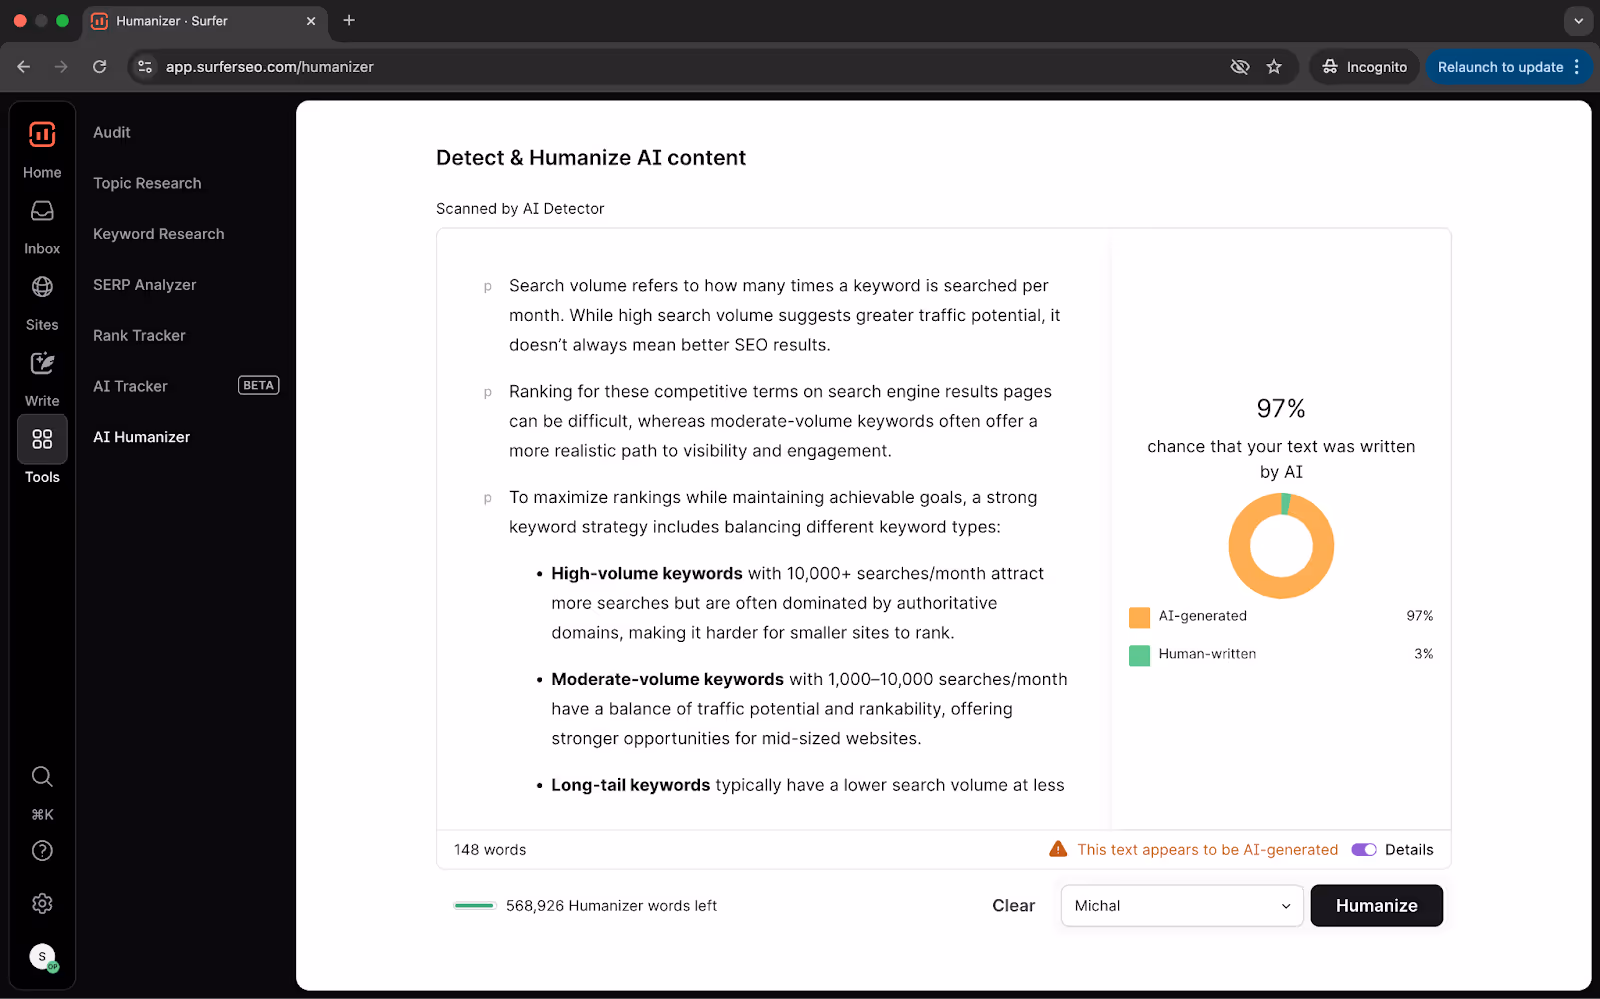
- Choose an inbuilt or custom voice and template, and click Humanize
Surfer will rewrite the text, making it sound more natural and human-like, ensuring it's prepared for publishing.
Tone of Voice [Automatic]
When you use the Automatic Tone of Voice setting, Humanizer will choose a neutral, broadly accessible style by default. It’s designed for mass appeal and consistency, which can be helpful when clarity and neutrality are priorities.
If your brand has a distinctive voice, you may want to explore Custom Voice instead to give your content more personality and identity.
Custom Voice
Custom Voice allows you to create a consistent, highly personalized writing style that mirrors the voice of your brand or an individual writer.
It captures nuances like word choice, phrasing, and stylistic quirks, so your content sounds unmistakably you.
Rather than using written instructions or style guidelines, enter well-crafted, human-written content that embodies the voice you’re aiming for.
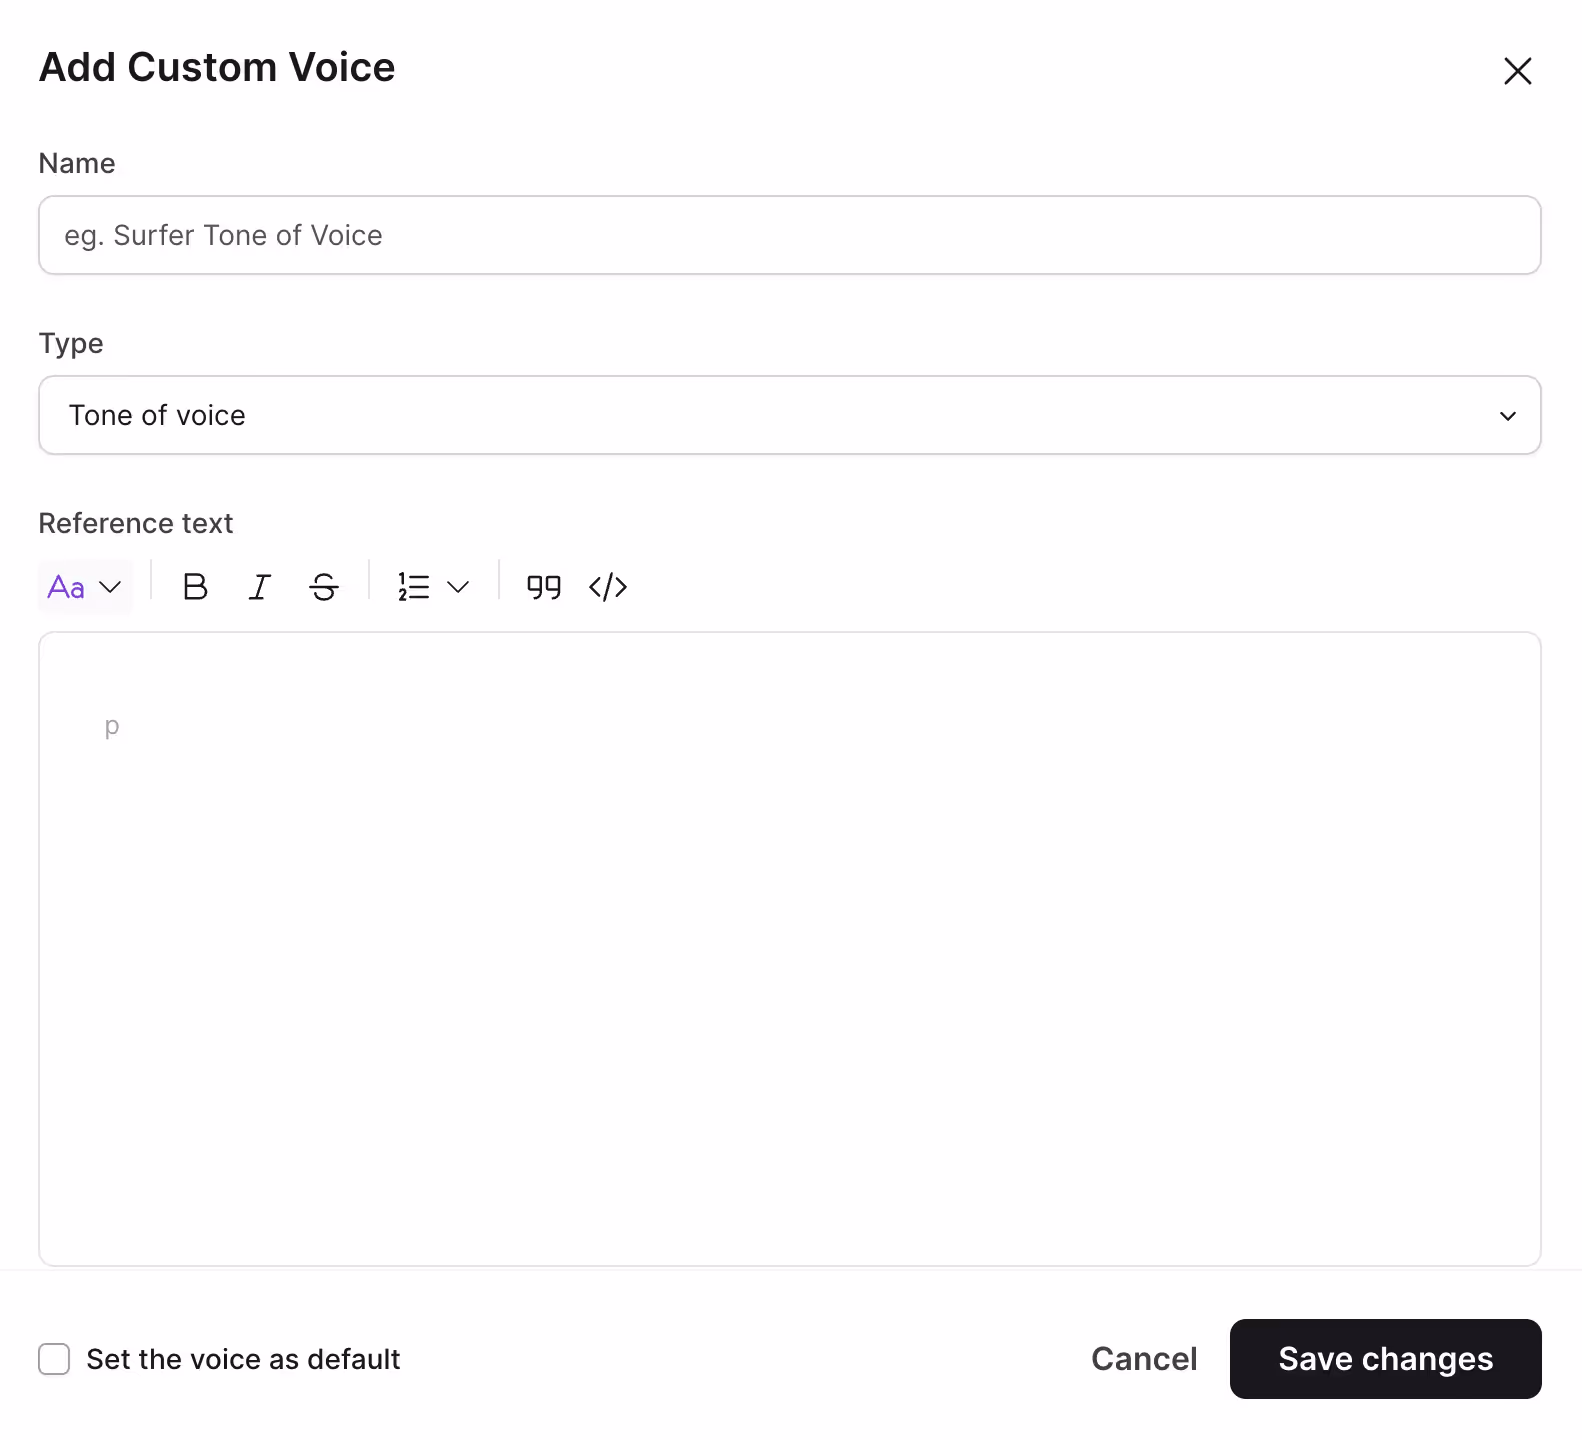
The richer and more distinctive the sample, the better Humanizer can model it.
Steer clear of using AI-generated text or vague style guidelines.
Mixing prompts like “write in a formal tone” with actual text examples will confuse the model and diminish the quality of the output. The best results come from giving Humanizer real, vibrant writing to learn from.
We recommend using a reference text of at least 200 words to give the model enough material to understand your desired style.
Templates
Templates provide a structural blueprint for how your content should be organized and presented. Using templates ensures your content mirrors the phrasing, style, format, and flow of reference material, perfectly aligning with the desired tone and layout.
Pro tip: You can also use Humanizer and AI Detector inside ChatGPT by using the Keyword Surfer Chrome extension. It’s a seamless way to humanize content as you work within ChatGPT.
Monitor LLM mentions with AI Tracker
Surfer’s AI Tracker helps your brand monitor how it appears across AI-driven search results and conversational queries inside large language models (LLMs), such as ChatGPT.
You’ll find several metrics inside the AI tracker.
- Average presence reflects how frequently your brand is featured
- Average visibility refers to how prominently these mentions appear.
- Average position offers helpful details about the performance of AI-generated content.
- Top sources reveal where the AI is drawing its information, which can inform content strategies.
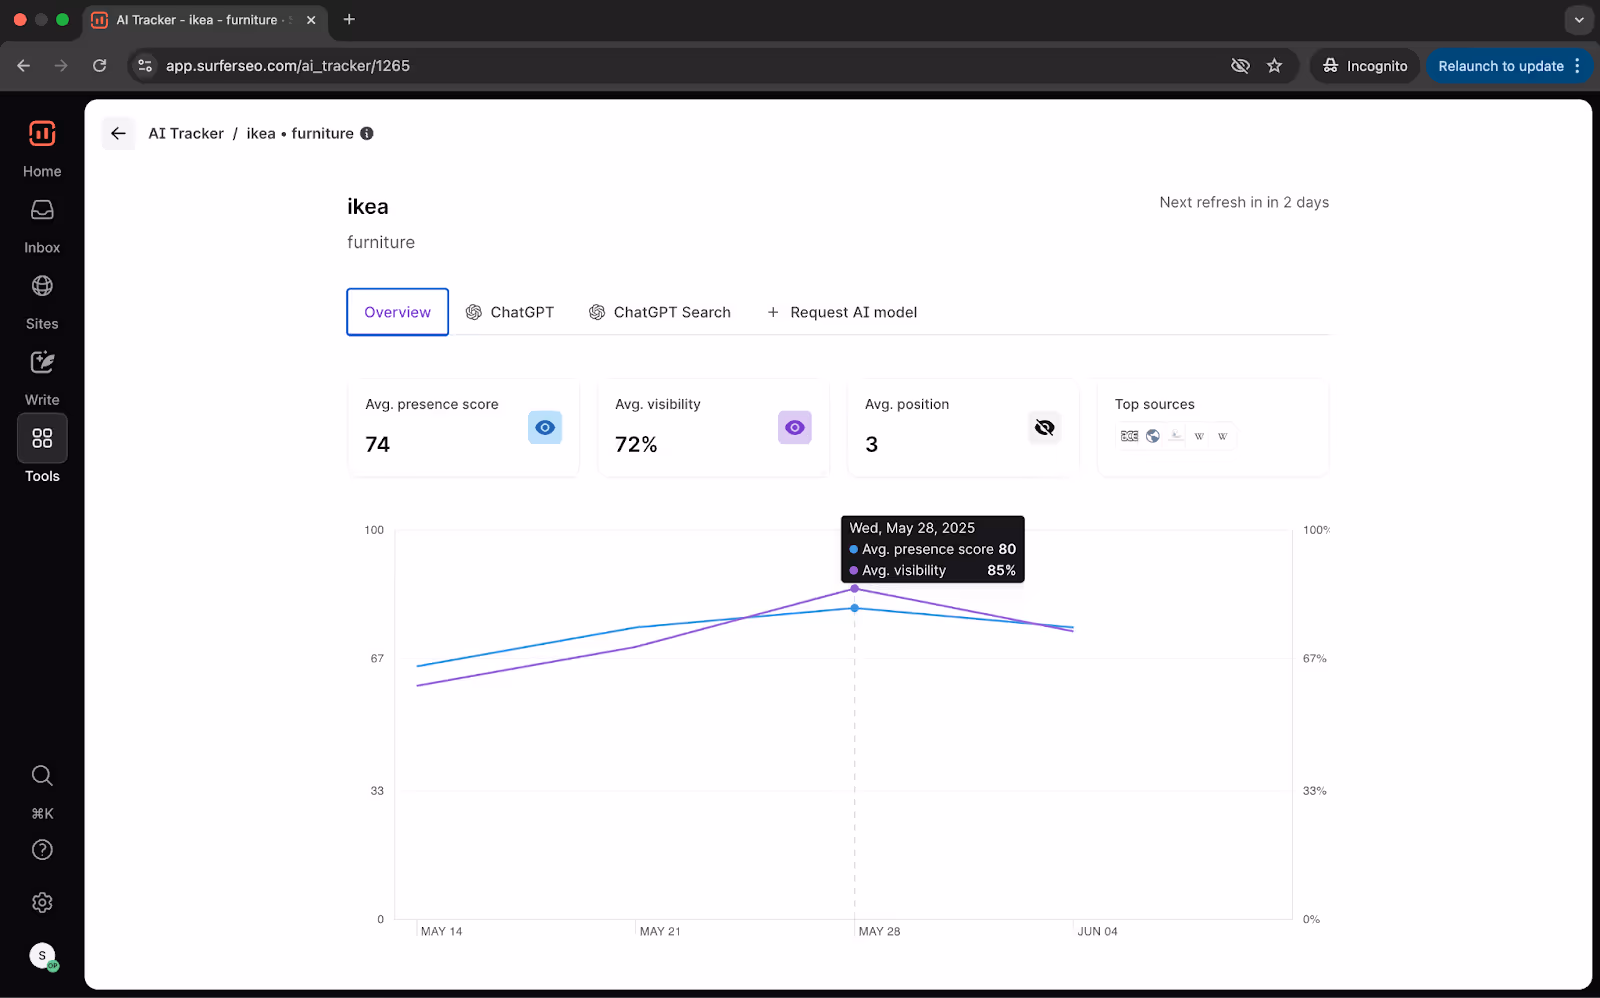
Tracking this data over time can help you identify content gaps and better optimize your AI search presence.
AI tracker analyzes your presence for your main topic, offering exact visibility into how often and where the brand is mentioned when users ask AI tools key questions.
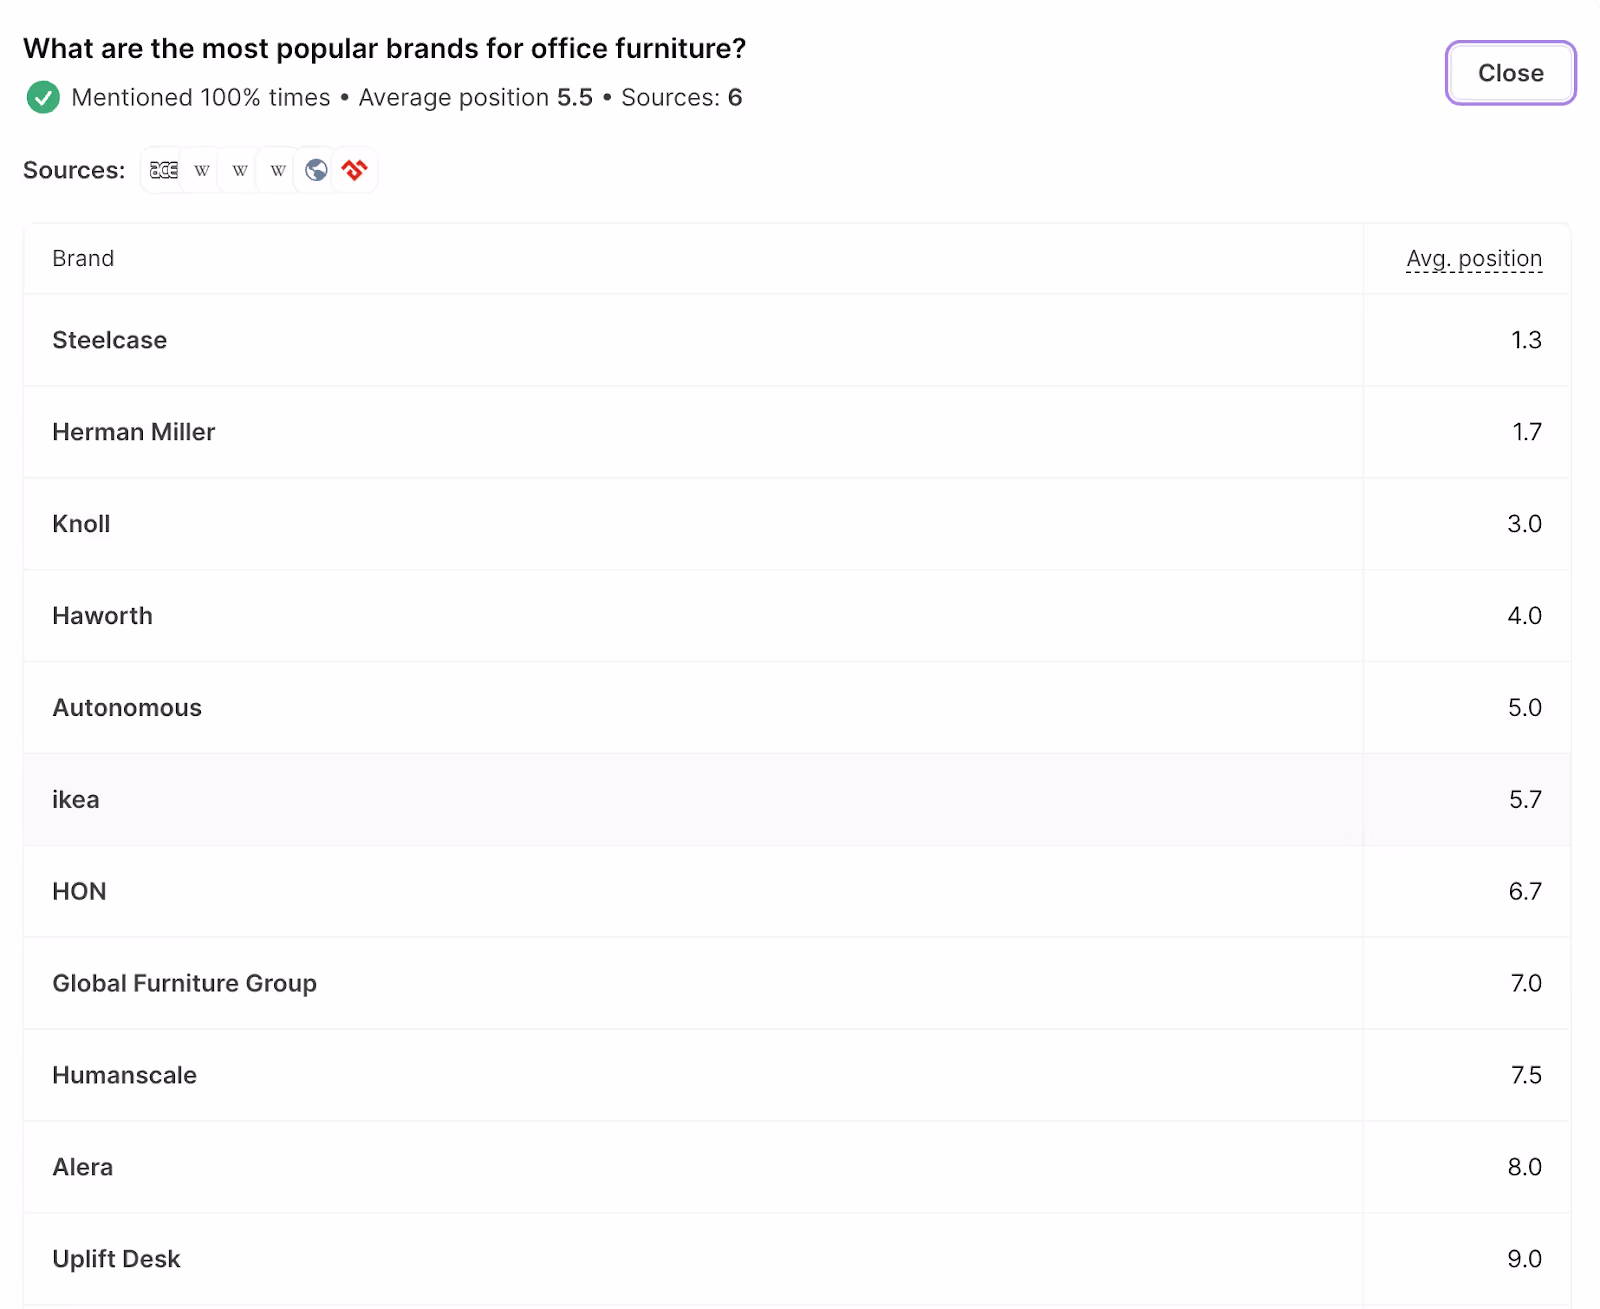
The ChatGPT Search view shows both overall and prompt-level performance. You can see how often your pages are suggested as sources, how they rank, and how they are shown in answers.
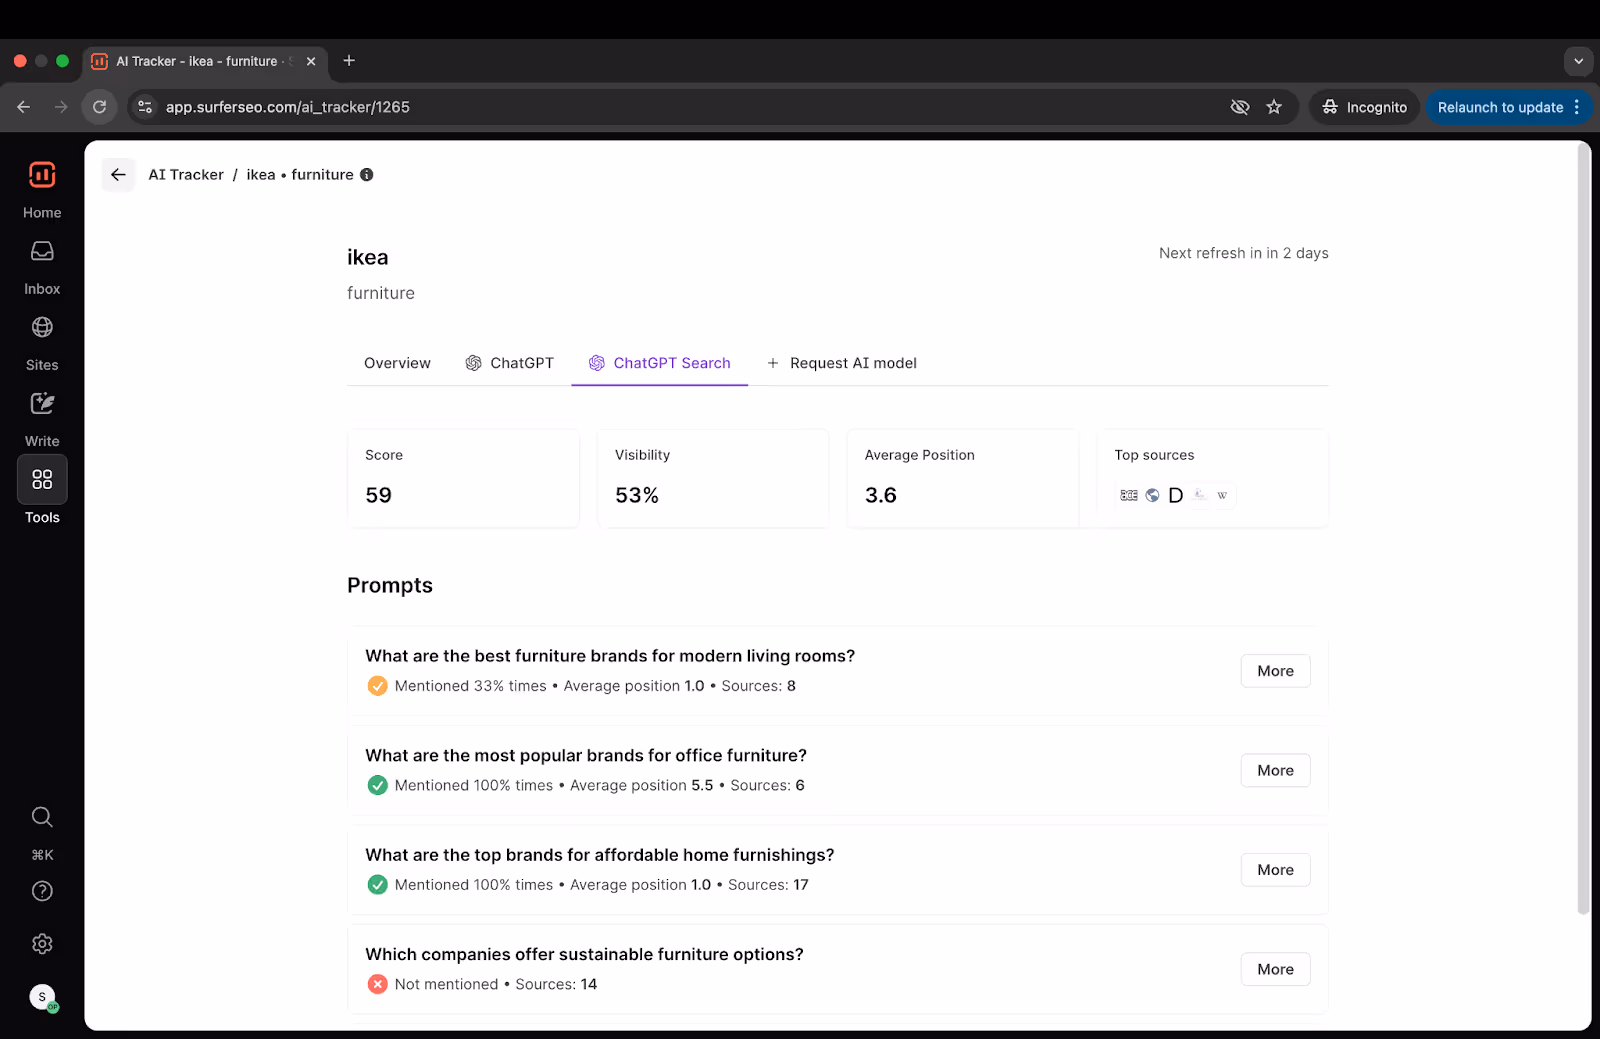
Click on an AI query to see more details on where your brand ranks.
Creating content that ranks is a deliberate process. It’s researched, optimized, and structured for both people and algorithms.
Whether that’s in traditional search like Google or emerging information generators like ChatGPT.
That’s why Surfer exists.
We give you a simple interface backed by serious data. You don’t need a PhD in SEO. You just need to follow the workflow and let Surfer handle the rest.
Scale your brand’s visibility with Surfer today.