The content creation process doesn’t end with the last comma you put into the content editor.
As the old saying goes, a blog post is never done. After you publish it on your site, you still have some optimization to do. It’s the only way to make all your hard work matter and not let your post sink in the vast depths of the SERPs.
And if you really want to squeeze the best results out of your blog post and make the best out of your SEO efforts, you shouldn’t stop with one optimization attempt. It’s best to come back to your post regularly and make sure it’s still performing well.
In this article, I’ll give you a ready-to-steal method of optimizing your post after you hit “publish”—right away, after one month, and after three months—with a little help from Google tools and Surfer content intelligence.
Read on!
Right after publication: indexation, internal links, content length
Early days after publishing an article are super important. You have to make a good first impression on Google algorithms and ensure your article gets crawled.
I’ll go through three optimization steps you can take right after you click the “publish” button:
- Making sure your article is indexed;
- Improving your internal linking structure;
- Reviewing your content length.
Let’s roll!
Request indexation in Google Search Console
Usually, Google will index your article without the request. But if you want to get indexed as early as possible (and start getting your money’s worth from day one), give Google a nudge in the right direction.
Plus, if you don’t have great domain authority, Google bots might look past you. It’s better to let them know you’ve just published a great piece of content.
Log in to your Google Search Console and paste the URL in the top bar.

If you do this soon after publishing, the page will most likely not be indexed. Confirm that you’ve provided a new URL, and request indexing.
It will take a while until you’re indexed, depending on how much authority your domain has.
To check if your page is indexed later, open Google and search site:your.new.article.url.
Check & add internal links with Surfer Audit
Internal links are the best way to make your site attractive to Google bots. They also help you pass and get the link juice and increase your site’s quality, visibility, and strength.
But which internal links should you include on your new page? You don’t have to wonder nor guess. Surfer’s SEO Audit will provide you with a ready list of your best internal linking opportunities.
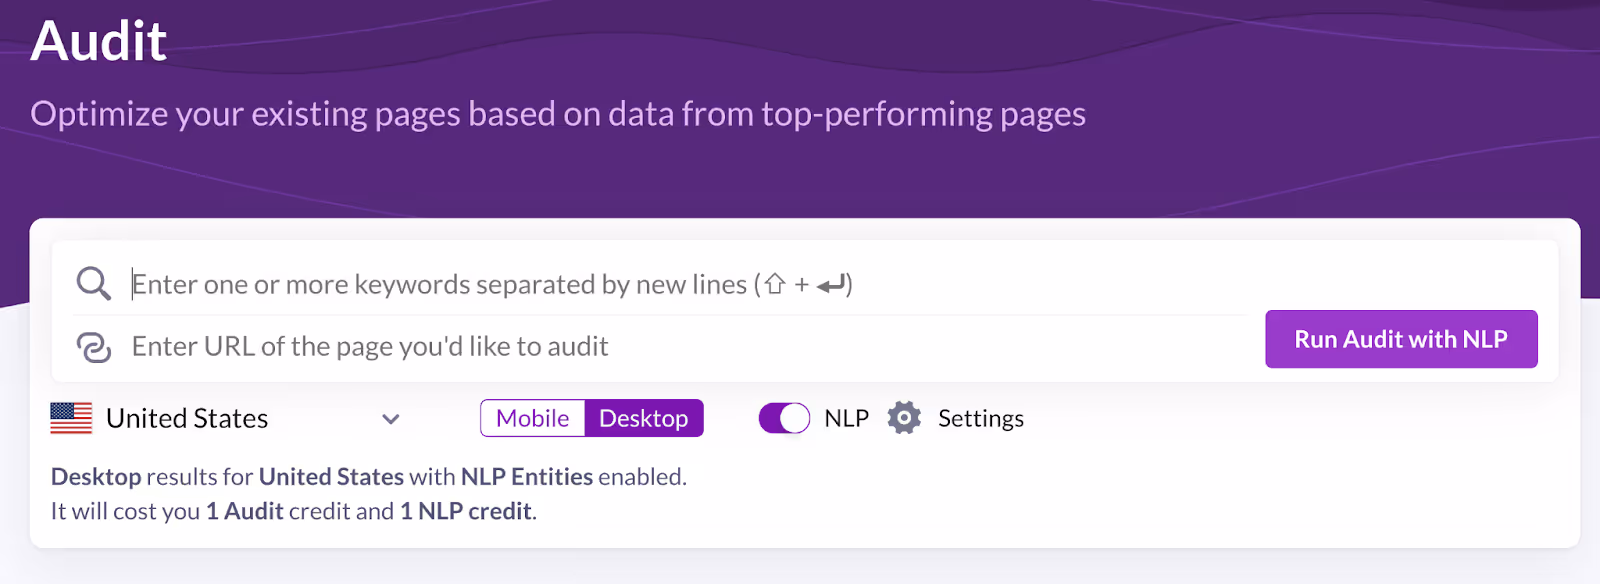
All you have to do is open the Surfer app and choose “Audit” from the main nav bar.
Then, type in your article’s URL and focus keyword, and click “Run Audit with NLP.”
When you open the ready audit, scroll down a bit and check out the details for the Internal Links section.
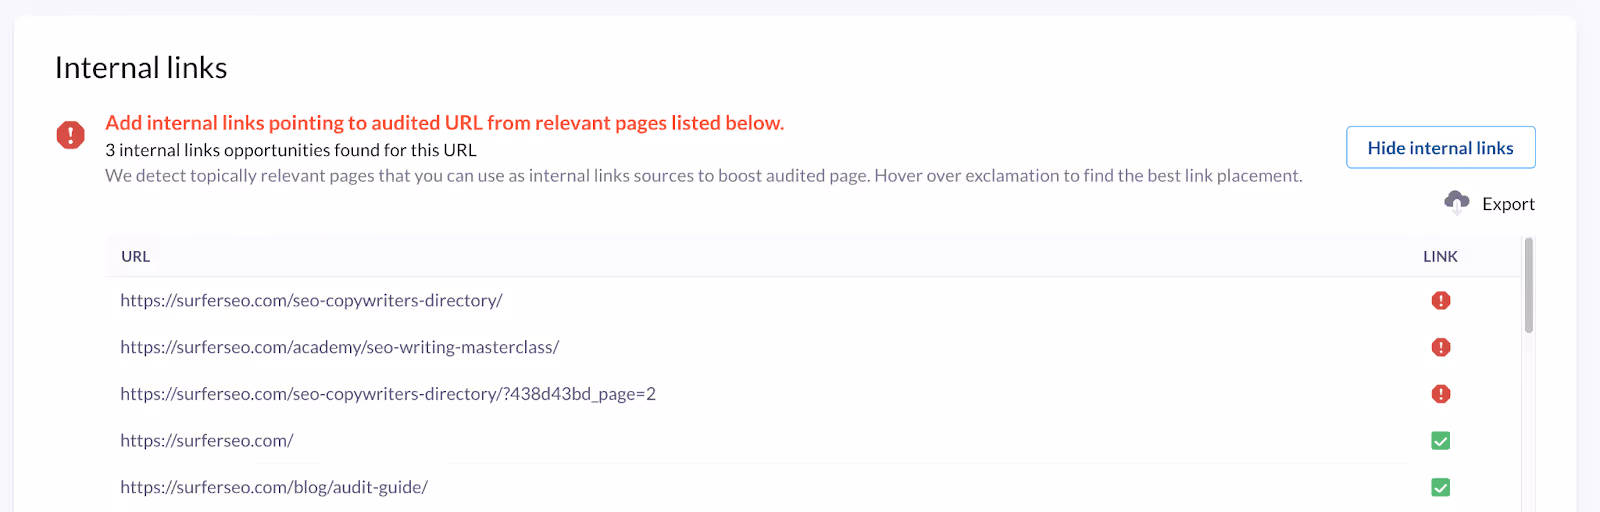
You will see a complete list of ALL the internal links your content should include for the best SEO and user experience, along with the information if you already have them on your page or not.
Always start optimizing your links from the top of the list down. If you’re missing a lot of links and don’t have time to fix them all right away, start with the top 10. Since the link opportunities are ordered by relevance, covering the top 10 will already help your page a lot.
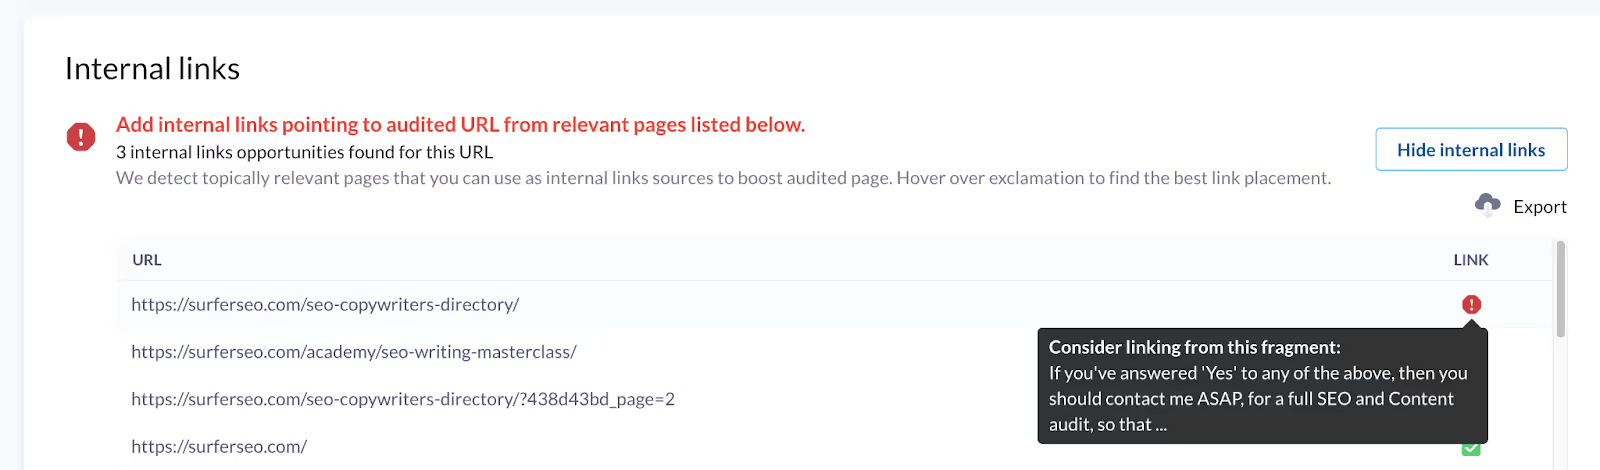
Now, it’s time to choose the right spot for your internal links. Hover over the red exclamation points—you will see the suggested placement for each link. All you have to do is choose the exact word or phrase to turn into an anchor.
How to find the right anchor text for internal links
Before I tell you the details, here’s a golden internal linking rule you should never forget.
Here goes:
Okay, so where do you find the best ideas for anchor texts?
If you used Keyword Research Tool to create the page, choose one of the keywords present in your cluster—as simple as that. In most cases, your clusters will consist of at least ten keywords.
When you later link this page across your domain, use your anchor keywords and texts alternately to help your site rank for all of them.
But what if your article is optimized for only one keyword? Don’t worry, you can still find ways to diversify.
Run your main keyword through SERP analyzer. NLP is not needed here, so don’t waste these precious credits.
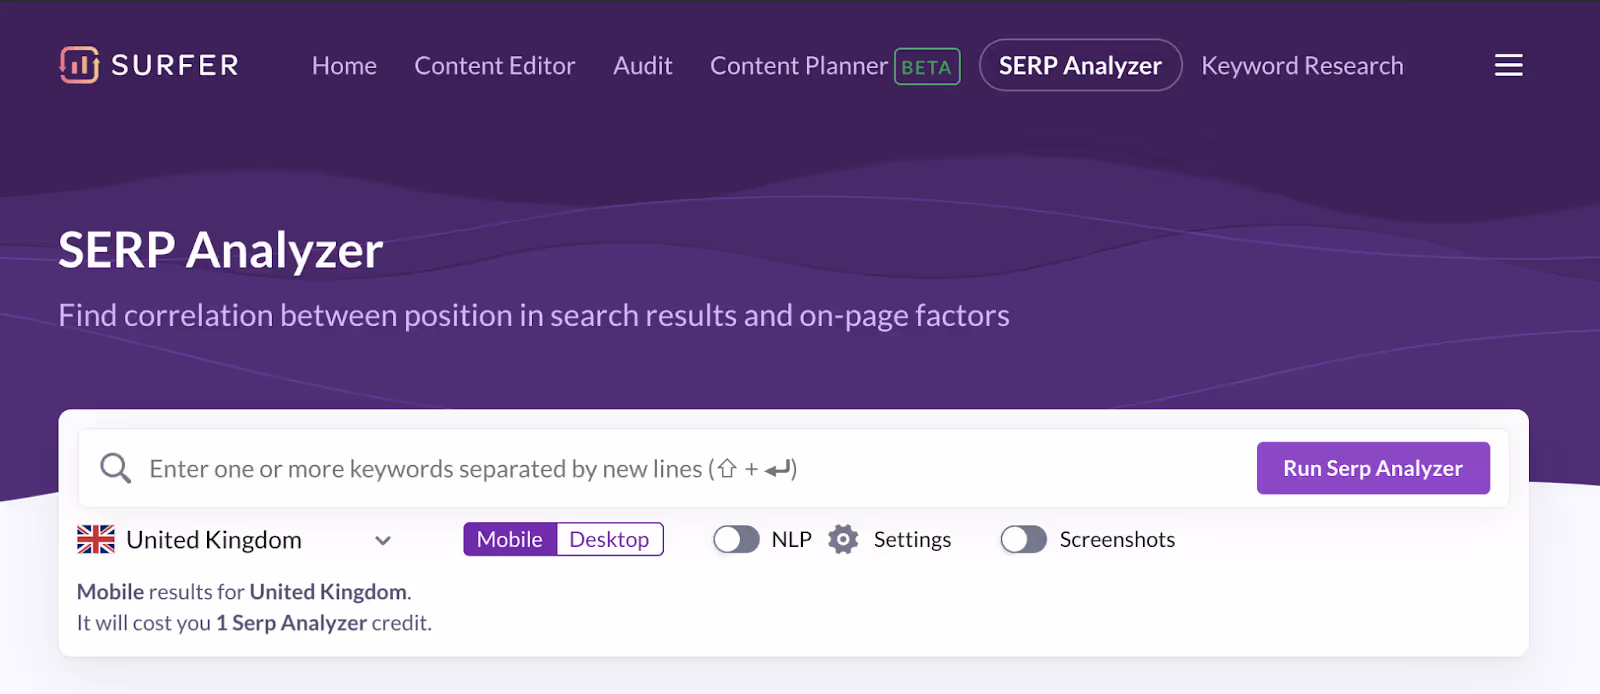
As your analysis is ready, scroll down a little and open the Keywords tab.
The top 10 search keywords on the list are your best anchor opportunities.
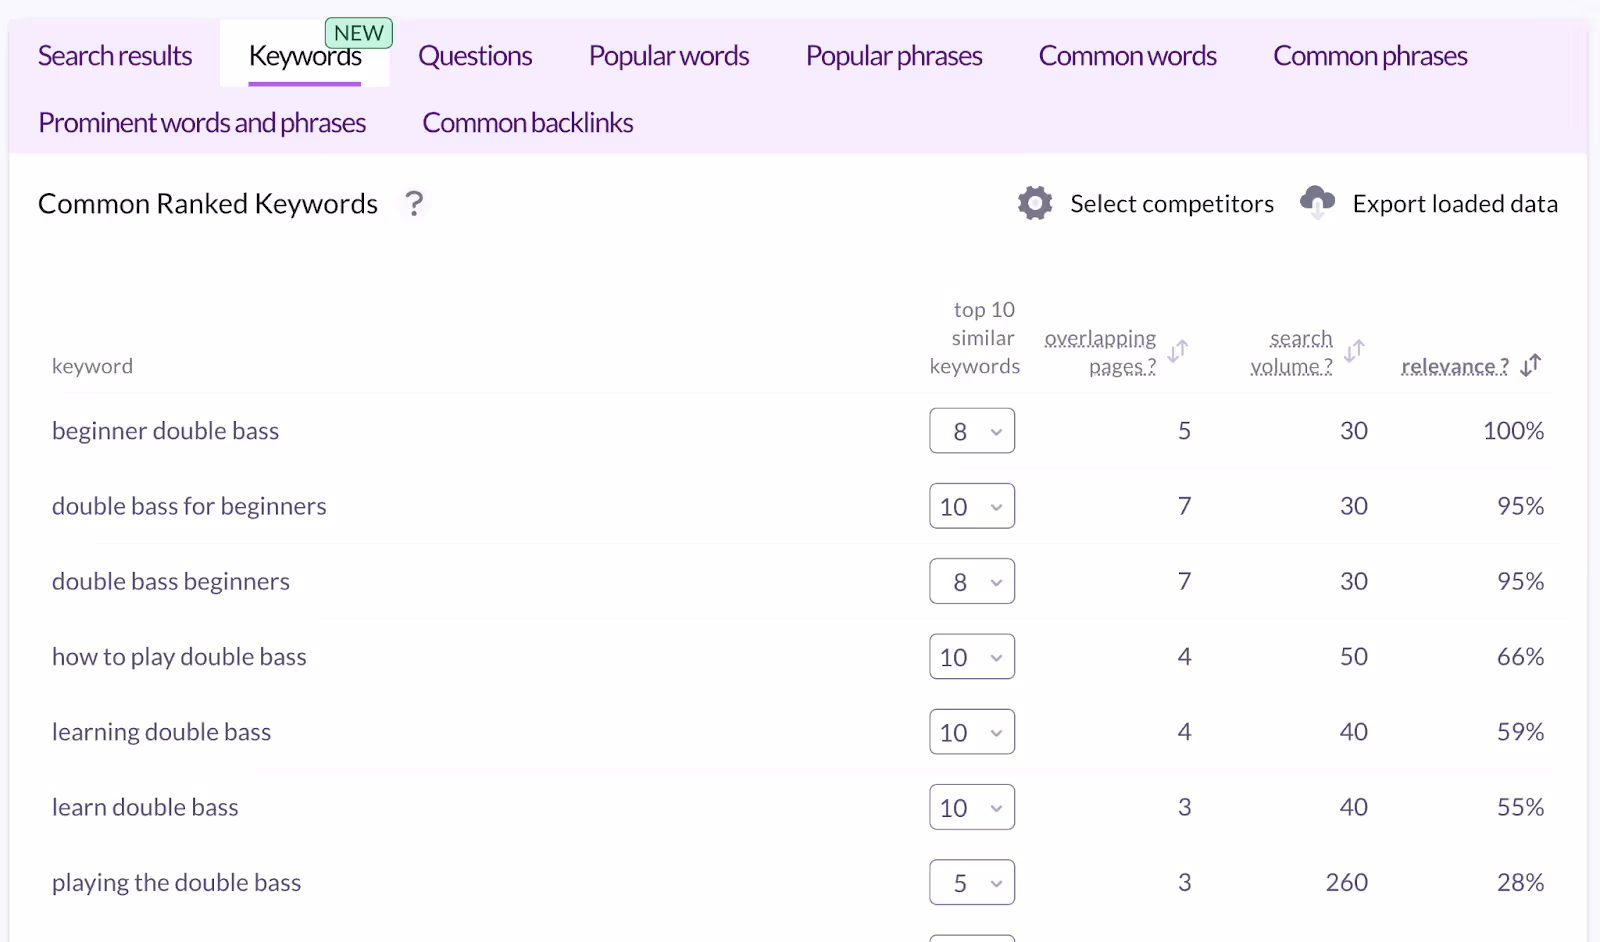
It’s best if you sort them by relevance and focus on keywords with the highest percentage—the higher the relevance to your main keyword, the more likely your page will rank for this keyword as well.
Check your content length in Audit
“Do I still have to do it even if I used Content Editor and hit the nail on the head?” you might ask.
Yes. And here’s why:
What does it mean? In many cases, the article is surrounded by some extra elements like sidebars, banners, or pop-ups. All these things are still regarded as content and Google bots register them.
So, the Audit is a great way to see if your content really is as optimized as you thought—and if it’s ready to make the rounds.
Open the Audit once again and scroll down to the Word Count section. Re-check if your article still has the right length—or if it’s become too long because of extra elements in your template.
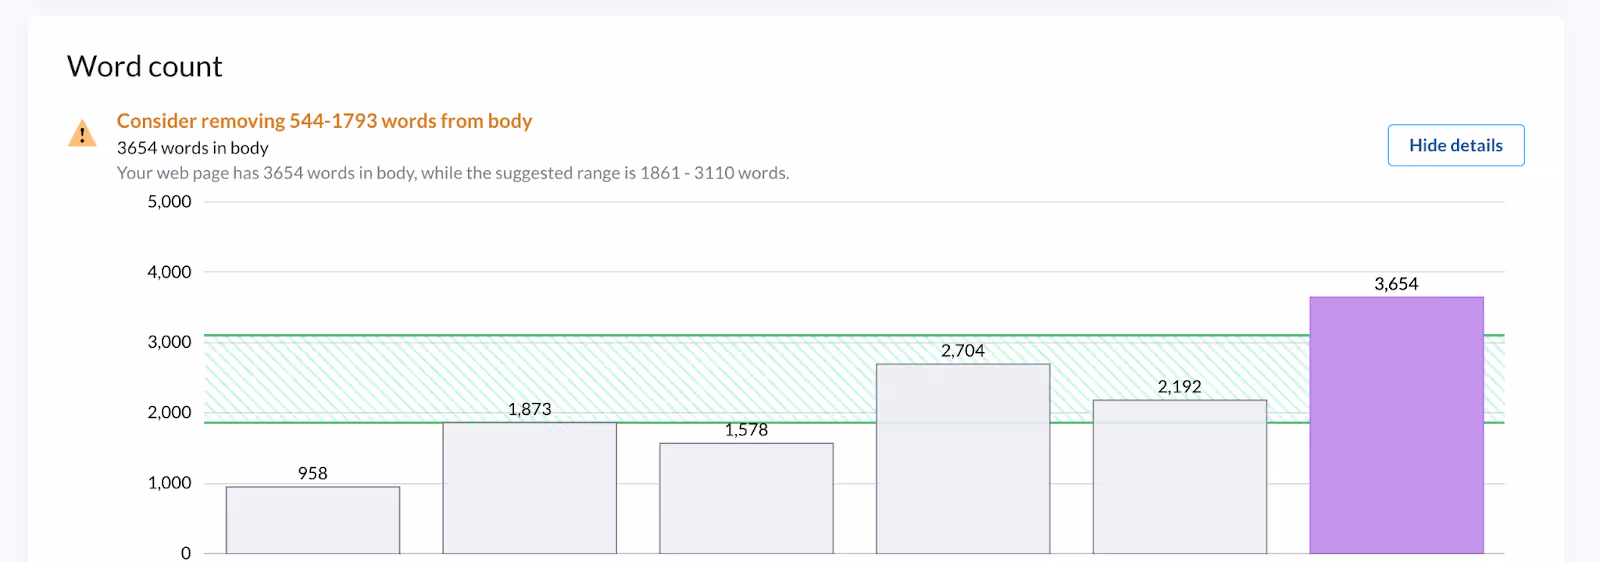
If that’s your case—find out where this extra content is and try to get rid of it.
Sure, you cannot get rid of all your ads and CTAs—but if your word count number jumped up significantly in comparison to Content Editor, it means you probably have too much irrelevant content on your page.
If your page contains too many extra words on topics that aren’t strictly connected to your article, you risk that your page’s main message will be diluted, and Google will not deem it topically relevant—which will harm your rankings.
See also: How to use content editor?
One month after publication: visibility & topical relevance checks
One month after is an excellent moment to check on your new page. It’s already had some time to settle in, get crawled by Google, and rank for a few keywords. Now, it’s time to make it rank better.
Here’s what we’re going to do:
- Check Google Search Console to find the Search Terms you rank for;
- Run an Audit to review the state of your topical coverage.
Let’s go!
Review keywords you rank for in Google Search Console.
Click through the following.
Performance → Search Results → Page (click on the page you want to review)→ Query.
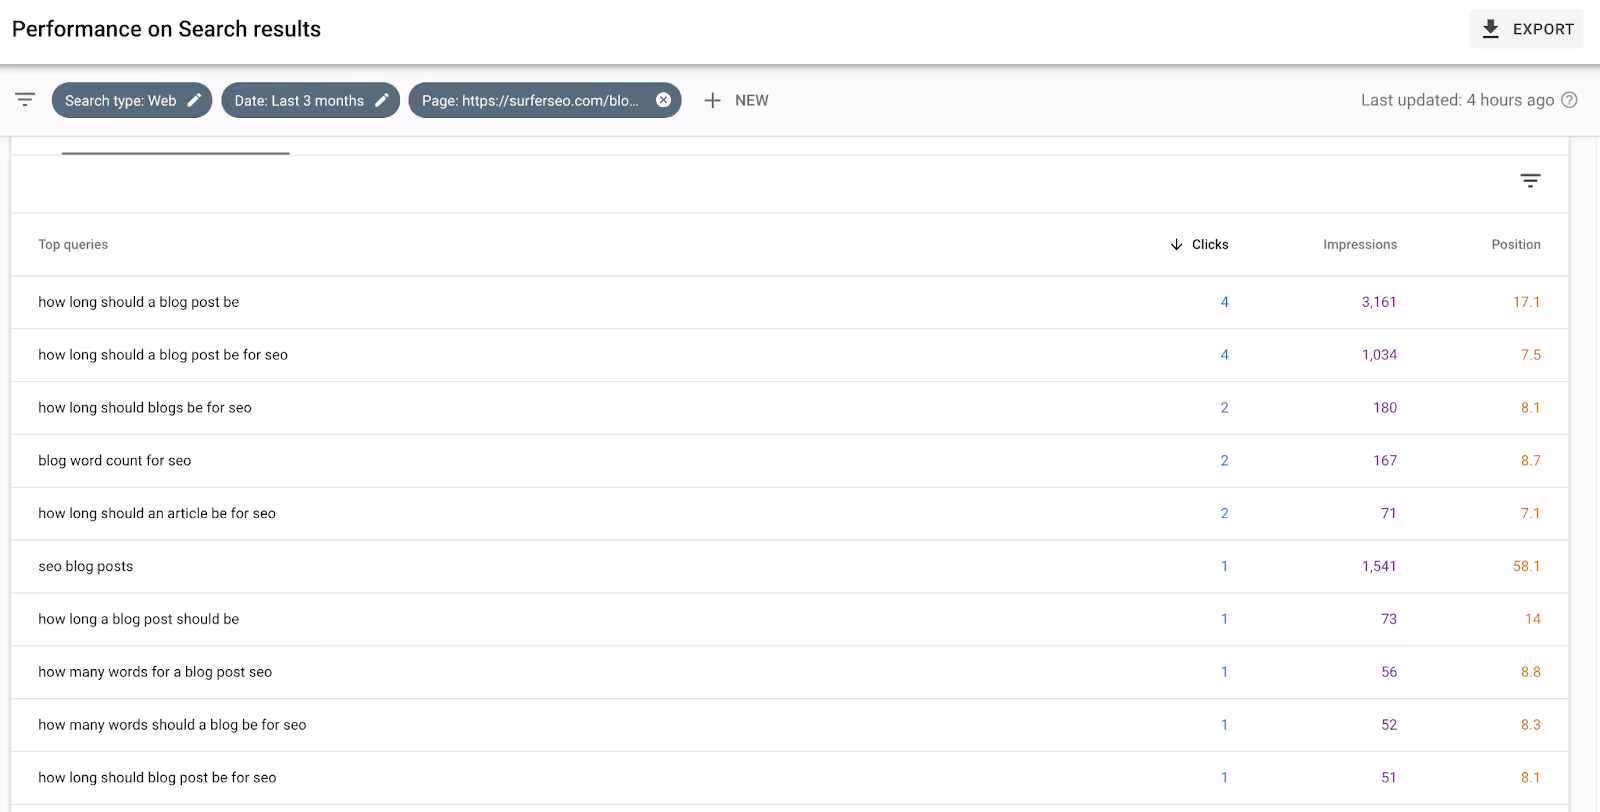
Here, you will see a list of all the keywords your page is ranking for right now.
Go through that list and check if your article contains all these keywords.
Have you noticed some phrases you’re missing? Include them in your content. Trust me; it will improve your rankings super quickly.
Here is what happened with one of my articles after I added a missing search term:
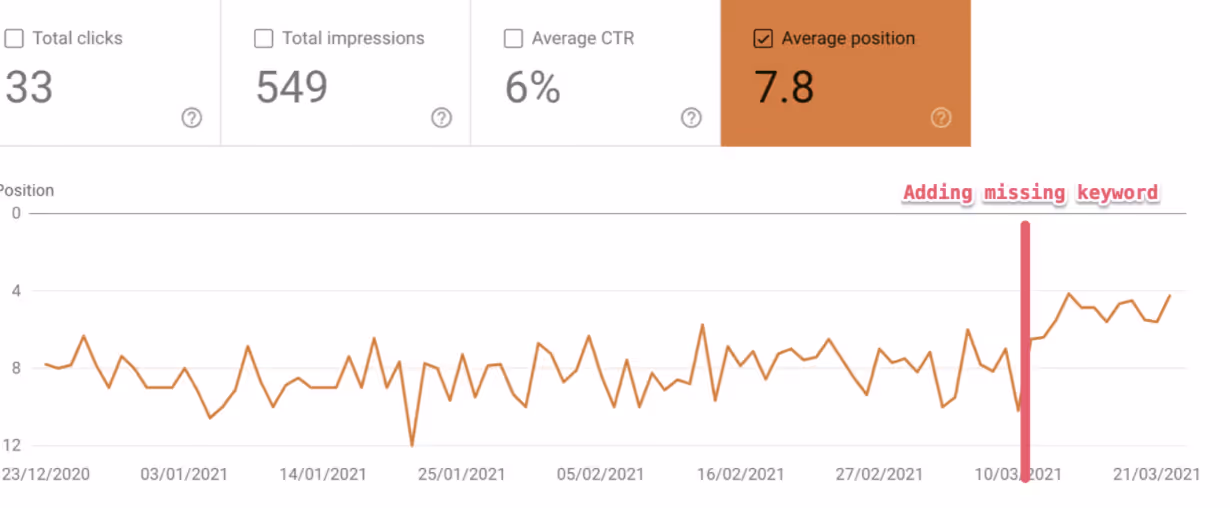
For example, instead of adding an awkward “how many words for a blog post seo” sentence to your article, you can write “How many words should a blog post have for best SEO results,” or something along the lines.
Review topical coverage using Audit
Okay, so you’ve fixed your missing keyword. Now it’s time to take care of the broader issue of topical relevance. You need to make sure your article contains all the words and phrases Google deems relevant for your niche.
Surfer Audit will help you with that once again!
This time around, go to the “Terms to Use” section. You will find a long list of terms that should be present in your content, along with a recommended number of times you should use them.
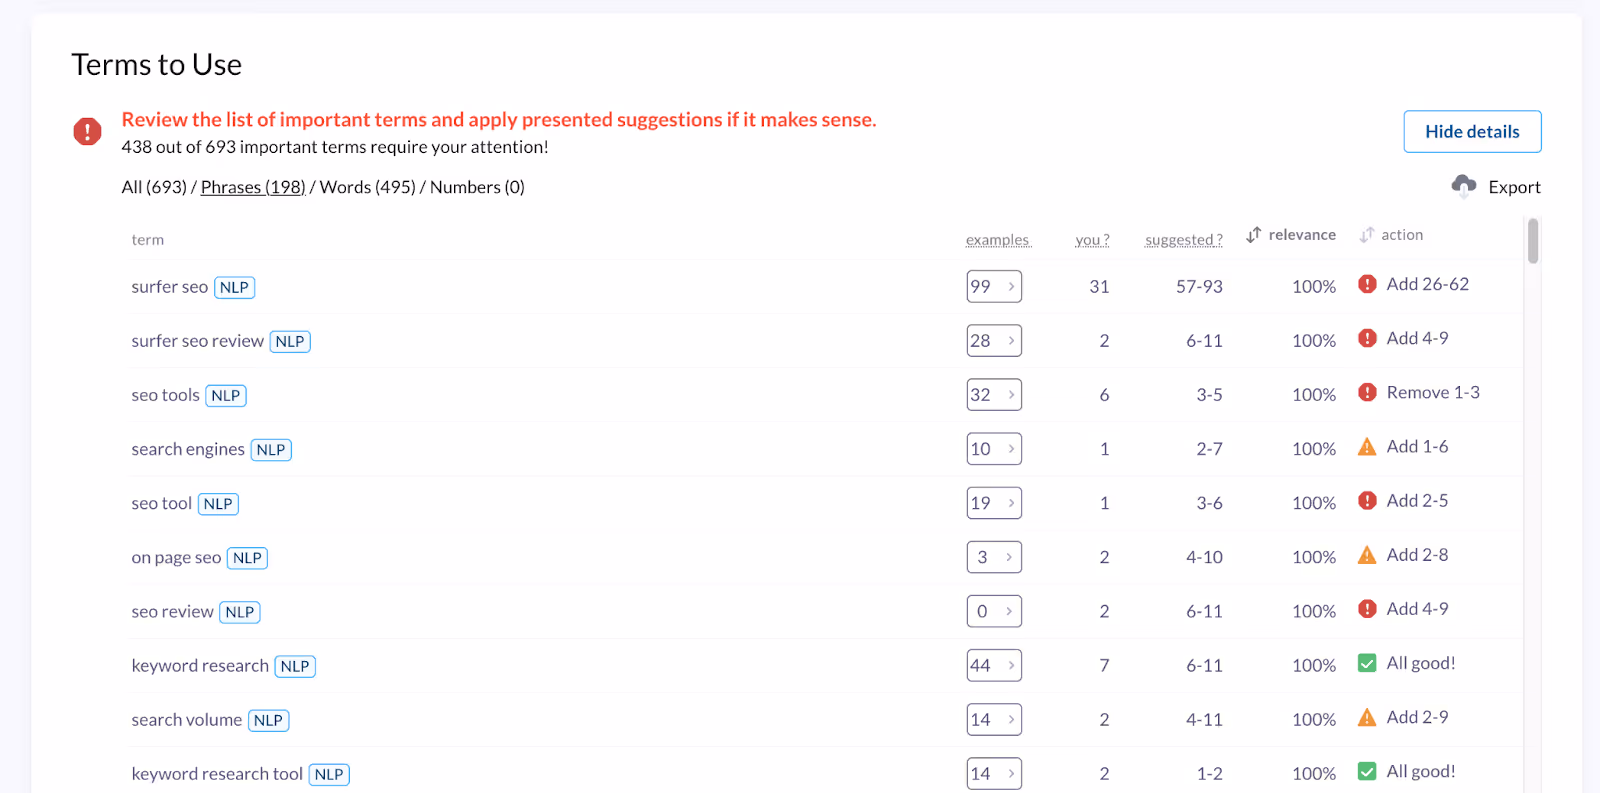
Sort the phrases by “Action” (last column) to get the most crucial errors on top.
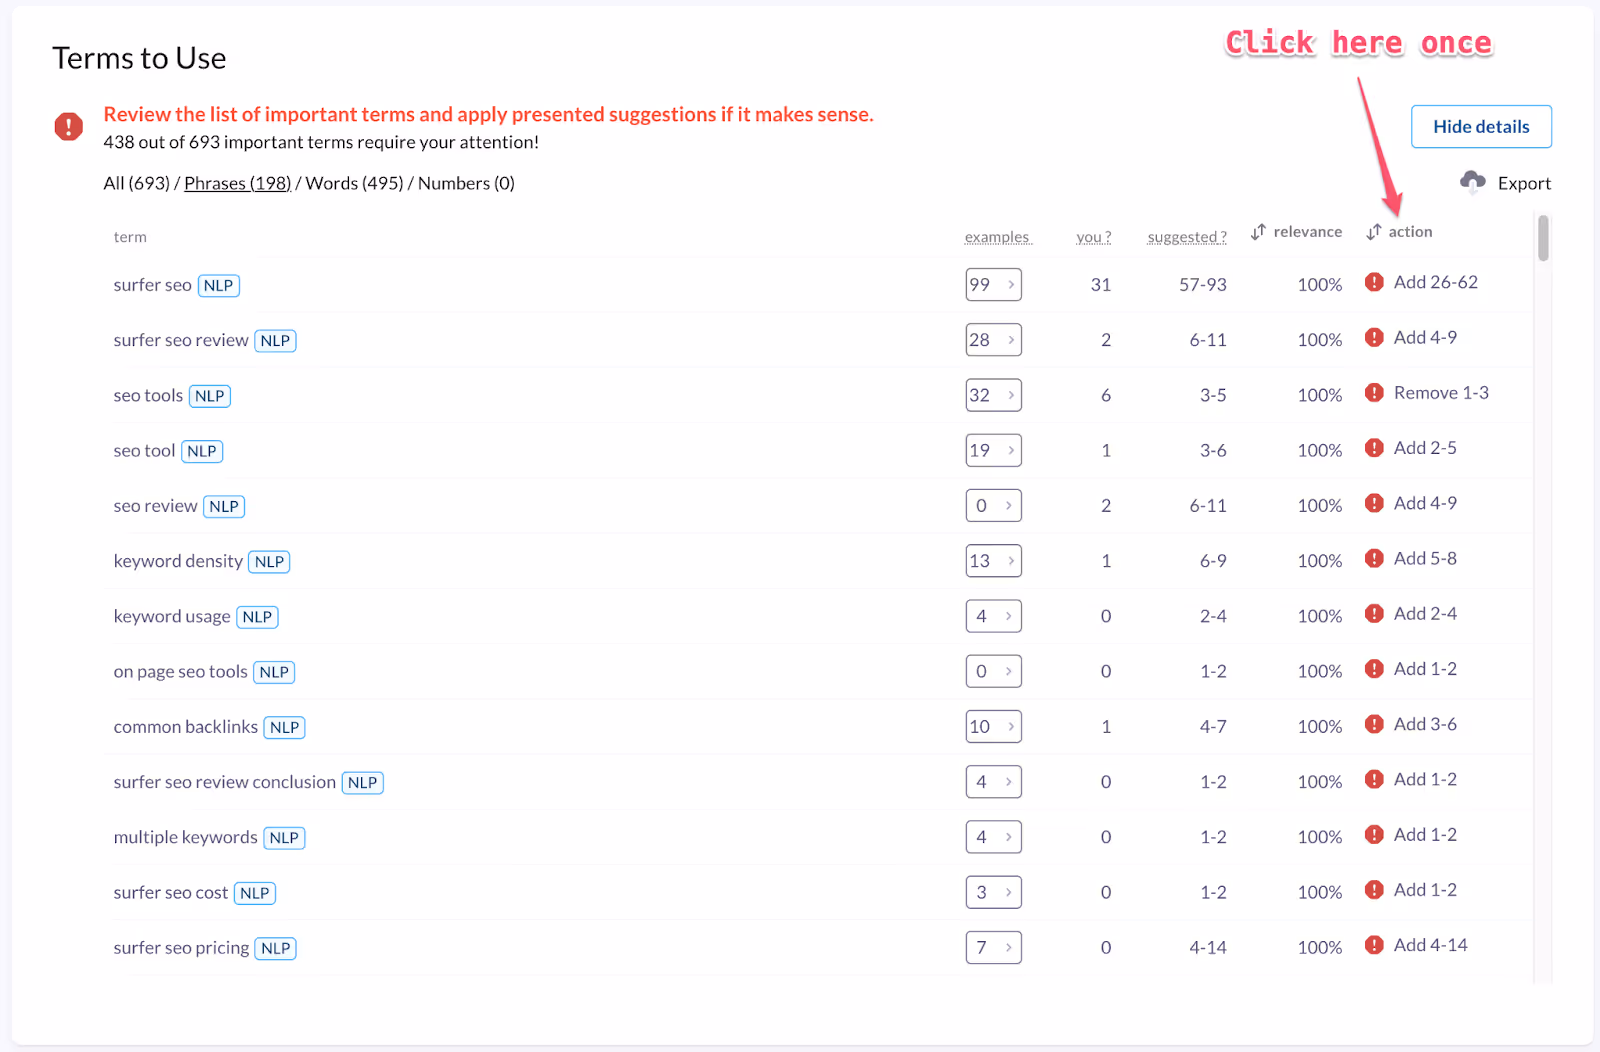
As you can see, there are tons of terms that this article is missing, not using frequently enough, or even using too many times.
Four months after publication: competitor & backlink check
Four months is a long time in SEO. The SERPs might be slightly different at this point—your competitors might have changed, and the search intent might have shifted. And search intent is super crucial for SEO. Miss the spot, and you’ll lose your sweet rankings.
A quarter after publication is a good moment to check if your content is still optimized enough and try to give it the extra push. Here’s what you should do:
- Scan your top competitors;
- Fight for some backlinks;
- Re-take all the optimization steps you did before.
Let me show you how to do it.
Check your competitors to see if you still match search intent
The Audit will come in handy once again.
This time, we will check our current competitors to see if the search intent is the same.
The super important thing is:
Click “Select Competitors” at the top of the Audit, check what the top 10 looks like.

According to Matt Diggity, you can read the search intent from the titles. If the main types of pages you can see are how-to articles, the intent is informational; if there are a lot of product pages, it’s transactional; and so on.
Make sure that your content is aligned with the pages that Google is currently rewarding.
Most likely, you will see small changes—like short how-to articles instead of “ultimate guides,” or concrete product pages replaced by landing pages or listicles. In that case, you should fix your page to fit the current trend.
If the intent change is drastic, it’s best to let it go. Write a new page for this keyword—and for this piece of content, focus on another attractive keyword that it already ranks for and still has fitting search intent.
Fix your backlinks
If the page is still not ranking high enough after four months, it’s best to do a little bit of off-page optimization. Consider throwing some backlinks at it.
Open Missing Common Backlinks tab in the Audit.
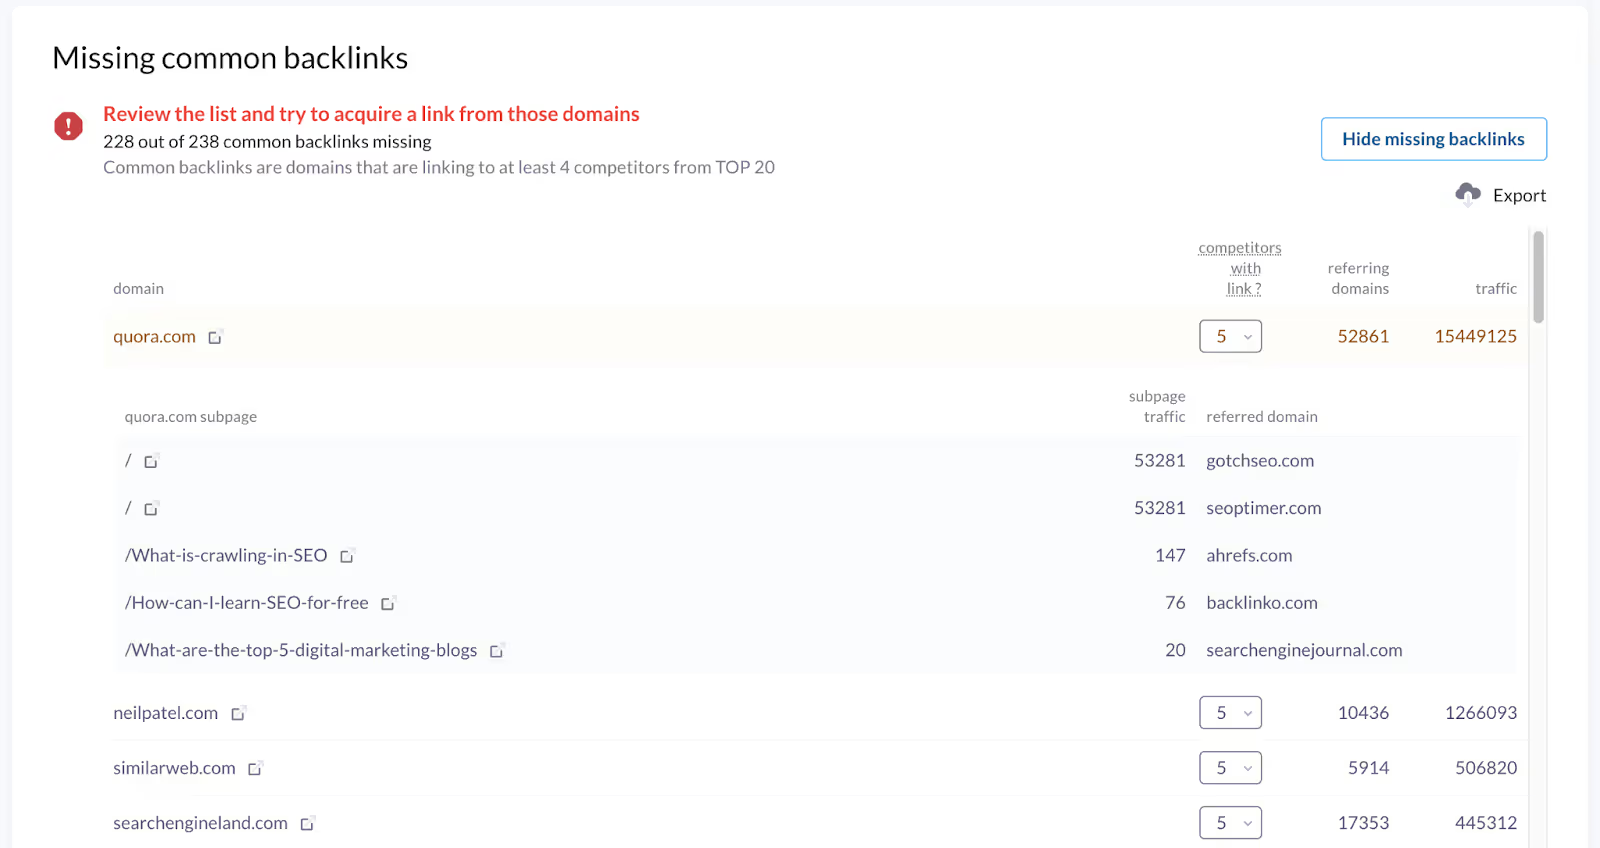
You will find a list of domains that link to your competitors but not link to you. Find the domains that are easy to acquire backlinks from and try to get 3-5 links.
Repeat the optimization process
If you have time, it’s best to repeat all the steps I recommended to take right after publication and after one month.
SERPs keep changing, your domain keeps growing, and your page keeps getting traction. So, review the new internal linking opportunities, optimize for the promising keywords you and make sure you remain topically relevant.
Conclusion
Optimizing your blog posts is just as important as writing them—if not more so.
Start optimizing right after you publish, and do it regularly after that. This way, you’ll keep getting ranked high on search engines and set yourself up for long-term success with organic traffic.
Use this article to build a repeatable optimization process that you’ll use for all your existing and upcoming pages—and you’ll see how much your SERP positions keep improving. I promise!
See also:
- Helpful Content Update Guide
- How to use Surfer SEO: Tips from the people who built it
- How to Update Old Blog Posts and Republish Content
- 4 ways to Use Machine Learning SEO algorithms