In the online world, images are not just a piece of the aesthetic puzzle—they play a crucial role in how websites communicate with search engines and users alike.
Image SEO is the unsung hero of a well-rounded SEO strategy, ensuring that your visuals are not only seen but also understood by search engines.
From the file name to the format, from image alt tags and text to responsive design, optimizing images can lead to better search engine rankings and enhance the user experience.
In this article, we'll explore the top 15 tips and tricks to make sure your images are working just as hard as your content to attract, engage, and retain your audience.
What you will learn:
- What image SEO is and why optimizing images matters.
- How to optimize images to boost crawlability through image structured data, HTML tags, image sitemaps, and more.
- How alt text benefits both search engines and readers, and how to implement it properly.
- How image resizing, compression, and lazy loading contribute to faster page load speed.
- The difference between image file formats and their common use cases.
- How to create responsive images for seamless mobile experiences.
- Why you shouldn't use stock photos on your web pages.
- How image CDNs can maximize your image optimization efforts.
What is image SEO?
Image SEO refers to the process of optimizing visual content to be easily discoverable and understandable by search engines.
It involves a range of techniques, such as proper file naming, using descriptive alt text, ensuring images are responsive and served in the correct format, and compressing them for faster load times.
The goal is to enhance the visibility and ranking of images in search engine results as well as on image search, thus driving more traffic to your website and improving the overall user experience.
15 image SEO best practices
Let's dive into 15 actionable image SEO best practices that will give your images an edge in search engine rankings
1. Choose the right image format
Google supports multiple image formats, including BMP, GIF, JPEG, PNG, WebP, and SVG, with each serving its use case—some favor faster loading speeds at the expense of quality, others vice-versa.
You can use a photo conversion tool to convert a picture to HD quality before uploading it.
PNG, JPEG, and WebP are the three most commonly used format. So let's look at each of them to make your choice easier.
Portable Network Graphics (PNG)
PNGs facilitate lossless compression, meaning that this format maintains its original image quality even after compression. PNG also allows for transparent image backgrounds and broader color palettes.
But since PNGs maintain their original quality during compression, these image files are significantly larger than other formats, which drags down page loading speeds.
It's recommended to use PNGs for small high-quality images, illustrations, text-based photos, or where image background transparency is necessary, like logos.
Joint Photographic Experts Group (JPEG)
In contrast, JPEGs allow for lossy compression, significantly reducing image file sizes while compromising more on image quality.
Due to its lossy compression method, JPEG images with text or sharp lines may appear slightly blurred. Also, JPEGs don't facilitate transparent backgrounds.
Nevertheless, they're a popular image file type among page-heavy websites, as it doesn't impact page speed as much.
JPEGs are best suited for hero images, product photos, and generally images with large default file sizes.
WebP
WebP handles both lossless and lossy compression methods. It also supports animations as well as transparent image backgrounds, making it the most versatile format.
As for the drawbacks, WebP is not compatible with older browsers, like Edge 12-17.
2. Compress images
Compression is a critical aspect of image optimization. Aside from videos, images are the heaviest hitters regarding page performance.
Since loading speed is a direct ranking factor, uncompressed images will negatively impact your search rankings. Not to mention that long loading times lead to increased bounce rates, which further affects SEO performance.
That said, image compression is a must.
You can compress images using a free compression tool like TinyPNG, ImageOptim (for Mac), or Smush (for WordPress).
3. Properly size images
Image resizing involves altering the dimensions of an image – its width and height – to fit the display requirements of a webpage without losing the essence of the visual content.
By specifying the width and height attributes in the image tags, you can reserve the necessary space in the webpage layout for the images before they fully load. This practice helps prevent unexpected layout shifts, contributing to a stable and predictable browsing experience.
So first, determine the maximum display size of the image on your website. Images should be resized to fit their largest display image dimensions.
Here are a few ways you can go about resizing your images:
- Manually resize images: You can manually adjust the dimensions of your images to fit your web requirements. Programs like Adobe Photoshop, GIMP, and Canva offer tools for resizing images.
- Serve responsive images: Implement responsive image techniques to serve different image sizes based on the user's device. More on this later.
- Use SVG image formats: Unlike PNG and JPEG, which are pixel-based, SVG (Scalable Vector Graphics) uses mathematical lines, shapes, dots, and algorithms that can scale up or down based on your needs.
4. Write SEO-friendly alt text
Alt text serves a dual purpose by improving SEO, as it helps search engines understand and index images, thereby influencing their ranking in search results.
Simultaneously, it enhances user experience by providing descriptive content for those using screen readers or when images fail to load, ensuring accessibility for all users.
When crafting alt text, aim for a concise description that captures the essence of the image while incorporating relevant keywords that align with the content's context.
Avoid keyword stuffing to maintain readability for screen readers and ensure the alt text serves its primary purpose of accessibility.
Keep the description natural and informative, enabling both search engines and users with visual impairments to understand the image content.
Let's look at a concrete example using an image from Unsplash. Writing "cute guinea pigs" as alt text isn't descriptive enough. Meanwhile, "two guinea pigs eating carrots on a wooden floor" gives search engines and screen readers a much better idea of what the photo is about.

5. Use original images
Reliance on generic stock photos can dilute your brand's authenticity and make your content less memorable, as these images are often overused across the web, leading to a homogenized user experience.
From an SEO perspective, stock photos are less likely to be shared or linked back to, which can hinder your website's ability to earn valuable backlinks and organic visibility.
Meanwhile, creating unique images can significantly elevate your brand's visual storytelling, setting you apart from competitors and fostering a unique connection with your audience.
Not to mention, unique and compelling visuals like infographics can serve as valuable resources that other websites may reference and link back to, enhancing your site's backlink profile.
For instance, here's how Databox effectively uses infographics to visually enhance its content, making complex data more digestible and engaging.
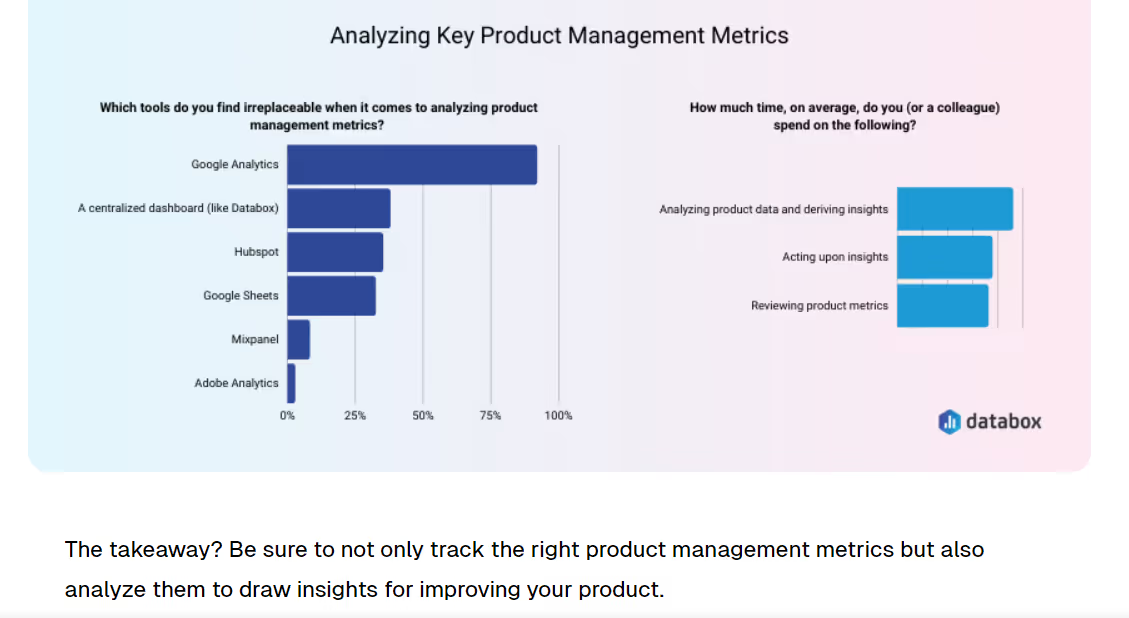
You can use tools like Canva to create original infographics.
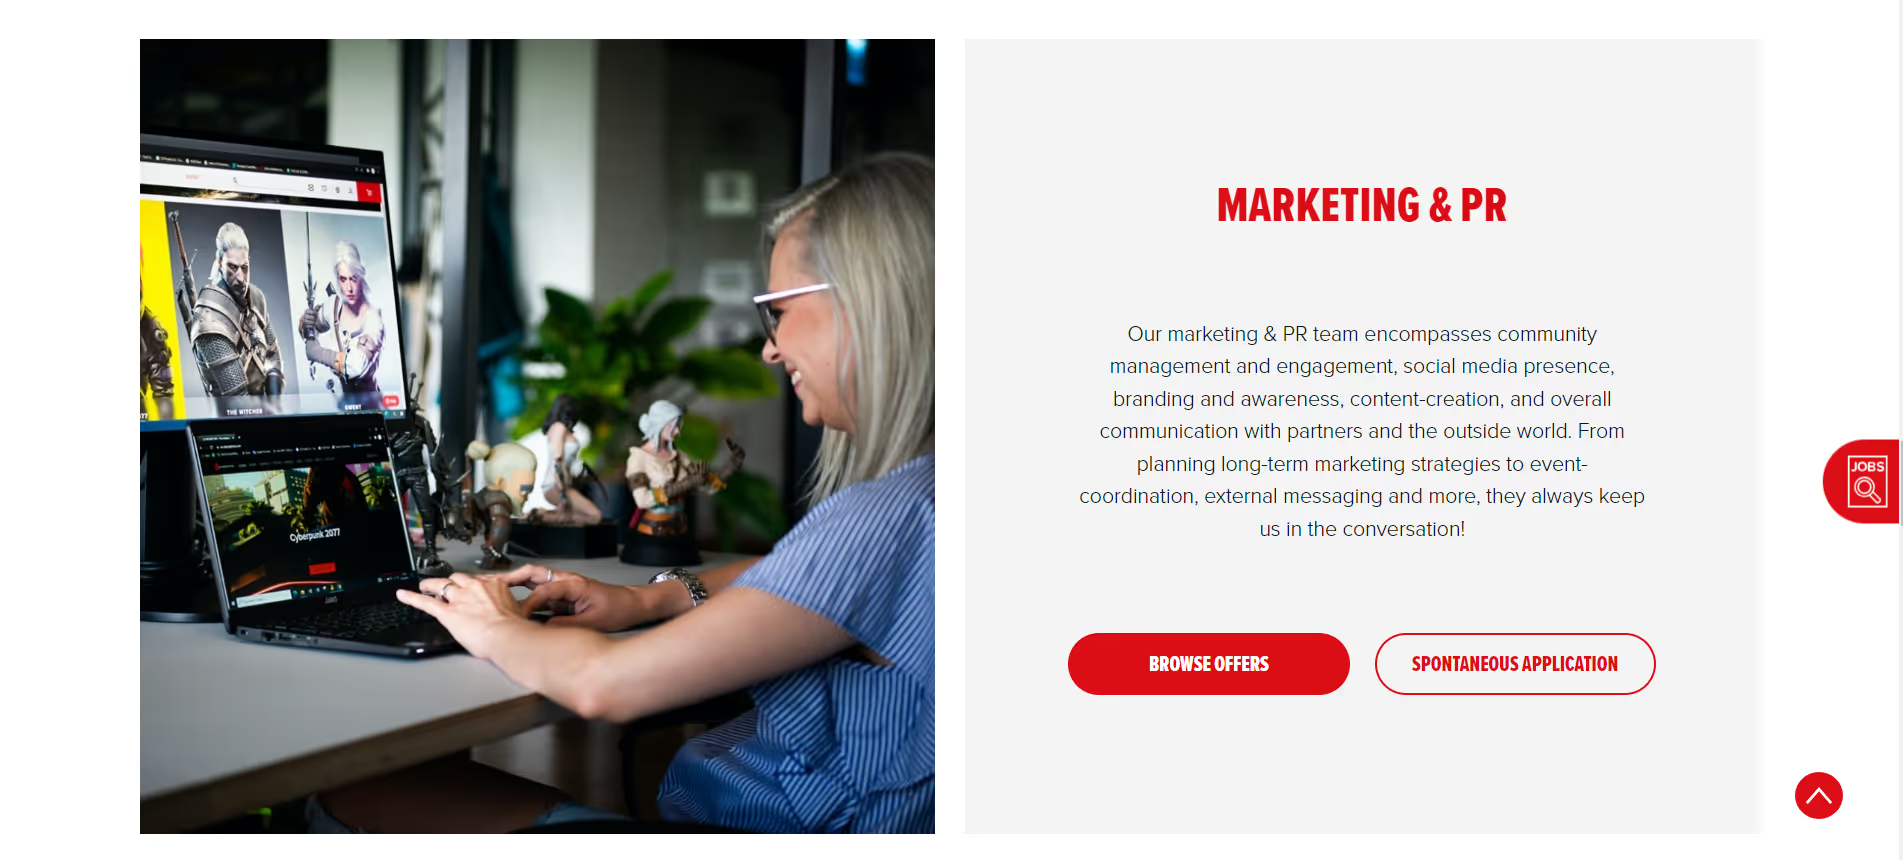
When it comes to decorative images, going the extra mile to create your own or hiring a professional photographer can be a worthwhile investment.
For example, how CD Projekt Red uses photos of its team members on its website adds a layer of authenticity, fostering a connection with the audience that generic stock images can't achieve.
6. Customize image file names
Like with alt text, search engines use image file names to understand the context of your photos.
Don't use default file names like "IMG0001.JPG," as they don't tell search engines anything. Be descriptive.
For instance, a good file name for this image would be "skullcandy-dime-wireless-earbuds-black." It's descriptive and highlights the product's name right at the beginning.

The image file name also doubles as the target keyword, making it easier for search engines to match the image with the users' search queries.
Additionally, notice the use of hyphens—it helps search engines distinguish between words. Google doesn't recognize underscores ("_"), so they'll treat your file name as a single word.
Moreover, Google advises translating image file names when localizing content, as it helps search engines rank images for specific audiences.
7. Serve responsive images
Responsive images are essential in SEO as they ensure that images display correctly across various device sizes, improving user experience and reducing bounce rates.
Specifically for mobile optimization, they help speed up page load times on smaller screens. This is especially important since Google places a high value on page speed and mobile-friendliness as ranking factors.
You can serve responsive images either by manually resizing them or using the src, srcset, and sizes attributes—all HTML image attributes that tell browsers what image sizes to load based on specific viewports.
Let's have a look at an example:

The srcset attribute here lists two size variations of the same image—one 150 pixels wide and the other 480 pixels wide.
The sizes attribute tells browsers which image size they variation to display based on the viewer's screen width. In our case, the small image will display as long as a viewport is less than 600 pixels wide. Anything larger than that, and the 480 pixel-wide image will display.
8. Add image captions
Unlike alt texts or custom image file names, image captions are visible to viewers—short snippets of text accompanying an image.
Captions catch the visitors' attention and nudge them to stop scrolling to read more about an image, which improves dwell times and lowers bounce rates—this signals to search engines that users enjoy your content, which can contribute to higher rankings.
You can also integrate keywords in your captions to let search engines understand your image's purpose and rank it accordingly.
Keep in mind that your captions should contribute to the overall reading experience by tying nicely with your images and the rest of your content.
Here's an example from Smashing Magazine:
.avif)
Depending on your content management system (CMS), you can add captions through the platform's photo editor. Alternatively, you can also do it through your page's HTML structure.
9. Enable lazy loading
Lazy loading optimizes page load times by delaying loading images and other media until they're actually needed—when they enter the user's viewport.
This approach reduces the initial weight of the webpage, as only the essential content is loaded first, minimizing the number of HTTP requests the browser needs to make when the page is first accessed.
This technique is particularly beneficial on mobile devices where bandwidth and processing power are limited. It not only speeds up initial page load times but also minimizes data usage, making for a smoother mobile browsing experience.
You can implement this technique by integrating the loading="lazy" attribute in your img HTML tag. Let's look at an example:

The loading="lazy" part of the code tells the browser to load the specified image only when needed. In contrast, loading="eager" or lacking the loading attribute entirely will load the image as soon as visitors land on the page.
10. Use image CDNs
Image CDNs spread your website data to a network of servers across the globe. This speeds up loading times by allowing visitors to connect to the server that's closest to them.
Image CDNs can reduce image file size by as much as 40% to 80%.
In addition, these platforms offer all the image optimization tools necessary to create highly optimized images, while their network of servers ensures you serve images as fast as possible—all of which significantly improve site speed and browsing experience.
When it comes to choosing the right CDN, many options are available, each serving distinct purposes. That said, here are a few things to look out for when picking an image CDN:
- Server locations: Make sure the image CDN of your choice has servers in areas where most of your visitors come from.
- Integrations: Native integrations with your CMS, photo editing, or graphics design tools are recommended to streamline workflows.
- Features: Some CDNs offer resizing, compression, format conversion tools, and even built-in media libraries.
11. Embed images using HTML
Using HTML image elements directly embeds the image into the page's HTML code, allowing search engine crawlers to easily discover and index the images.
Crawlers won't index CSS images, so this method ensures that your visuals are recognized and properly categorized by search engines for better visibility in search results.
You can simply open up your HTML editor and type in the following code:

Scr lets the browser know where to find the image file. If you have the photo saved on your computer, just type in its file path. If it's on an image hosting platform, type the URL address instead.
It's also important to specify the image alt text through an alt tag, as shown above.
12. Make use of structured data
Structured data can significantly boost the visibility of images in search results by providing clear and detailed context to search engines about the content within an image.
This additional information makes it more likely for the images to appear in relevant searches and can also lead to their inclusion in rich search results, also known as rich snippets.
That's because structured data allows search engines to understand your page's content through various pre-defined labels.
Here's an example of how images in rich snippets can boost visibility:
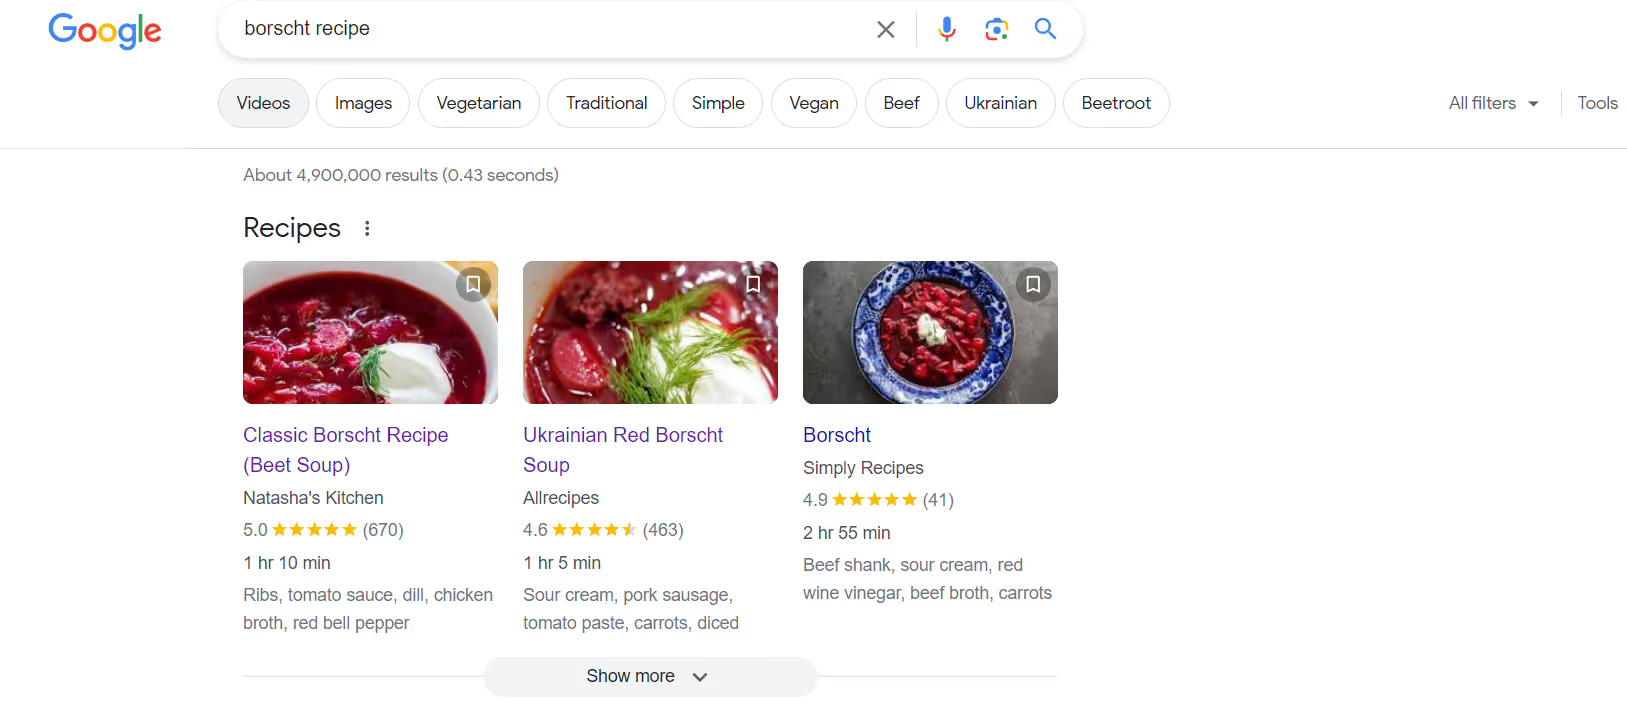
You can add structured data by following the guidelines specified by Schema.org. Here's a snippet of code to illustrate how one of the pages shown above uses structured data to appear in rich results:
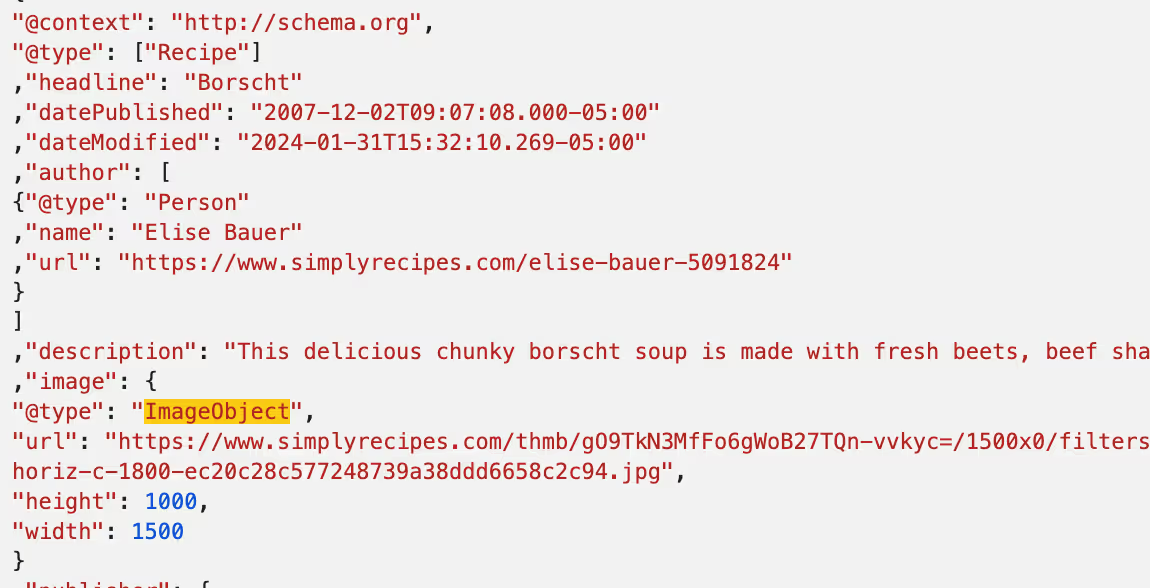
The ImageObject markup allows crawlers to quickly identify the photo and show it in rich results. The rest of the code also uses markups to display ratings and preparation times.
13. Submit an image sitemap
By including images in sitemaps, you provide search engines with direct access to all of your site's images, ensuring they are discovered and indexed accurately.
By improving image indexing, there's a significant opportunity to boost user engagement since well-indexed images are more likely to appear in visual searches, drawing in visitors who are enticed by the visual aspects of search results.
Here's an image sitemap example from Google:
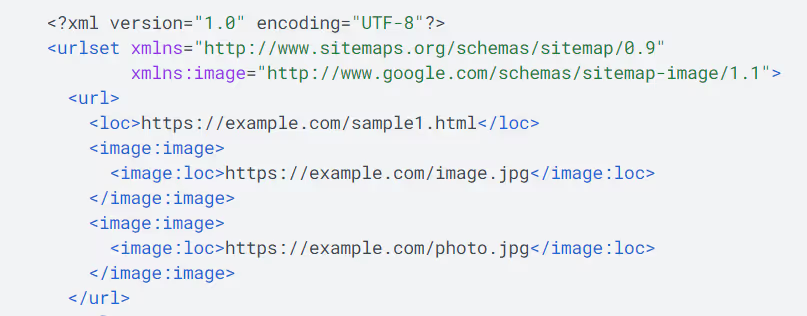
The sitemap neatly points out each image and its location. You can include up to 1,000 images per page.
You can either create an image sitemap manually or use a free sitemap generator tool such as XML Sitemaps.
14. Optimize image file structure
Search engines use your image file name and file path during ranking and indexing. Consider a more structured approach, such as categorizing your images by type, purpose, or theme.
This allows search engine crawlers to crawl and index your images more easily.
For instance, if you're running an online fashion store, you could structure your files through subfolders that specify the type of clothing, like product images/t-shirts/red-cotton-t-shirt.jpg and product images/jackets/blue-denim-jacket.jpg.
15. Leverage PageSpeed Insights Report
Google's PageSpeed Insights provides a comprehensive analysis of your site's performance on both desktop and mobile devices, pinpointing specific areas for improvement.
This could range from optimizing image sizes to adjusting server configurations for faster delivery times.

As your website evolves with new content and images, it's crucial to consistently monitor how these changes affect page load times and overall user experience.
By regularly checking your PageSpeed Insights report, you can stay ahead of potential issues that could harm your search rankings.
It also empowers you to seize new opportunities for image optimization, ensuring that your visuals load quickly and efficiently, thereby contributing to a seamless user experience and improved SEO results.
So, make it a routine to use PageSpeed Insights as part of your ongoing SEO strategy to keep your site speedy and competitive.
Key Takeaways
- Image optimization is crucial for enhancing page load speeds and search engine rankings, and should be a key component of your SEO strategy.
- You can optimize the images on your site to appear on Google images search using a variety of techniques.
- Enable lazy loading, compress and resize your images, and leverage image CDNs to maximize page speed.
- Use custom file names, logical file path structures, image sitemaps, and schema markups to help search engines easily find and index your images.
- Embed images using the HTML image tag to ensure search engines can easily crawl and index your content.
- Use original images and write descriptive alt text as well as captions to increase page dwell times and accessibility.
- Ensure your images are responsive for a seamless mobile experience.
- Pick the right image format according to your needs to find a balance between image file size and quality.
Conclusion
By implementing the 15 image SEO best practices outlined above, you can ensure that your images are not only visually appealing but also optimized for search engines.
Remember, image optimization aims to create a harmonious balance between aesthetics and functionality. Your images should load quickly, look great on any device, and be easily understood by search engines, all while enhancing the user experience.
Start with small steps, like optimizing your alt texts and file names, and gradually incorporate more advanced techniques such as lazy loading and structured data. Keep an eye on your website's performance with tools like PageSpeed Insights to continuously refine your approach.
.avif)


